🧢 Beautiful ✨ Detailed πŸ’ Adorable

Frog Phone Pouch Amigurumi Pattern

Frog Phone Pouch Amigurumi Pattern
4.6β˜… Rating
5-7 Hours Time Needed
1.5K Made This
βœ‚οΈ

Intermediate Level

Ideal for those with basic crochet experience, featuring slightly more advanced stitches and techniques to expand your skills.

⏱️

Weekend Treat

Takes 5-7 hours, making it an enjoyable project to finish over a couple of days.

✨

Stylish Touch

An elegant detail to elevate any look, combining traditional techniques with contemporary design sensibilities.

About This Frog Phone Pouch Amigurumi Pattern

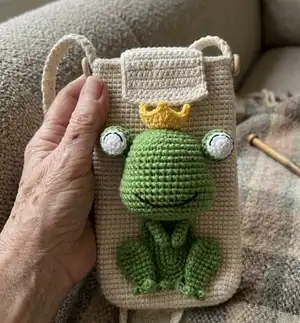
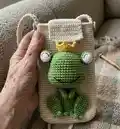
This pattern creates a stylish phone pouch with a 3D amigurumi frog sewn to the front. Youll work the pouch in single crochet rounds, add a lid and shoulder strap, and crochet the frog pieces separately. The frog details include eyes, crown and tiny toes for an adorable finish.

Frog Phone Pouch Amigurumi Pattern crochet pattern - detailed view of completed project

Includes full round-by-round instructions for the bag and frog pieces with assembly steps. Suitable for crocheters comfortable with basic amigurumi techniques.

Why You'll Love This Frog Phone Pouch Amigurumi Pattern

I absolutely love this pattern because it combines a practical accessory with a playful amigurumi character that brings instant charm. I enjoy the balance of simple repetitive rounds for the pouch and the more detailed shaping of the frog. Sewing the frog onto the pouch lets me personalize placement and expression every time. This design is so satisfying to finish because it transforms ordinary yarn into a cute, useful piece you can wear or gift.

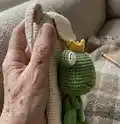
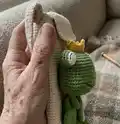
Frog Phone Pouch Amigurumi Pattern step 1 - construction progress Frog Phone Pouch Amigurumi Pattern step 2 - assembly progress Frog Phone Pouch Amigurumi Pattern step 3 - details and accessories Frog Phone Pouch Amigurumi Pattern step 4 - final assembly and finishing

Switch Things Up

I love customizing this pouch by changing the frog color palette; try pastel greens or teal for a fresh look.

I sometimes use bulky yarn with a larger hook to make a chunky, oversized pouch that feels plush and warm.

I also make tiny versions as keychains by using thinner yarn and a small hook for a portable pocket pal.

I often add embroidered details like freckles or a little tongue to give the frog more personality before gluing it on.

Try different eye styles: felt circles, safety eyes, or embroidered pupils to change the expression quickly.

I like to line the pouch with fabric to protect phones; use a lightweight cotton and hand-sew it in for a tidy interior.

Swap the buttons for magnetic snaps or decorative studs if you prefer a cleaner or more secure lid closure.

For a more wearable piece, shorten or lengthen the strap length to make it a crossbody or wristlet version.

I sometimes create an entire set by crocheting matching coin pouches or a headband with the same frog motif for a coordinated gift.

If you want a sturdier pouch, insert a thin piece of cardboard or plastic cut to size between the lining and outer fabric for extra protection.

I also enjoy adding tiny crocheted accessories like a bow, scarf or mini crown in contrasting yarn to personalize each frog.

Common Mistakes & How to Fix Them

βœ— Skipping stitch markers during the pouch rounds can cause you to lose track of the beginning of the round; place a marker at the first stitch of every round to stay aligned. βœ— Using double crochet for the pouch will make it stretch and become mushy over time; use single crochet as instructed to keep the pouch firm and durable. βœ— Stuffing too late or too little in the frog head can make shaping difficult; stuff gradually and firmly before closing to maintain the correct shape. βœ— Forgetting to count increases and decreases in shaping rounds causes uneven shaping; count your stitches after each round, especially during increases and decreases. βœ— Sewing the frog in the wrong position will look unbalanced; pin or glue the pieces in place and check symmetry before permanently attaching them. βœ— Not weaving in ends as you go creates a messy finish that is hard to tidy later; weave in ends progressively to keep your work neat and secure.

Frog Phone Pouch Amigurumi Pattern

Make a charming Frog Phone Pouch with a cute amigurumi frog applique to decorate the front. This pattern guides you step-by-step through the bag body, lid, strap and the frog (head, eyes, crown, body, legs, toes and arms). Youll get clear rounds, assembly notes and helpful tips so you can create a delightful handmade accessory to gift or keep.

Intermediate 5-7 Hours

Materials Needed for Frog Phone Pouch Amigurumi Pattern

β€” Main Fabric

  • 01
    Jeans from YarnArt, 165m/50g - Jeans 05 (used for pouch/main color)
  • 02
    Jeans from YarnArt, 165m/50g - Jeans 37 (used for frog green)
  • 03
    Jeans from YarnArt, 165m/50g - Jeans 35 (used for white accents/yellow crown)
  • 04
    Small amounts of yellow and white yarn for crown and eyes
  • 05
    Polyester fiberfill for stuffing frog head and body

β€” Tools Required

  • 01
    Crochet hook size 2.3 mm
  • 02
    Two 15 mm buttons
  • 03
    Polyester fiberfill
  • 04
    Stitch markers
  • 05
    Fabric glue (for pasting eyes and attaching parts into pouch)
  • 06
    Yarn needle for sewing and weaving ends
  • 07
    Scissors
  • 08
    Pins for positioning pieces while sewing

Progress Tracker

0% Complete

β€” Bag :

Info :

There are 2 ways to make a single crochet: v-stitch (yarn over single crochet) and x-stitch (yarn under single crochet). There are a lot of video tutorials on youtube, you can watch on it. I use x-stitch (yarn under single crochet).

Info :

And I think you shouldn’t use double crochet, because the pouch will quickly stretch and become mushy.

Info :

Make 24 ch, start in the second ch from hook

Round 1 :

22 sc, 3 sc in the last stitch, continue on the other side of the foundation chain, 21 sc, inc (48)

Round 2 :

inc, 21 sc, 3 inc, 21 sc, 2 inc (54)

Round 3 :

inc, 24 sc, 3 inc, 24 sc, 2 inc (60)

Round 4-51 :

60 sc (60)

Info :

Fasten off and weave the yarn.

β€” Lid of pouch :

Info :

Leaving a long tail for sewing, make 15 ch, start in the second ch from hook:

Round 1 :

14 sc, turn

Round 2-13 :

14 sc. Cut and weave the yarn.

Info :

Sew the lid into the pouch between rows 50-51.

β€” Make shoulder - strap :

Info :

Make 3 ch, start in the second ch from hook: 2 sc, turn

Round 2 :

2 sc, turn

Info :

Crochet repeat 2 sc until the shoulder-strap is about 113 cm. Fasten off and weave the yarn.

Info :

Sew the shoulder - strap and button into the pouch.

β€” FROG :

β€” Head :

Info :

Start in green

Round 1 :

6 sc in the magic ring (6)

Round 2 :

6 inc (12)

Round 3 :

(3 inc, 3 sc)*2 (18)

Round 4 :

(1 sc, inc)*3, 4 sc, (inc, 1 sc)*2, inc, 3 sc (24)

Round 5 :

(1 sc, inc)*4, 5 sc, (inc, 1 sc)*3, inc, 4 sc (32)

Round 6 :

(7 sc, inc)*4 (36)

Round 7-11 :

36 sc (36)

Round 12 :

6 sc, 6 inc, 12 sc, 6 inc, 6 sc (48)

Round 13-17 :

48 sc (48)

Round 18 :

6 sc, 6 dec, 12 sc, 6 dec, 6 sc (36)

Round 19 :

5 sc, dec, 4 sc, dec, 10 sc, dec, 4 sc, dec, 5 sc (32)

Round 20 :

(dec, 2 sc)*8 (24)

Info :

Stuff the head

Round 21 :

(1 sc, dec)*8 (16)

Round 22 :

8 dec (8)

Info :

Slst and stuff the head, then fasten off and weave the yarn.

Info :

Sew the mouse between rows 14-17 with black yarn.

β€” EYE (make 2) :

Info :

Start in white: make 2

Round 1 :

6 sc in the magic ring (6)

Round 2 :

6 inc (12)

Round 3-4 :

12 sc (12)

Round 5 :

6 dec (6)

Info :

Stuff, slst, fasten off and weave the yarn. Sew the eyes between rows 2-3 with black yarn.

Info :

Start in green: make 2

Round 1 :

6 sc in the magic ring (6)

Round 2 :

6 inc (12)

Round 3 :

(3 sc, inc)*3 (15)

Round 4 :

15 sc (15)

Info :

Slst, fasten off and weave the yarn.

Info :

Use fabric glue to paste the white eye into the green eye

Info :

Use fabric glue to paste the eyes into the head between rows 5-9.

β€” CROWN :

Info :

Start in yellow

Round 1 :

Leaving a long tail for sewing the crown into the top of head, make 18 ch, close round, 1 sc in the each ch around : 18 sc

Round 2 :

3 sc, 1 hdc, (1 dc, 3 ch, slst in the third ch from hook, 1 dc)* in the same stitch, 1 hdc, 1 sc, 1 hdc, (1 dc, 3 ch, slst in the third ch from hook, 1 dc)* in the same stitch, 1 hdc, 1 sc, 1 hdc, (1 dc, 3 ch, slst in the third ch from hook, 1 dc)* in the same stitch, 1 hdc, 3 sc. Slst, fasten off and weave the yarn.

β€” BODY :

Info :

Start in green

Info :

Make 9 ch, start in the second ch from hook:

Round 1 :

7 sc, 3 sc in the last stitch, continue on the other side of the foundation chain, 6 sc, inc (18)

Round 2 :

inc, 6 sc, 3 inc, 6 sc, 2 inc (24)

Round 3 :

1 sc, inc. 6 sc, (1 sc, inc)*3, 6 sc, (1 sc, inc)*2 (30)

Round 4 :

(4 sc, inc)*6 (36)

Round 5 :

2 sc, inc, (5 sc, inc)*5, 3 sc (42)

Info :

Slst, fasten off and weave the yarn.

β€” LEG (make 2) :

Info :

Start in green

Round 1 :

6 sc in the magic ring (6)

Round 2 :

6 inc (12)

Round 3 :

(3 sc, inc)*3 (15)

Round 4-5 :

15 sc (15)

Round 6 :

(3 sc, dec)*3 (12)

Round 7-8 :

12 sc (12)

Round 9 :

(4 sc, dec)*2 (10)

Round 10 :

10 sc (10)

Round 11 :

(dec, 3 sc)*2 (8)

Info :

Don’t stuff. Slst, fasten off and weave the yarn.

β€” Toe (make 2) :

Info :

Start in green

Info :

Make 4 ch, start in the second ch from hook: 3 sc in the second ch from hook, 2 slst (the first toe). Don’t cut the yarn, make 4 ch, start in the second ch from hook: 3 sc in the second ch from hook, 2 slst (the second toe). Don’t cut the yarn, make 4 ch, start in the second ch from hook: 3 sc in the second ch from hook, 2 slst (the third toe).

Info :

Fasten off the yarn, leaving a long tail for sewing the toe into the leg at row 11.

β€” ARM (make 2) :

Info :

Start in white

Round 1 :

6 sc in the magic ring (6)

Round 2-8 :

6 sc (6)

Info :

Slst and fasten off the yarn, leaving a long tail for sewing.

Info :

Don’t stuff the arms.

β€” Assembling :

Info :

1. Use fabric glue to paste the head into the pouch between rows 21-38.

Info :

2. Use fabric glue to paste the body into the pouch.

Info :

3. Use fabric glue to paste the legs into the pouch.

Info :

4. Sew the arms into the pouch

Assembly Instructions

  • Use fabric glue to paste the head into the pouch between rows 21-38 to position it centrally on the upper front panel.
  • Use fabric glue to paste the body into the pouch under the head so the frog sits naturally on the pouch front.
  • Use fabric glue to paste the legs into the pouch, aligning toe seams with the bottom edge so legs look symmetrical.
  • Sew the arms into the pouch using the yarn tail left from the arms, securing them firmly and hiding knots inside the pouch.

Important Notes

  • πŸ’‘Use x-stitch (yarn under single crochet) for a tighter, neater fabric as recommended by the designer.
  • πŸ’‘Do not use double crochet for the pouch body because it will stretch and lose shape over time.
  • πŸ’‘Pin or glue pieces in place before final sewing to ensure correct placement and symmetry.

Thank you for choosing this Frog Phone Pouch pattern β€” a sweet mix of practical accessory and playful amigurumi charm. Make it in your favorite colors, personalize the frog expression, and gift it to brighten someone’s day. Happy crocheting and enjoy every stitch! 🐸🧢

You ask,

we answer.

FAQs

What size will the finished piece be?

If you use the same Jeans yarn as in the pattern, the finished phone pouch measures approximately Length: 17 cm and Width: 10 cm.

Can I use different yarn weights for this pattern?

Yes, you can use different yarn weights but this will affect the final size; adjust your hook size accordingly and expect changes to measurements.

Do I need prior crochet experience for this pattern?

This pattern is rated intermediate, so basic knowledge of single crochet, increases, decreases and working in the round is recommended.

How long does this project typically take to complete?

Most crocheters finish this pattern in about 5-7 hours, depending on experience and how much time you spend on assembly and finishing.