🧢 Beautiful ✨ Detailed πŸ’ Adorable

Erebus the Angler Fish Amigurumi Pattern

Erebus the Angler Fish Amigurumi Pattern
4.3β˜… Rating
5-7 Hours Time Needed
2.4K Made This
βœ‚οΈ

Intermediate Level

Ideal for those with basic crochet experience, featuring slightly more advanced stitches and techniques to expand your skills.

⏱️

Weekend Treat

Takes 5-7 hours, making it an enjoyable project to finish over a couple of days.

🧸

Cute Companion

An adorable friend to cherish, handcrafted with love to bring comfort and joy for years to come.

About This Erebus the Angler Fish Amigurumi Pattern

This pattern creates Erebus, a charming amigurumi angler fish with a sculpted head, posable light, fins, teeth and a mouth. The design uses worsted weight yarn and standard amigurumi techniques worked in continuous rounds. Clear step-by-step rounds, finishing notes and helpful photo guidance are included to make assembly straightforward.

Erebus the Angler Fish Amigurumi Pattern crochet pattern - detailed view of completed project

You will make all pieces separately (head/body, tail, fins, light, teeth and mouth) then assemble and sew them together. The pattern includes tips for eye placement and optional posable light support.

Why You'll Love This Erebus the Angler Fish Amigurumi Pattern

I absolutely love this pattern because it balances cute character design with practical construction details that make assembly satisfying. I enjoy the sculpted head shaping and the opportunity to add a posable light for personality. The pattern lets me play with color contrasts for the fins, teeth and light while still using simple stitches. I also appreciate that the eye placement and finishing tips help achieve a professional, polished look every time.

Erebus the Angler Fish Amigurumi Pattern step 1 - construction progress Erebus the Angler Fish Amigurumi Pattern step 2 - assembly progress Erebus the Angler Fish Amigurumi Pattern step 3 - details and accessories Erebus the Angler Fish Amigurumi Pattern step 4 - final assembly and finishing

Switch Things Up

I love how versatile this pattern is for customization β€” you can change colours to create a completely different character: try dark teals and greys for a realistic deep-sea look or bright pastels for a whimsical friend.

Want a posable light? Use a pipe cleaner or thin floral wire inside the light piece before attaching to the head; this lets you bend and pose the angler lure.

To make a mini keychain version, use sport or fingering weight yarn with a smaller hook and reduce eye size; this will create a tiny, portable version perfect for gifting.

If you prefer a chunkier, cuddlier fish, use a bulky yarn and larger hook β€” just ensure you adjust eye placement since stitch gauge changes the proportions.

I often add embroidered scars, spots or tiny sequins for extra personality β€” these small details can tell a story about your fish.

For eyes, try different sizes or colored safety eyes; larger eyes give a cuter look while smaller or shimmery eyes add realism.

Swap the color placement of the fins and lure to create contrast: a bright lure against a dark body makes the light stand out dramatically.

I enjoy adding a felt base or a small sewn loop at the tail so the fish can hang as an ornament or mobile piece.

Change the mouth expression by shifting the placement slightly β€” moving the mouth up or down changes the fish's personality a lot, so test with pins before sewing.

If you want to make a set, experiment with scale by varying yarn and hook sizes and line them up for a family of angler fish in different sizes and colour schemes.

Common Mistakes & How to Fix Them

βœ— Skipping stitch markers during continuous rounds leads to losing your starting point; use a stitch marker at the beginning of each round to maintain correct stitch counts. βœ— Placing safety eyes too early can prevent shaping properly and cause misplacement later; follow the eye placement directions and adjust before securing the washers. βœ— Overstuffing the head or body creates a distorted shape and makes sewing difficult; stuff gradually and evenly to the desired firmness for smooth shaping. βœ— Not counting stitches after increases or decreases leads to shape errors; count stitches regularly and check the pattern totals after each shaping round.

Erebus the Angler Fish Amigurumi Pattern

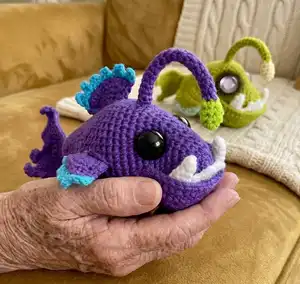
Bring a whimsical deep-sea friend to life with this detailed angler fish amigurumi pattern. You will crochet the head, body, fins, teeth and light with clear step-by-step instructions and helpful photos. Perfect for gifting, selling (where allowed), or adding a unique handmade character to your collection. Follow the guide to customize colors and add posable elements for extra personality.

Intermediate 5-7 Hours

Materials Needed for Erebus the Angler Fish Amigurumi Pattern

β€” Main Fabric

  • 01
    Worsted weight yarn (#4), approximately 75g main color (Color A - Purple)
  • 02
    Accent colors less than 25g each: Color B - Green, Color C - White, Color D - Blue
  • 03
    Exact color suggestions: Purple - Red Heart Purple; Green - I Love This Yarn Key Lime; White - Big Twist White; Blue - Red Heart Aqua
  • 04
    Optional accent yarns: Yellow (Light Yellow) and Black for alternate light/head details

β€” Tools Required

  • 01
    Crochet hook size D or 3.25 mm
  • 02
    27 mm safety eyes (2 pieces)
  • 03
    Scissors
  • 04
    Yarn needle for sewing
  • 05
    Stitch markers
  • 06
    Polyester stuffing (fiberfill)
  • 07
    Pins for assembly
  • 08
    Pipe cleaner (optional for posable light)

Progress Tracker

0% Complete

β€” Fish Head and Body :

Round 1 :

Make 6 sc into a magic ring= 6

Round 2 :

Increase in each st around= 12

Round 3 :

(sc, inc) x 6= 18

Round 4 :

(2 sc, inc) x 6= 24

Round 5 :

(3 sc, inc) x 6= 30

Round 6 :

sc in each st around

Round 7 :

(inc, sc) x 3, 24 sc= 33

Round 8 :

sc in each st around

Round 9 :

(inc, 2 sc) x 3, 24 sc= 36

Round 10 :

sc in each st around

Round 11 :

(inc, 3 sc) x 3, 24 sc= 39

Infos :

Place eyes between rounds 10 and 11, leaving 10 holes between them. 1st Eye is placed 1 hole before the 1st increase. Count 11 holes after the first eye and place the 2nd eye. If you want the sunken eye look, do not place the backs of the eyes on until round 21.

Info :

TIP! You may need to adjust eye placement depending on yarn you use

Round 12 :

sc in each st around

Round 13 :

(inc, 4 sc) x 3, 24 sc= 42

Round 14-18 :

sc in each st around

Round 19 :

(dec, 12 sc) x 3= 39

Round 20 :

(dec, 11 sc) x 3= 36

Round 21 :

sc in each st around

Infos :

Now for the eyes. Stuff the head well. Cut a long piece of yarn and remove the eyes. Place the needle in the hole where the first eye was and thread the needle into a hole next to the eye hole. Go back and forth between each eye hole repeating the process from the first eye. Pull slightly on the yarn after going through each hole. Do this about 3 times on each side until you reach the look you want. Follow the pictures for help. There is also a youtube video I have for extra help on this process. https://www.youtube.com/watch?v=9XoBnTY6k70&t=55s

Info :

To place the backs of the eyes you will need to remove most of the stuffing to place the washers on the eyes then re stuff it.

Round 22 :

(dec, 10 sc) x 3= 33

Round 23 :

(dec, 9 sc) x 3= 30

Round 24-26 :

sc in each st around

Round 27 :

(3 sc, dec) x 6= 24

Round 28-30 :

sc in each st around

Round 31 :

(2 sc, dec) x 6= 18

Round 32-33 :

sc in each st around

Round 34 :

(sc, dec) x 6= 12

Round 35 :

sc in each st around

Info :

Now you are making the tail: Fold the opening half. Sc the opening closed.

Tail Row 1 :

Ch 1, turn, sc across

Tail Row 2 :

Ch 1, turn, inc, 4 sc, inc= 8

Tail Row 3 :

Ch 1, turn, inc, 6 sc, inc= 10

Tail Row 4 :

Ch 1, turn, sc across

Tail Row 5 :

Ch 1, turn, inc, 8 sc, inc= 12

Tail Row 6 :

Ch 1, turn, inc, 10 sc, inc= 14

Tail Row 7 :

Ch 1, turn, inc, 12 sc, inc= 16

Tail Row 8 :

Ch 5, sc in 2nd ch from hook, hdc in next ch, dc in next ch, tr in last ch, Sl st in same st, 4 sc

Tail Row 9 :

Ch 3, sc in 2nd ch from hook, hdc in next ch, Sl st in same st, 4 sc

Tail Row 10 :

Ch 5, sc in 2nd ch from hook, hdc in next ch, dc in next ch, tr in last ch, Sl st in same st, 4 sc

Tail Row 11 :

Ch 4, sc in 2nd ch from hook, hdc in next ch, dc in last ch, Sl st in same st, 3 sc

Info :

F/O and weave in the tail end

β€” Teeth (Make 2) :

Round 1 :

With Color C: Make 3 sc into a magic ring= 3

Round 2 :

Inc, 2 sc= 4

Round 3 :

sc in each st around

Round 4 :

(inc, sc) x 2= 6

Info :

Do not stuff the teeth

Round 5-6 :

sc in each st around

Info :

Sc the opening closed. F/O and leave a long tail for sewing

β€” Front Teeth :

Instruction :

With Color C: Ch 8

Row 1 :

Sc in 2nd ch from hook and across= 7

Row 2 :

*Ch 3, turn, sl st in same st, sc in next 2 st* Repeat from * to * across

Info :

F/O and leave a long tail for sewing

β€” Mouth :

Instruction :

With Color A: Ch 11

Row 1 :

sc in 2nd ch from hook and across= 10

Row 2 :

Ch 1, turn, Inc, 8 sc, inc= 12

Row 3 :

Ch 1, turn, inc, 10 sc, inc= 14

Row 4 :

Ch 1, turn, inc, 12 sc, inc= 16

Row 5 :

Ch 1, turn, inc, 14 sc, inc= 18

Row 6 :

Ch 1, turn, inc, 16 sc, inc= 20

Row 7 :

Ch 1, turn, inc, 18 sc, inc= 22

Row 8 :

Ch 1, turn, inc, 20 sc, inc= 24

Row 9 :

Ch 1, turn, inc, 22 sc, inc= 26

Row 10 :

Ch 1, turn, BLO sc in each st across, sc around the rest of the edges of the mouth.

Info :

This will give the finished piece a cleaner look. F/O and leave an extra long tail for sewing

β€” Side Fins (Make 2) :

Instruction :

Starting with Color A: Leave a long tail at the beginning of the ch 5 for sewing. Ch 5

Row 1 :

sc in 2nd ch from hook and across= 4

Row 2 :

Ch 1, turn, inc, 2 sc, inc= 6

Row 3 :

Ch 1, turn, sc in each st across

Row 4 :

Ch 1, turn, inc, 4 sc, inc= 8

Row 5 :

Ch 1, turn, sc in each st across

Info :

Sc around all the edges to give a cleaner look. Change to Color D:

Row 6 :

*Ch 3, sl st in same st, sc in next 2 st* repeat from * to * across

Info :

F/O and weave in the tail ends

β€” Top Fin Version #1 :

Instruction :

Starting with Color A: Leave a long tail at the beginning of the ch 9 for sewing. Ch 9

Row 1 :

sc in 2nd ch from hook and across= 8

Row 2 :

Ch 1, turn, inc, 6 sc, inc= 10

Row 3 :

Ch 1, turn, inc, 8 sc, inc= 12

Row 4 :

Ch 1, turn, sc in each st across

Info :

Sc around the side edge, bottom of the fin, and opposite side of the fin. Change to Color D:

Row 5 :

*Ch 5, sl st in same st, sc in next 2 st* Repeat from * to * across

Info :

F/O and weave in the tail end

β€” Top Fin Version #2 :

Instruction :

With Black or color of choice: Ch 9

Row 1 :

sl in 2nd ch from hook and across= 8

Row 2 :

BLO Ch 1, turn, 5 sc

Row 3 :

BLO Ch 1, turn, 5 sc

Row 4 :

BLO Ch 1, turn, 5 sc, Ch 4, sl st in 2nd ch from hook and next 2 chains

Row 5 :

BLO Ch 1, turn, 4 sc

Row 6 :

BLO Ch 1, turn, 4 sc

Row 7 :

BLO Ch 1, turn, 4 sc, Ch 2, sl st in 2nd ch from hook

Row 8 :

BLO Ch 1, turn, 3 sc

Row 9 :

BLO Ch 1, turn, 3 sc

Row 10 :

BLO Ch 1, turn dec, sc

Row 11 :

BLO Ch 1, turn, dec

Info :

F/O and leave a long tail for sewing

β€” Light :

Round 1 :

Starting with Color B: Make 4 sc into a magic ring= 4

Round 2 :

Increase in each st around= 8

Round 3 :

sc in each st around

Round 4 :

(2 sc, dec) x 2= 6

Round 5 :

(sc, dec) x 2= 4

Info :

I used pipe cleaner to stuff the light piece. That way it could be posable

Round 6-21 :

Change to Color A: sc in each st around (6-21)

Info :

F/O and leave a long tail for sewing

β€” Assembly :

Top Fin :

Pin the top fin onto the top of the body.

Top Fin :

Sew the fin onto the top of the body.

Teeth and Mouth :

Pin the mouth onto the front of the face. The mouth will stop at rounds 2 and 3. Pull the mouth down and pin all the teeth onto the face. Sew the teeth onto the face. Sew the mouth onto the face except the top of the mouth.

Side Fins :

Pin the fins onto the side of the body. Sew the fins onto the body.

Light :

If you decide to use the pipe cleaner, insert it into the light now. Pin the light onto the head above the eyes. Sew the light onto the head.

Info :

You have your finished angler fish! Thank you for your purchase! If you have any questions or concerns please email me at sweetoddityart@gmail.com or etsy convo me. I will get back to you asap. Please share your finished angler fish with me as often as you want! I love seeing them!

Assembly Instructions

  • Pin the top fin onto the top of the body and sew it securely into place using a yarn needle and matching yarn.
  • Pin the mouth onto the front of the face (it will stop at rounds 2 and 3). Pull the mouth down, pin all teeth into place, then sew the teeth onto the face and sew the mouth in leaving the top edge free as instructed.
  • Pin each side fin onto the sides of the body, spacing evenly, then sew around the base of each fin to attach permanently.
  • If using a pipe cleaner for the light, insert it into the light piece before attaching; pin the light above the eyes and sew securely to the head.
  • Position safety eyes as instructed between rounds 10 and 11, then follow the yarn threading technique to create a sunken look; secure washers only after repositioning stuffing as needed.

Important Notes

  • πŸ’‘Do not join rounds unless stated, work in a continuous spiral for smooth shaping.
  • πŸ’‘Use a stitch marker to mark the beginning of each round to avoid losing track in continuous rounds.
  • πŸ’‘All stitches are worked in both loops unless stated otherwise in the pattern.
  • πŸ’‘Stuff slowly and evenly; remove stuffing when needed to place eye washers or to achieve correct shaping.

This adorable Erebus angler fish was designed to spark joy and imagination with its posable light and cute teeth. Create a colorful, handmade companion that brightens any shelf or gift box. Share your finished fish and spread handmade smiles! 🧢🐟✨

You ask,

we answer.

FAQs

What size will the finished piece be?

The finished amigurumi measures approximately 6 inches long from back of fin to front of head when using recommended worsted weight yarn and a 3.25 mm hook.

Can I use different yarn weights for this pattern?

Yes, you can use different yarn weights, but this will change the final size; adjust your hook accordingly and remember you may need to reposition the eyes and adjust stuffing.

Do I need prior crochet experience for this pattern?

This pattern is rated intermediate, so basic knowledge of working in the round, increases, decreases and simple shaping is recommended for best results.

How long does this project typically take to complete?

Most crocheters complete this project in 5-7 hours, though time may vary based on experience, customization choices, and assembly time.