🧢 Beautiful ✨ Detailed πŸ’ Adorable

Flower Coasters Pattern

Flower Coasters Pattern
4.8β˜… Rating
1-2 Hours Time Needed
3.8K Made This
βœ‚οΈ

Beginner Friendly Level

Perfect for those just starting their crochet journey, with clear instructions and simple techniques

⏱️

Quick Make

Complete in under 2 hoursβ€”lightning fast fun for instant gratification and quick gifts.

β˜•

Warm Welcome

A comforting piece for home or gifts that brings handmade warmth to everyday moments and special occasions.

About This Flower Coasters Pattern

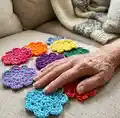
This pattern creates a single 12cm flower-shaped coaster worked in the round using two strands of DK yarn held together. It uses simple UK crochet stitches including treble (tr) and half treble (htr) and a decorative fan petal round to form the flower shape. The coaster is quick to make, great for using up yarn scraps and perfect for gifting as a colourful set.

Flower Coasters Pattern crochet pattern - detailed view of completed project

A magic circle is used to start and the pattern includes full round-by-round instructions and a finishing method for a neat edge. The design is versatile β€” mix and match colours to create a tweedy or stained-glass effect.

Why You'll Love This Flower Coasters Pattern

I absolutely love this pattern because it turns tiny scraps of yarn into bright, cheerful coasters that instantly lift any table setting. I enjoy how quick each coaster is to make β€” you can crochet one or several in an evening and see immediate results. The stitch combination creates a lovely textured petal edge that always looks handmade and thoughtful. I also love that you can personalise each coaster with different colour pairings, making every set unique and special. Sharing these as little gifts always brings a smile, and they are a perfect way to use up leftover DK yarn.

Flower Coasters Pattern step 1 - construction progress Flower Coasters Pattern step 2 - assembly progress Flower Coasters Pattern step 3 - details and accessories Flower Coasters Pattern step 4 - final assembly and finishing

Switch Things Up

I love changing up the colour combos β€” try pairing a neutral with a bright accent for a modern look.

You can use a single strand of DK instead of two strands for a lighter, finer coaster if you prefer a more delicate finish.

Want a chunkier coaster? Use a bulkier yarn and a larger hook to scale the pattern up for a cozier feel.

I often add a contrasting round of single crochet around the petals to create a defined border and extra durability.

Experiment with ombre or variegated yarns held with a solid colour to create a stained-glass or tweedy effect that looks beautiful in sets.

I sometimes embroider a small centre detail or sew a button in the middle to personalise each coaster as a gift.

Try blocking the finished coaster lightly to flatten and open the petals for a more polished look before gifting.

Join multiple flower coasters together to make placemats or a runner for seasonal decor β€” the motifs fit together nicely when you plan the spacing.

I also like adding a felt or cork backing glued in place to protect tabletops and add weight to the coaster.

Play with the petal round by adding one extra round of petals for a larger layered flower β€” just repeat the petal sequence outwards.

If you prefer a different stitch texture, swap the petal tr clusters for puff stitches or bobbles and see how it changes the look.

Don't be afraid to mix textures like cotton DK with an acrylic strand for resilience and easy care while keeping a pretty surface texture.

Common Mistakes & How to Fix Them

βœ— Not holding two strands together evenly can create uneven tension; hold both strands together carefully and treat them as one strand to maintain consistent tension. βœ— Skipping the magic circle step may leave a hole in the center; use a magic circle or the ch4 and slst method and pull the ring tight to close the center. βœ— Forgetting to count chains included in stitch counts leads to wrong totals; remember the ch2 counts as the first tr and include chain stitches in the stitch counts. βœ— Turning when not required can distort the rounds and petals; follow the pattern directions to turn or not turn specifically as noted for each round. βœ— Not weaving in the tail correctly after the invisible join can result in a loose edge; follow the finishing instruction exactly and weave the tail behind the work securely.

Flower Coasters Pattern

Bright, easy-to-make flower coasters that add a pop of colour to your home or workspace. Each coaster is crocheted using two strands of DK yarn held together for a lovely textured finish. The pattern is a quick stash-buster and makes a cheerful set to gift or use around the house. Clear rounds and finishing instructions make this a satisfying small project.

Beginner Friendly 1-2 Hours

Materials Needed for Flower Coasters Pattern

β€” Main Fabric

  • 01
    Two strands of DK weight yarn worked together (held double) - approximately 7g of each of 2 colours per coaster
  • 02
    Example yarn: Stylecraft Special DK 100g/295m β€” approx. 7g/21m of each colour required per coaster
  • 03
    Assorted DK scraps or full skeins depending on number of coasters desired

β€” Tools Required

  • 01
    5mm Crochet Hook
  • 02
    Scissors
  • 03
    Darning needle for weaving in ends

Progress Tracker

0% Complete

β€” Flower Coaster :

Infos :

You will need: 5mm Crochet Hook. Approximately 7g each of any 2 colours of DK weight yarn per coaster. (I used Stylecraft Special Dk 100g/295m so needed approx. 7g/21m of each colour). Scissors & Darning needle.

Infos :

This pattern is written in UK Crochet Terms and is for 1 Flower Coaster/12cm diameter. A magic circle is used to begin. (Please feel free to use ch 4, slst in 1st ch to form a ring instead). A ch 2 is used as a starting stitch at the beginning of rounds and is counted as 1 st throughout. Chain stitches are included in stitch counts. Stitches within brackets should be worked into the same st or sp together.

Infos :

Stitch abbreviations: Ch/s = chain/s htr = half treble tr = treble slst/s = slip stitch/es sp/s = space/s st/s = stitch/es (2 tr, ch 1, 2 tr) = fan stitch

Info :

Using 2 strands of yarn together, form a magic circle to begin. Work all Round 1 sts into magic circle.

Round 1 :

ch 2 (counts as 1 tr), 8 tr into magic circle. Join with slst into top of ch 2. Close magic circle. Turn work. (9 sts in magic circle)

Round 2 :

ch 2, tr into sp between 1st and last st of round below, ch 1, *2 tr into space between next 2 sts below, ch 1.* Repeat from * to * 7 more times. Join with slst into top of ch 2. Turn work. (27 sts)

Round 3 :

ch 2, tr into ch 1 sp, ch 1, 2 more tr into same ch 1 sp. Skip 2 sts. *fan stitch (2 tr, ch 1, 2 tr) into next ch 1 sp.* Repeat from * to * 7 more times. Join with slst into top of ch 2. Do not turn work. (45 sts)

Round 4 :

(Petal round) Slst into next tr st and ch 1 sp. Ch 2 (counts as 1 htr), (4 tr, htr) into same ch 1 sp. Skip 2 sts. Slst into sp between fan sts. (1st Petal complete). *(htr, 4 tr, htr) into next ch 1 sp. Skip 2 sts. Slst into space between fan sts.* Repeat from * to * 7 more times. (63 sts)

Info :

To finish your last round, join with either a slst into the top of your 1st st, or create an Invisible Join. Snip of yarn tail and pull through top of last st, thread a darning needle and insert front to back through top of 2nd st in round, then back down through top of last st. Weave in behind work.

Info :

AFTER CARE: Hand wash or wipe clean only.

Assembly Instructions

  • Finish the last round by joining with a slst into the top of your first stitch or by creating an Invisible Join as described; this gives a neat edge.
  • Snip the yarn tail, pull through the top of the last stitch, thread a darning needle and insert front-to-back through the top of the 2nd stitch in the round, then back down through the top of the last stitch and weave in behind the work.
  • If you prefer not to use a magic circle, start with ch 4 and slst into the first chain to form a ring as an alternative beginning method.
  • Make a coordinated set by varying colour combinations for each coaster and arrange them as a gift set in matching tones for presentation.
  • Care for finished coasters by hand washing or wiping clean only to preserve shape and colour.

Important Notes

  • πŸ’‘This pattern is written in UK crochet terms; check conversions if you use US terminology.
  • πŸ’‘A ch2 at the beginning of rounds counts as the first treble stitch and is included in stitch counts.
  • πŸ’‘Chain stitches are included in the stitch totals shown at the end of roundsβ€”count them when checking your work.
  • πŸ’‘Stitches shown within brackets or parentheses should be worked into the same stitch or space together for correct shaping.

These colourful flower coasters are perfect to brighten your home or give as a thoughtful handmade gift. Mix and match colours to create tweedy or stained-glass effects and make a charming set for friends and family. Happy crocheting and enjoy making beautiful little blooms! 🧢🌸

You ask,

we answer.

FAQs

What size will the finished piece be?

The finished flower coaster measures approximately 12 cm in diameter when using two strands of DK yarn and a 5mm hook as recommended.

Can I use different yarn weights for this pattern?

Yes, but changing yarn weight will alter the finished size; if you use a heavier yarn, use a larger hook and expect a larger coaster.

Do I need prior crochet experience for this pattern?

This pattern is beginner friendly and uses basic UK stitches like treble and half treble, but familiarity with working in rounds and magic circle technique is helpful.

How do I close the centre neatly if I don't use a magic circle?

You can start with ch 4 and slst into the first chain to form a ring, then work Round 1 into that ring and pull the tail tight to close the centre.

How should I care for finished coasters?

After care instructions are: hand wash or wipe clean only to keep the coaster shape and colours intact.