🧢 Beautiful ✨ Detailed πŸ’ Adorable

Floral headband Pattern

Floral headband Pattern
4.5β˜… Rating
5-7 Hours Time Needed
2.7K Made This
βœ‚οΈ

Intermediate Level

Ideal for those with basic crochet experience, featuring slightly more advanced stitches and techniques to expand your skills.

⏱️

Weekend Treat

Takes 5-7 hours, making it an enjoyable project to finish over a couple of days.

✨

Stylish Touch

An elegant detail to elevate any look, combining traditional techniques with contemporary design sensibilities.

About This Floral headband Pattern

This pattern shows you how to crochet a floral headband made from raffia yarn, featuring poppies, camomiles and cornflowers. Youll learn small flower corollas, centres, and how to assemble stamens and tassels for realistic details. The instructions include stitch counts, finishing techniques and photos to help you at every step.

Floral headband Pattern crochet pattern - detailed view of completed project

Perfect for craft lovers who want a wearable floral accessory, this pattern uses simple crochet stitches and glue assembly for a polished result. The finished headband measures approximately 4 inches high and 2 inches wide, with ribbon tapes about 39 inches long.

Why You'll Love This Floral headband Pattern

I absolutely love this pattern because it transforms simple raffia yarn into lifelike, textured flowers that look stunning on a headband. I enjoy the mix of crochet and mixed-media assembly β€” adding tassels, glitter and bead centres always makes each piece unique. The step-by-step photos helped me refine the finishing touches, and I always feel proud gifting these handmade crowns. Crocheting the little corollas is relaxing, and assembling them into a headband is the satisfying final flourish that brings everything together.

Floral headband Pattern step 1 - construction progress Floral headband Pattern step 2 - assembly progress Floral headband Pattern step 3 - details and accessories Floral headband Pattern step 4 - final assembly and finishing

Switch Things Up

I love changing up colors and materials to get different effects; try pastel raffia for a soft vintage look or bright saturated raffia for bold festival vibes.

I often swap the raffia for paper yarn or thin ribbon for a different texture and structure β€” the stitches remain the same but the result feels lighter.

To make a smaller version for a keychain, use thinner raffia and a smaller hook; to make a dramatic statement crown, use more flowers and wider tape ties.

Embellish centres with beads, buttons or tiny pom-poms instead of the raffia tassel if you want a more polished or sparkly finish.

If you want posable flowers, add a thin wire inside the leaf or stem sections before attaching to the headband to allow shaping when worn.

I like to paint the adjustable clamps with metallic gold or bronze to match the headband hardware; it gives a professional look once assembled.

Try mixing flowers across the headband β€” like two poppies, three camomiles and a cornflower β€” to create balanced asymmetry that looks natural and artful.

For a bridal version, use white or cream raffia and add pearl beads to the centres and a long flowing ribbon for ties to keep it romantic and elegant.

Don’t be afraid to add a light spray of fabric-safe glitter to the stamens for evening wear; secure with PVA so it doesnt flake off easily.

I recommend testing your preferred glue and drying method on a spare piece to ensure the raffia doesnt change color or texture with the adhesive you choose.

Common Mistakes & How to Fix Them

βœ— Skipping the second loop when instructed will change the flower centre shape; always work the 6 SC in the 2nd loop from the hook as shown. βœ— Forgetting to tighten and hide ends makes pieces come apart after glueing; pull the end through and secure it to the wrong side before hiding it. βœ— Not steaming the corolla leaves them floppy and misshapen; slightly steam the corolla with an iron to set the shape before gluing the centre. βœ— Applying too much PVA glue to the centre causes a wet, bulky result; use a small amount and press firmly, then allow to dry thoroughly.

Floral headband Pattern

Make a beautiful floral headband using raffia yarn and simple crochet techniques. This pattern guides you through crocheting camomiles, poppies and cornflowers and assembling them onto a headband with easy finishing tips. Youll get photo-supported steps and clear stitch counts so you can follow along with confidence. Perfect for gifting or creating a special handmade accessory.

Intermediate 5-7 Hours

Materials Needed for Floral headband Pattern

β€” Main Fabric

  • 01
    Raffia yarn for poppies - 66 yards (60 m)
  • 02
    Raffia yarn for camomiles, cornflowers and leaves - 22 yards (20 m) each
  • 03
    Raffia yarn for spikelets - 11 yards (10 m)
  • 04
    Raffia yarn for centres - 6 yards (5 m)
  • 05
    Additional small amounts of raffia for tassels and details

β€” Tools Required

  • 01
    Crochet hook size 3 mm
  • 02
    Plastic headband, width 10 mm
  • 03
    33 adjustable plastic clamps, length 4-5 inches (10-12 cm)
  • 04
    Gold spray paint (or nail polish)
  • 05
    Little glitter
  • 06
    5 beads, diameter 10-15 mm (optional)
  • 07
    3 tapes of 2 1/5 yards (2 m) each (optional)
  • 08
    PVA glue and glue gun
  • 09
    Scissors
  • 10
    Iron
  • 11
    Pins for assembly

Progress Tracker

0% Complete

β€” Crochet the camomile :

Info :

Corolla (base). Crochet 2 CH.

Round 1 :

1 row. Crochet 6 SC in the 2nd loop from the hook.

Round 2 :

2 row. 1 Inc*6 = 12, SlSt.

Round 3 :

3 row. (6 CH, 3 DC from the 3rd loop of the hook, 1 SC, skip one loop of the 2nd row, SlSt)*6.

Info :

Cut the thread, pull out the end. Tighten the end in the 1st CH of the row to the wrong side. Tie the knot, hide the ends.

Info :

Centre. Crochet 2 CH.

Round 1 :

1 row. 6 SC in the 2nd loop from the hook, SlSt.

Round 2 :

2 row. 1 Inc*6 in the hole (= 12).

Info :

Cut the thread, pull out the end. Close this row: Insert the hook under the 1st loop of the row, pull out the end, tighten the end back to the wrong side. Strengthen and hide the end.

Info :

Slightly compress the centre so that it takes the shape of a ball.

Info :

Steam the corolla with an iron. Glue on the centre with the PVA glue.

Info :

Crochet four more camomiles.

β€” Crochet the poppy :

Info :

Corolla 1. Crochet 2 CH.

Round 1 :

1 row. 6 SC in the 2nd loop from the hook.

Round 2 :

2 row. 1 Inc*6 = 12, SlSt.

Round 3 :

3 row. (8 CH, 3 DC from the 3rd loop of the hook, 1 SC, skip one loop of the 2nd row, SlSt)*6.

Info :

Cut the thread, pull out the end. Tighten the end in the 1st CH of the row to the wrong side. Tie the knot, hide the ends.

Info :

Corolla 2. Crochet 2 CH.

Round 1 :

1 row. 6 SC in the 2nd loop from the hook, SlSt.

Round 2 :

2 row. (1 SC, 1 Inc)*3 = 9, SlSt.

Round 3 :

3 row. (6 CH, 3 DC from the 3rd loop of the hook, 1 SC, skip one loop of the 2nd row, SlSt)*3 (petal repetition).

Info :

Cut the thread, pull out the end. Tighten the end in the 1st CH of the row to the wrong side. Tie the knot, hide the ends.

Info :

Corolla 3. Crochet 2 CH.

Round 1 :

1 row. 6 SC in the 2nd loop from the hook.

Round 2 :

2 row. 1 Inc*6 = 12, SlSt.

Round 3 :

3 DC from the 3rd loop of the hook, 1 SC, skip one loop of the 2nd row, SlSt)*6.

Info :

7 SC on the back loop only from the 2nd loop of the hook, SlSt in the loop of the 2nd row, turn, 7 SC on the back loop only, CH, 7 SC on the back loop only, SlSt, 7 SC on the back loop only, CH, 7 SC on the back loop only, SlSt, 7 SC on the back loop only, CH, 7 SC on the back loop only, SlSt)*3.

Info :

Cut the thread, pull out the end. Tighten the end in the 1st CH of the row to the wrong side. Tie the knot, hide the ends.

Info :

Glue on the centre in the 2nd corolla, then the 2nd corolla - in the 1st corolla with the PVA glue.

Info :

Crochet two more poppies.

β€” Centres and stamens :

Info :

Centre. Crochet similarly to the centre of the camomile. Take two pieces of the raffia yarn of 2 inches (5 cm) each. Straighten both pieces. Cut the fringe on both sides, leaving 10 mm uncut in the middle.

Info :

Glue on the pieces from below to the centre crosswise. Dip the ends in the PVA glue and immediately in the glitter.

Info :

Glue on the centre in the 2nd corolla, then the 2nd corolla – in the 1st corolla with the PVA glue.

β€” Crochet the cornflower :

Info :

Corolla. Crochet 4 CH. Connect in the circle with SlSt.

Round 1 :

1 row. (3 CH, 3 DC in the hole, turn, 3 CH, SlSt, 3 CH, SlSt, 3 CH, SlSt)

Round 2 :

Turn, fold the petal in half and connect with SlSt, SlSt in the hole)*6.

Info :

Cut the thread, pull out the end. Tie the knot on the wrong side, hide the ends.

Info :

Centre. Wrap two fingers four times with a piece of the raffia yarn. Grab in the middle with the loop. Wrap the fold with the ends. Cut the ends of the tassel.

Info :

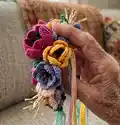
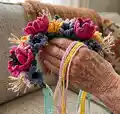
Glue on the centre to the cornflower and assemble the flowers as shown in photos.

β€” Tassel / Finishing :

Info :

Take two pieces of raffia, wrap, tie and trim to make small tassels for the poppy centres. Use PVA to fix and glitter optional.

Assembly Instructions

  • Glue the rounded centre into the 2nd corolla, then glue the 2nd corolla into the 1st corolla using PVA glue to create the layered poppy centre.
  • Steam each corolla lightly with an iron to set the shape, then glue centres and stamens into place with PVA glue.
  • Glue the finished flowers onto the painted headband and secure them from the underside with adjustable plastic clamps while the glue sets.
  • Add tassels/stamens into the flower centres by gluing trimmed raffia pieces across the centre and dipping the ends in PVA and glitter for effect.
  • Attach ribbon tapes to the ends of the headband and trim any excess; hide knots and weave in small raffia ends for a neat finish.

Important Notes

  • πŸ’‘Use PVA glue sparingly and allow full drying time before handling the finished headband to prevent shifting or glue marks.
  • πŸ’‘Steam the corollas gently with an iron to shape the petals; do not overheat raffia yarn because it can distort or melt.
  • πŸ’‘Hide and secure all thread ends to the wrong side after finishing each corolla to keep the decorative side neat and durable.

Create a charming handmade floral headband that brings a touch of vintage botanical beauty to any outfit. This pattern combines crocheted raffia flowers with simple assembly techniques for a stunning wearable result. Make a set of camomiles, poppies and cornflowers, add glittery stamens and ribbon ties, and youre ready to gift or wear with pride! 🧢🌸

You ask,

we answer.

FAQs

What size will the finished headband be?

The finished headband from the specified materials measures approximately 4 inches (10 cm) in height and 2 inches (5 cm) in width for the floral cluster; tape length is about 39 inches (1 m).

Can I use different yarn or a different hook?

You can experiment with different yarns, but using different yarn weights or materials will change the size and texture. Adjust hook size accordingly and test a sample corolla first.

Do I need special tools to assemble the headband?

You need PVA glue, a glue gun (optional), clamps to hold pieces while drying, scissors and an iron for shaping. No advanced tools are required.

How long does this project typically take to complete?

Most crocheters complete this project in 5-7 hours, though time may vary based on experience level and how many flowers and finishing details you add.