🧢 Beautiful ✨ Detailed πŸ’ Adorable

Cutie Utility Basket Pattern

Cutie Utility Basket Pattern
4.8β˜… Rating
5-7 Hours Time Needed
1.9K Made This
βœ‚οΈ

Intermediate Level

Ideal for those with basic crochet experience, featuring slightly more advanced stitches and techniques to expand your skills.

⏱️

Weekend Treat

Takes 5-7 hours, making it an enjoyable project to finish over a couple of days.

🏑

Cozy Accent

A warm touch for your space that transforms ordinary corners into inviting nooks filled with handmade charm.

About This Cutie Utility Basket Pattern

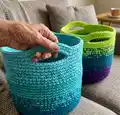
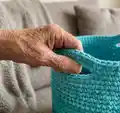
This pattern creates a roomy, structured utility basket worked in the round using three strands of medium worsted weight yarn held together. The basket features integrated handles and easy-to-follow color changes to create a gradient or contrasting style. Tight gauge and smaller hook produce a stiff, functional basket perfect for storage.

Cutie Utility Basket Pattern crochet pattern - detailed view of completed project

Detailed round-by-round instructions guide you from base to rim, including handle placement and finishing. The pattern is adaptable to different colorways and yarn brands for a custom look.

Why You'll Love This Cutie Utility Basket Pattern

I absolutely love this pattern because it turns simple worsted yarn into a sturdy, beautiful storage solution that looks great in any room. I enjoy how the three-strand technique creates a dense fabric without complicated stitches. The built-in handles are clever and practical, making the basket both decorative and useful. I also love that the color changes are easy to control and create striking gradients or contrasting bands.

Cutie Utility Basket Pattern step 1 - construction progress Cutie Utility Basket Pattern step 2 - assembly progress Cutie Utility Basket Pattern step 3 - details and accessories Cutie Utility Basket Pattern step 4 - final assembly and finishing

Switch Things Up

I love how easy it is to customize this basket by changing colorsβ€”try ombre shades for a soft gradient or high-contrast bands for a bold look.

I often make smaller or larger baskets by simply adding or removing increase rounds at the base to change the circumference.

To get a chunkier texture, use a bulkier yarn and the same technique of holding multiple strands together; this will create a thicker, more sculptural basket.

If you prefer a softer, floppy basket, go up one or two hook sizes and use fewer strands held together to reduce stiffness.

I like to add a decorative trim to the rim by switching to HDC or DC for a round or two after RND 37 for a contrasting finishing edge.

Want handles that lie flat? Make shorter chain openings on RND 35 or add a second round of SC around the handle opening for reinforcement.

I sometimes add a fabric liner to my baskets for a polished interior and to protect delicate contentsβ€”simply measure the interior and sew a circle and side strip of fabric.

Try embroidering initials or small motifs onto the finished basket with tapestry needle and a single strand of yarn for personalization.

I like to experiment with metallic or shiny accent strands mixed in with two neutral strands to give the basket a subtle shimmer.

If you want a matching set, make several baskets with the same base color and different accent color combinations to coordinate across a room.

Common Mistakes & How to Fix Them

βœ— Not winding skeins into center-pull balls before starting can lead to tangled joins and pully yarn; wind each skein into two center-pull balls first as instructed to avoid knots and make color changes smooth. βœ— Skipping the stitch marker when working in a spiral will make it difficult to track rounds; place a stitch marker at the start of the round and move it each round to keep an accurate count. βœ— Using a larger hook than recommended will produce a floppy basket that lacks structure; use the smaller 6mm hook specified for firm stitches or only increase hook size if you accept a looser, larger basket. βœ— Changing colors in the wrong place can create visible joins and loose ends; perform color changes in the last stitch of the previous round as described to create neat transitions. βœ— Uneven tension when holding three strands together will cause inconsistent stitch size and rows; practice holding the three strands evenly and maintain steady tension throughout the project.

Cutie Utility Basket Pattern

Make a sturdy, stylish utility basket perfect for storage and decor. This pattern uses three strands of worsted yarn held together to create a firm, structured basket with built-in handles. You'll enjoy clear, round-by-round instructions and helpful tips for changing colors and finishing. Ideal for adding a handmade finishing touch to any room.

Intermediate 5-7 Hours

Materials Needed for Cutie Utility Basket Pattern

β€” Main Fabric

  • 01
    Red Heart Super Saver - Real Teal (0656) CA - 275 yards
  • 02
    Red Heart Super Saver - Jade (3862) CB - 150 yards
  • 03
    Red Heart Super Saver - Aruba Sea (0505) CC - 120 yards
  • 04
    Yarn Info (Red Heart Super Saver): 198 grams / 364 yards per skein
  • 05
    Lion Brand Vanna's Choice - Eggplant (145) CA - 275 yards
  • 06
    Lion Brand Vanna's Choice - Peacock (176) CB - 150 yards
  • 07
    Lion Brand Vanna's Choice - Radiant Lime (175) CC - 120 yards
  • 08
    Yarn Info (Vanna's Choice): 100 grams / 170 yards per skein
  • 09
    Substitute with any medium worsted weight yarn as needed

β€” Tools Required

  • 01
    Stitch marker
  • 02
    Crochet hook 6mm (US-J)

Progress Tracker

0% Complete

β€” Basket Instructions :

Info :

Note: The instructions are the same for both style baskets.

Round 1 :

With CA, SC 6 times in magic adjustable loop. (6 STS)

Info :

Note: You will not join the RND. The entire basket will be worked in spirals. Use a stitch marker to keep track of rounds.

Round 2 :

[SC 2 times in next ST] 6 times. (12 STS)

Round 3 :

[SC 2 times in next ST, SC in next ST] 6 times. (18 STS)

Round 4 :

[SC 2 times in next ST, SC in next 2 STS] 6 times. (24 STS)

Round 5 :

[SC 2 times in next ST, SC in next 3 STS] 6 times. (30 STS)

Round 6 :

[SC 2 times in next ST, SC in next 4 STS] 6 times. (36 STS)

Round 7 :

[SC 2 times in next ST, SC in next 5 STS] 6 times. (42 STS)

Round 8 :

[SC 2 times in next ST, SC in next 6 STS] 6 times. (48 STS)

Round 9 :

[SC 2 times in next ST, SC in next 7 STS] 6 times. (54 STS)

Round 10 :

[SC 2 times in next ST, SC in next 8 STS] 6 times. (60 STS)

Round 11 :

[SC 2 times in next ST, SC in next 9 STS] 6 times. (66 STS)

Round 12 :

[SC 2 times in next ST, SC in next 10 STS] 6 times. (72 STS)

Round 13-17 :

SC in each ST around. (72 STS)

Round 18 :

With 2 strands of CA and 1 strand of CB, SC in each ST around. (72 STS)

Round 19 :

SC in each ST around. (72 STS)

Round 20 :

With 1 strand of CA and 2 strands of CB, SC in each ST around. (72 STS)

Round 21-22 :

SC in each ST around. (72 STS)

Round 23 :

With 3 strands of CB, SC in each ST around. (72 STS)

Round 24-27 :

SC in each ST around. (72 STS)

Round 28 :

With 2 strands of CB and 1 strand of CC, SC in each ST around. (72 STS)

Round 29 :

SC in each ST around. (72 STS)

Round 30 :

With 1 strand of CB and 2 strands of CC, SC in each ST around. (72 STS)

Round 31-32 :

SC in each ST around. (72 STS)

Round 33 :

With 3 strands of CC, SC in each ST around. (72 STS)

Round 34 :

SC in each ST around. (72 STS)

Round 35 :

SC in next 13 STS, CH 10, skip the next 10 STS, SC in next 26 STS, CH 10, skip the next 10 STS, SC in last 13 STS. (72 STS)

Round 36 :

SC in next 13 STS, SC 10 times around CH 10, SC in next 26 STS, SC 10 times around CH 10, SC in last 13 STS. (72 STS)

Round 37 :

SC in each ST around to last ST, SL ST in last ST (to bring the last ST in line with the rest of the basket). (72 STS)

Info :

Fasten off and weave in ends.

Assembly Instructions

  • Wind each skein into two center pull balls before beginning to make color changes and working with three strands easier and tangle-free.
  • Use a stitch marker to mark the first stitch of each round and move it up as you work since the basket is worked in a spiral and rounds are not joined.
  • Change colors during the last stitch of the previous round as instructed (example: change one strand during the last stitch to prepare the next round's strand combination).
  • Create the handle openings by working RND 35 (CH 10 gaps) and then working SC around the chains in RND 36 to form neat integrated handles.
  • Fasten off at the end of RND 37 and weave in all ends securely to hide tails and stabilize the rim of the basket.

Important Notes

  • πŸ’‘All parts of the pattern are worked with three strands of yarn held together for a dense, structured fabric.
  • πŸ’‘Wind each skein into two center-pull balls before starting to make color changes easier and avoid tangles.
  • πŸ’‘The pattern uses a smaller hook than usual to create tight stitches for structure; if you prefer a looser basket, go up a hook size with the understanding it will be larger and less stiff.
  • πŸ’‘Use a stitch marker to keep track of rounds because you will not join rounds; the basket is worked in spirals.
  • πŸ’‘When a new round calls for strand changes, make the change during the last stitch of the previous round as described to create clean color transitions.

This Cutie Utility Basket pattern gives you a stylish, functional storage solution that's handmade with love. The three-strand technique creates a sturdy, attractive basket that stands up to everyday use. Perfect for gifting or keeping your space tidy and beautiful. 🧢🧡✨

You ask,

we answer.

FAQs

What size will the finished basket be?

The finished basket measures approximately 24 inches in circumference and 8 inches high using the recommended yarn and hook size.

Can I use a different yarn weight for this pattern?

Yes, you can substitute any medium worsted weight yarn, but changing yarn weight or hook size will affect the final size and stiffness of the basket.

Do I need to join rounds when working this basket?

No, you will not join rounds; the entire basket is worked in a continuous spiral, so use a stitch marker to keep track of the start of each round.

How do I handle color changes between rounds?

Perform color changes during the last stitch of the previous round by pulling up a loop with the old color, dropping one strand, adding the new strand, and pulling through to have the correct strand combination for the next round.