🧢 Beautiful ✨ Detailed πŸ’ Adorable

Daisy Flowers Car Hanging Pattern

Daisy Flowers Car Hanging Pattern
4.4β˜… Rating
5-7 Hours Time Needed
1.5K Made This
βœ‚οΈ

Intermediate Level

Ideal for those with basic crochet experience, featuring slightly more advanced stitches and techniques to expand your skills.

⏱️

Weekend Treat

Takes 5-7 hours, making it an enjoyable project to finish over a couple of days.

🏑

Cozy Accent

A warm touch for your space that transforms ordinary corners into inviting nooks filled with handmade charm.

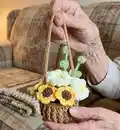
About This Daisy Flowers Car Hanging Pattern

This pattern teaches you to crochet a miniature hanging pot filled with daisy and yellow blooms, plus eucalyptus stems for a natural touch. You will make small pistils, petals, stems and a textured pot, then assemble them into a hanging decoration. The instructions include stitch counts and simple shaping techniques.

Daisy Flowers Car Hanging Pattern crochet pattern - detailed view of completed project

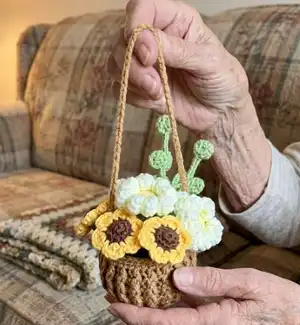
Clear step-by-step rounds and photos guide your assembly and finishing. Suitable for crocheters familiar with basic stitches and some post stitch techniques.

Why You'll Love This Daisy Flowers Car Hanging Pattern

I absolutely love this pattern because it combines small, satisfying motifs into a single charming hanging piece that brightens any space. I enjoy how each tiny daisy and sunflower comes together quickly yet looks intricate when clustered. The mix of textures from popcorn-like petals to the ribbed pot adds a handmade, tactile quality I adore. This project is also great for using small yarn leftovers and experimenting with color combinations to match your car or home decor. Finally, assembling the stems and pot into a hanging arrangement is a rewarding finishing step I always look forward to.

Daisy Flowers Car Hanging Pattern step 1 - construction progress Daisy Flowers Car Hanging Pattern step 2 - assembly progress Daisy Flowers Car Hanging Pattern step 3 - details and accessories Daisy Flowers Car Hanging Pattern step 4 - final assembly and finishing

Switch Things Up

I love how easy it is to customize the colors to match your car or room; try pastel shades for a soft look or jewel tones for drama.

I often change the petal stitch to make fuller or flatter petalsβ€”use DC or TRC variations for a different silhouette.

I sometimes swap the foam for a small cork ball or felt for different weight and stability inside the pot.

I add tiny beads or embroidered centers to the pistils to give each flower a sparkling detail.

I make miniature versions by using thinner yarn and a smaller hook to create keychain-friendly flowers.

I also try bulky yarn and larger hooks for a chunky, more sculptural pot and oversized blooms.

I like to braid or twist multiple chains for a decorative hanger instead of a single chain of 70 for extra strength and style.

I recommend experimenting with mixed yarn texturesβ€”pair a fuzzy yarn for petals with smooth cotton for stems for interesting contrast.

I sometimes add scent by tucking a small sachet into the pot or lightly scenting the stuffing for a fragrant car hanging.

I encourage trying different leaf shapes and numbers of petals to create your own signature bouquet arrangement.

Common Mistakes & How to Fix Them

βœ— Skipping stitch markers during rounds can make it hard to find your starting stitch; place a marker at the beginning of each round to maintain accurate stitch counts. βœ— Stuffing too much or too little at the wrong time changes the shape of petals or soil; start stuffing at the rounds indicated and add fiber gradually for an even finish. βœ— Cutting yarn tails too short leaves nothing to sew with when closing openings; leave long tails for sewing and for wrapping stems around wire as instructed. βœ— Rushing the join when making seamless petals can cause loose joins and uneven petals; join carefully and weave ends in securely to keep petals neat and stable.

Daisy Flowers Car Hanging Pattern

Create a charming hanging daisy arrangement perfect for cars or small spaces. This pattern walks you through crocheting tiny daisies, sunflower-style blooms, eucalyptus stems and a mini hanging pot. You will enjoy stitching petals, assembling stems and finishing with a pretty hanging chain for display. Perfect for gifting or brightening your own ride.

Intermediate 5-7 Hours

Materials Needed for Daisy Flowers Car Hanging Pattern

β€” Main Fabric

  • 01
    Supper fine yarn (approx. 1.8 oz / 50 g) - main weight used
  • 02
    Color: green - small amounts for stems and leaves
  • 03
    Color: white - for daisy petals, small amount
  • 04
    Color: blue - optional accent, small amount
  • 05
    Color: yellow - for petal centers and yellow flower petals
  • 06
    Color: brown - for pistils/centres and soil/pot
  • 07
    Cotton (for stems/wrapping)
  • 08
    Foam - small piece to fit inside pot for stability
  • 09
    Cotton filling - small amount for stuffing soil piece

β€” Tools Required

  • 01
    Crochet hook size 2.5-3.0 mm
  • 02
    Crochet hook size 3.0 mm (use for pot)
  • 03
    Stitch maker
  • 04
    Sewing needle
  • 05
    Scissors
  • 06
    Hot gun glue
  • 07
    Wire - for stems and wrapping
  • 08
    Foam to fit the pot
  • 09
    Cotton filling for stuffing

Progress Tracker

0% Complete

β€” Materials :

Info :

Weight/yardage: supper fine 1.8 oz (50 g). Color : green , white, blue, yellow, and brown. hook size : 2.5-3.0 mm. Stitch maker. Sewing needle. Scissors. Hot gun glue. Cotton. Wire. Foam. Cotton filling.

β€” Abbreviations :

Infos :

MR : Magic Ring. st(s) : stitch(es). sl st : slip stitch. sk : skip. ch: chain. SC : single crochet. DC : double crochet. HDC : half double crochet. INC : increase. BLO : back loop only. FLO: Front loop only. TRC: Triple crochet. FPDC: Front post double crochet. BPDC: Back post double crochet.

β€” Daisy Flower :

Item Name (P1) :

Pistils & Peduncle (green & yellow) (make 2 : one by green one by yellow)

Round 1 :

MR, 6 SC (6sts)

Round 2 :

6 SC inc (12sts)

Round 3 :

12 SC (12sts)

Item Name (P2) :

Petal (white)

Info :

Seamless piece Join with petal crochet

Round 1 :

( chain 8, You're going to be working into the second from the hook : 7HDC, slst in next st) x 12 times (start stuffing from 9th petal) *wrap yarn around the stems*

β€” Yellow Flower :

Item Name (P1) :

Pistils & Peduncle (green & brown) (make 2 piece : one by green one by brown)

Round 1 :

MR, 6 SC (6sts)

Round 2 :

6 SC inc (12sts)

Item Name (P2) :

Petal (yellow)

Info :

Seamless piece Join with petal crochet

Round 1 :

Chain 2, 3HDC in one st. Chain 2, sl st in next st. X 6 times (start stuffing from the 4th petal)

β€” Eucalyptus Stems :

Info :

(make 2)

Round 1 :

Row 1 (make 2) : MR, 8 SC (6sts) cut yarn and leave a shot tail for wrap wire

Round 2 :

Row 1 (make 4) : MR, 6 SC (6sts) cut yarn and leave a shot tail for wrap wire

Info :

The first one we stick 2 piece (8sc piece) together and star wrap around the wire to stick each leaves on the stem (look like photo)

β€” Pots :

Info :

Using 3mm size hook

Round 1 :

Row 1: 8sc (8)

Round 2 :

Row 2: 8 inc (16)

Round 3 :

Row 3: (sc,inc) 8 times (24)

Round 4 :

Row 4: (2sc,inc) 8 times (32)

Round 5 :

Row 5: (3sc,inc) 8 times (40)

Round 6 :

Row 6: BLO 40dc (40)

Round 7-9 :

Row 7-9: 1FPDC, 1BPDC repeat in end (40)

Round 10 :

Row 10: 40sc (40)

Round 11 :

Row 11: 40slst

Info :

continue chain 70 to make hanging

β€” The Soil :

Item Name (Type 1) :

Row 1: 8 SC in an MR (8sts)

Round 2 :

Row 2: 8 SC INC (16sts)

Round 3 :

Row 3: (1 SC + 1 INC ) 8 times ( 24sts)

Round 4 :

Row 4: (2SC + 1 INC) 8 times (32sts)

Round 5-9 :

Row 5-9: SC in each st to end

Round 10 :

Row 10: (2 SC + 1 DEC) 8 times (24sts)

Round 11 :

Row 11: (1 SC + 1 DEC) 8 times (16sts)

Info :

*stuffing*

Round 12 :

Row 12: 8 DEC (8sts)

Info :

Cut yarn and leave a long tail for sewing, close off the hole.

Item Name (Type 2) :

Cut the foam to fit the size of the pot and place the foam in the plant pot

β€” Mixed Flowers & Assembly :

Info :

-This is all we have. Finally fixed tegether. Put the soil in plant pots. Insert each flower into a pots.

Assembly Instructions

  • Put the soil piece into the plant pot and place it so the opening is at the top for inserting stems and flowers.
  • Insert each flower stem into the soil foam or stuffed soil, arranging daisies and yellow flowers as shown and spacing evenly.
  • Wrap the wire stems with yarn tails and secure leaves and eucalyptus pieces by wrapping yarn around the wire as shown in photos.
  • Attach the pot hanging chain by continuing a chain of 70 after finishing the pot rounds, secure and fasten off neatly.
  • Close the pot hole by sewing with a long tail left from the soil piece, then glue or tuck the foam in place to stabilize the arrangement.

Important Notes

  • πŸ’‘Use stitch markers to keep track of the beginning of each round, especially when working increases or post stitches.
  • πŸ’‘Start stuffing petals and soil only at the rounds indicated to retain the correct shape; add stuffing a little at a time.
  • πŸ’‘Leave long tails after cutting yarn for pieces that need sewing or wrapping around wire; short tails will make assembly difficult.
  • πŸ’‘Cut foam to fit the pot snugly to keep stems stable and use hot glue if necessary to secure foam inside the pot.

This Daisy Flowers car hanging pattern creates a tiny bouquet you can carry with you wherever you go. It mixes white daisies, sunny yellow flowers and eucalyptus stems for a fresh handmade look. Perfect as a thoughtful gift or a cheerful car accessory. 🧢🌼

You ask,

we answer.

FAQs

What size will the finished piece be?

The finished hanging measures approximately 10-15 cm tall (including chain) depending on your yarn tension and hook size; the small pot is roughly palm-sized.

Can I use different yarn weights for this pattern?

Yes, you can change yarn weight but it will affect final size; use a larger hook for bulkier yarn and adjust stitch counts if necessary.

Do I need prior crochet experience for this pattern?

This pattern is rated intermediate and assumes familiarity with single crochet, increases, decreases, half double crochet and post stitches.

How long does this project typically take to complete?

Most crocheters finish this project in about 5-7 hours, depending on experience and assembly time.