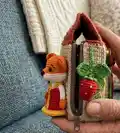
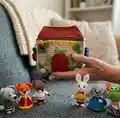
Create a charming set of Teremok finger puppets — mouse, frog, bunny and fox — with complete step-by-step crochet instructions. This pattern gives you detailed rounds, materials and assembly notes so you can make tiny, gift-ready toys. Perfect for crafters who love miniature amigurumi and playful storytelling.
Progress Tracker
0% Complete
— Mouse the finger puppet :
— Head :
Round 1 :
Start 6 sc in a mr (6)
Round 2 :
(1 sc, inc) x 3 times (9)
Round 3 :
(2 sc, inc) x 3 times (12)
Round 4-5 :
12 sc in the round
Round 6 :
3 sc, 6 inc, 3 sc (18)
Round 7 :
3 sc, (1 sc, inc) x 6 times, 3 sc (24)
Round 8 :
(3 sc, inc) x 6 times (30)
Round 9 :
(4 sc, inc) x 6 times (36)
Round 10 :
36 sc in the round
Round 11 :
(5 sc, inc) x 6 times (42)
Round 12 :
42 sc in the round
Round 13 :
(6 sc, inc) x 6 times (48)
Round 14-20 :
48 sc in the round (7 rounds)
Round 21 :
(6 sc, dec) x 6 times (42)
Round 22 :
(5 sc, dec) x 6 times (36)
Round 23 :
(4 sc, dec) x 6 times (30)
Round 24 :
(3 sc, dec) x 6 times (24)
Round 25 :
(2 sc, dec) x 6 times (18)
Round 26 :
(1 sc, dec) x 6 times (12)
— Ears (make 2) :
Info :
Work in pink yarn color
Round 1 :
Start 6sc in a mr (6)
Round 3 :
(1 sc, inc) x 6 times (18)
Round 4 :
(2 sc, inc) x 6 times (24)
Round 5 :
(3 sc, inc) x 6 times (30)
Round 6 :
(4 sc, inc) x 6 times (36)
Info :
Fasten off, cut the yarn.
— Ears (outer) :
Info :
Work in grey yarn color
Round 1 :
Start 6sc in a mr (6)
Round 3 :
(1 sc, inc) x 6 times (18)
Round 4 :
(2 sc, inc) x 6 times (24)
Round 5 :
(3 sc, inc) x 6 times (30)
Round 6 :
(4 sc, inc) x 6 times (36)
Info :
Put 2 parts together and crochet sc in the round (36 sc).
— Body :
Info :
Make 18 stitches on the head (use light blue yarn color). Follow the instructions: 2 sc on the back, 1 sc obliquely, 3 sc on the sideline, 1 sc obliquely, 4 sc in front of the work, 1 sc obliquely, 3 sc on the sideline, 1 sc obliquely, 2 sc on the back.
— Crochet top skirt :
Round 7 :
into front loops only 18 inc (36)
Round 9-20 :
72 sc (12 rounds)
— Lower skirt (white) :
Info :
Go back to the 7th round, work into back loops only
Round 1 :
(5 sc, inc) x 3 times (21)
Round 2-5 :
in the round 21 sc (4 rounds)
Round 6 :
(6 sc, inc) x 3 times (24)
Round 7-13 :
in the round 24 sc (7 rounds)
Round 14 :
crochet a round to decorate, (ch1, sc) x 24 times
— Front legs :
Info :
Work in grey yarn color
Round 1 :
Start 6sc in a mr
Round 2 :
(1 sc, inc) x 3 times (9)
Round 3-4 :
9 sc in the round
Round 5-15 :
change yarn to light blue color and crochet 9 sc in the round (11 rounds)
Info :
Do not stuff the legs
Round 15 :
put together and crochet 4 sc through the loops of both sides. Cut the yarn, leaving a tail to sew.
— Decoration and assembly :
Info :
Fold the ears in half; sew 4 stitches through the loops of both sides. Pin the ears to the head in the 15-16th rounds, sew the ears. Embroider the nose, the eyebrows; sew the eyes (beads). Sew the arms on the border where the head and the body meet.
Item Name (Flower) :
The flower on the dress. 15 ch, start working from the 2nd stitch from hook, 14 inc, between each sc 1 ch, roll the flower into two tiers, in the middle you can sew a bead.
— Frog the finger puppet :
— Head :
Info :
Work in green yarn color
Round 1 :
ch11, start working from the 2nd stitch from hook 9 sc, 3 sc into last stitch, continue into the unused loops on the opposite side of the chain 8 sc, inc (22)
Round 2 :
inc, 8 sc, 3 inc, 8 sc, 2 inc (28)
Round 3 :
1 sc, inc, 8 sc, (1 sc, inc) x 3 times, 8 sc, (1 sc, inc) x2 times (34)
Round 4 :
2 sc, inc, 8 sc, (2 sc, inc) x 3 times, 8 sc, (2 sc, inc) x2 times (40)
Round 5 :
3 sc, inc, 8 sc, (3 sc, inc) x 3 times, 8 sc, (3 sc, inc) x2 times (46)
Round 6-13 :
46 sc (8 rounds)
Round 14 :
3 sc, dec, 8 sc, (3 sc, dec) x3 times, 8 sc, (3 sc, dec) x2 times (40)
Round 15 :
2 sc, dec, 8 sc, (2 sc, dec) x3 times, 8 sc, (2 sc, dec) x2 times (34)
Round 16 :
1 sc, dec, 8 sc, (1 sc, dec) x3 times, 8 sc, (1 sc, dec) x2 times (28)
Round 17 :
dec, 8 sc, 3 dec, 8 sc, 2 dec (22). Stuff.
Round 18 :
dec, 6 sc, 2 dec, 8 sc, dec (18)
Info :
Fasten off, cut the yarn, leaving a tail and sew the opening. Use remained yarn tail.
— Eyes (make 2) :
Round 1 :
Start 6 sc in a mr (6)
Round 3 :
(1 sc, inc) x 6 times (18)
Round 4-6 :
18 sc (3 rounds)
Round 7 :
(1 sc, dec) x 6 times (12)
Round 8 :
6 dec; cut the yarn and hide inside the work.
Info :
Sew the beads to whites; pull the thread a little to place whites deeper inside the eyes
— Eyelid :
Info :
Use green yarn color
Round 1 :
Start 6sc in a mr
Round 3 :
(1 sc, inc) x 6 times (18)
Round 4 :
(2 sc, inc) x 6 times (20)
Round 5-6 :
work in the round 20 sc
Info :
Install whites inside eyelid, sew. Sew the eyes together and sew to the head.
— Dress :
Info :
Work in pink yarn color. 1 Rnd – make 18 stitches on the head.
Round 2-6 :
work in the round 18 sc (5 rounds)
Round 7 :
(5 sc, inc) x 3 times (21)
Round 8-11 :
21 sc (4 rounds)
Round 12 :
(6 sc, inc) x 3 times (24)
Round 13 :
change color to blue, BLO 24 sc
Round 14-19 :
24 sc (6 rounds)
Info :
TIP – crochet in the last round a little bit more to hide the yarn in the leg.
Round 1 (Shirt) :
Return to round 2 of the body, crochet in yellow color through front loops. Hold the toy upside down. 1 Rnd – 18 sc
Round 2 :
(2 sc, inc) x 6 times (24)
Round 3 :
(3 sc, inc) x 6 times (30)
Round 4 :
(4 sc, inc) x 6 times (36)
Round 5-9 :
36 sc (5 rounds)
Round 10 :
(4 sc, dec) x 6 times (30)
Round 11 :
(3 sc, dec) x 6 times (24). Stuff the tummy slightly.
Round 12 :
crochet through stitches on the shirt and front loops of round 13 of the body: 24 sc
Round 13 :
(1 sc, inc) x 12 times (36)
Round 15 :
change color to red, 35 sc, 1 sl st, fasten off, do not cut the yarn, pull it to round 13 and crochet the belt with sl st. Cut the yarn, weave in the yarn end in the shirt. Embroider a collar on the shirt in red color.
— Front legs (make 2) :
Round 1 :
Start 6sc in a mr
Round 3-5 :
work in the round 12 sc (3 rounds)
Round 6 :
(2 sc, dec) x 3 times (9)
Round 7-15 :
change yarn to pink color and crochet 9 sc in the round (9 rounds). Add some stuffing inside the hands.
Round 16 :
put together and crochet 4 sc through the loops of both sides. Cut the yarn, leaving a tail to sew.
Info :
Decoration and assembly: Embroider the mouth and the nostrils. Sew front legs. Also I recommend you to sew a bow.
— Bunny :
— Head :
Info :
Work in white yarn color
Round 1 :
Start 6 sc in a MR
Round 3 :
(1 sc, inc) x 6 times (18)
Round 4 :
(2 sc, inc) x 6 times (24)
Round 5 :
(3 sc, inc) x 6 times (30)
Round 6 :
(4 sc, inc) x 6 times (36)
Round 7 :
(5 sc, inc) x 6 times (42)
Round 8 :
(6 sc, inc) x 6 times (48)
Round 9-16 :
48 sc (8 rounds)
Round 17 :
(6 sc, dec) x 6 times (42)
Round 18 :
(5 sc, dec) x 6 times (36)
Round 19 :
(4 sc, dec) x 6 times (30)
Round 20 :
(3 sc, dec) x 6 times (24). Stuff
Round 21 :
(2 sc, dec) x 6 times (18)
Round 22 :
BLO (1 sc, dec) x 6 times (12)
Round 23 :
6 dec, tighten the hole and weave in the yarn ends.
— Body (bunny) :
Round 1 :
in red color through front loops of round 21 of the head, 18 sc
Round 3 :
change color to white, BLO 18 sc
Round 4-6 :
18 sc (3 rounds)
Round 7 :
(5 sc, inc) x 3 times (21)
Round 8-11 :
21 sc (4 rounds)
Round 12 :
(6 sc, inc) x 3 times (24)
Round 13 :
change color to blue, BLO 24 sc
Round 14-19 :
24 sc (5 rounds)
Round 20 :
20 Rnd - (ch 1, sl st) x 24 times
— Shirt (bunny) :
Round 1 :
Return to round 2 of the body, crochet in yellow color through front loops. Hold the toy upside down. 1 Rnd – 18 sc
Round 2 :
(2 sc, inc) x 6 times (24)
Round 3 :
(3 sc, inc) x 6 times (30)
Round 4 :
(4 sc, inc) x 6 times (36)
Round 5-9 :
36 sc (5 rounds)
Round 10 :
(4 sc, dec) x 6 times (30)
Round 11 :
(3 sc, dec) x 6 times (24). Stuff the tummy slightly.
Round 12 :
crochet through stitches on the shirt and front loops of round 13 of the body: 24 sc
Round 13 :
(1 sc, inc) x 12 times (36)
Round 15 :
change color to red, 35 sc, 1 sl st, fasten off, do not cut the yarn, pull it to round 13 and crochet the belt with sl st. Cut the yarn, weave in the yarn end in the shirt. Embroider a collar on the shirt in red color.
— Arms (2 pcs.) :
Info :
Work in white yarn color
Round 1 :
Start 6 sc in a MR
Round 3-5 :
12 sc (3 rounds)
Round 6 :
(2 sc, dec) x 3 times (9)
Round 7-15 :
change color to yellow, 9 sc (9 rounds). Stuff the palms slightly.
Round 16 :
fold the arm in half and crochet 4 sc through both sides. Cut the yarn, leaving a long tail for sewing.
— Legs :
Info :
Work in white yarn color
Round 1 :
Start 6 sc in a MR
Round 3-4 :
12 sc (2 rounds)
Round 5 :
fold the arm in half and crochet 6 sc through both sides. Cut the yarn, leaving a long tail for sewing.
— Ears (2 pcs.) :
Info :
Crochet in white color.
Round 1 :
Start 6 sc in a MR
Round 2 :
(1 sc, inc) x 3 times (9)
Round 4 :
(2 sc, inc) x 3 times (12)
Round 5 :
(3 sc, inc) x 3 times (15)
Round 6 :
(4 sc, inc) x 3 times (18)
Round 7 :
(5 sc, inc) x 3 times (21)
Round 8-10 :
21 sc (3 rounds)
Round 11 :
(5 sc, dec) x 3 times (18)
Round 12 :
(4 sc, dec) x 3 times (15)
Round 13 :
(3 sc, dec) x 3 times (12)
Round 14-15 :
12 sc. Cut the yarn, leaving a long tail for sewing.
— Assembly and decoration (bunny) :
Info :
Sew on the legs. Sew the arms approximately to round 2 of the shirt. Place the ears on the head as you like more, sew them on. Sew on eyes, inserting the needle at the back between the stitches. Fix the eyes and exit the needle through the starting point. Tie a knot, pulling tightly. The eyes should drown a little. Next, embroider a mouth and eyebrows. You can apply blush with pastel pencils or shadows.
— Fox :
— Head :
Info :
Work in orange yarn color
Round 1 :
Start 6 sc in a MR
Round 3 :
(1 sc, inc) x 6 times (18)
Round 4 :
(2 sc, inc) x 6 times (24)
Round 5 :
(3 sc, inc) x 6 times (30)
Round 6 :
(4 sc, inc) x 6 times (36)
Round 7 :
(5 sc, inc) x 6 times (42)
Round 8-12 :
42 sc (5 rounds)
Round 13 :
(6 sc, inc) x 6 times (48)
Info :
Change color to white.
Round 14-16 :
48 sc (3 rounds)
Round 17 :
(6 sc, dec) x 6 times (42)
Round 18 :
(5 sc, dec) x 6 times (36)
Round 19 :
(4 sc, dec) x 6 times (30)
Round 20 :
(3 sc, dec) x 6 times (24). Stuff
Round 21 :
(2 sc, dec) x 6 times (18)
Round 22 :
BLO (1 sc, dec) x 6 times (12)
Round 23 :
6 dec, tighten the hole and weave in the yarn ends.
— Muzzle :
Round 1 :
Start 6sc in a MR (orange yarn color)
Info :
Now work in orange and white colors.
Round 2 :
3 inc orange yarn color, 3 inc white yarn color (12)
Round 3-4 :
6 sc orange yarn color, 6 sc white yarn color (12)
Info :
It may help to close last loop of color changing in new yarn color. As a result, color changing looks neat.
Round 5 :
(3 sc, inc, 2 sc) orange yarn color, (2 sc, inc, 2 sc, inc) white yarn color (15)
Round 6-7 :
7 sc orange yarn color, 8 sc white yarn color (15)
Info :
Cut the yarn, leaving a long tail for sewing. Stuff.
— Ears (fox) :
Info :
Crochet in orange color
Round 1 :
Start 6 sc in a MR
Round 3 :
(1 sc, inc) x 3 times (9)
Round 4 :
(2 sc, inc) x 3 times (12)
Round 5-9 :
(continue shaping to create ear shape) Cut the yarn, leaving a long tail for sewing. Do not stuff.
— Arms (fox) :
Info :
Crochet in orange color.
Round 1 :
Start 6 sc in a MR
Round 3-5 :
12 sc (3 rounds)
Round 6 :
(2 sc, dec) x 3 times (9)
Round 7-15 :
change color to white, 9 sc (9 rounds). Stuff the palms slightly.
Round 16 :
fold the arm in half and crochet 4 sc through both sides. Cut the yarn, leaving a long tail for sewing.
This Teremok finger puppet set brings tiny storybook charm to your hands, perfect for little plays and big imaginations. Each character is designed to be compact, colorful and full of personality — a delightful project for intermediate crocheters. Make a full set to tell the Teremok tale or mix and match colors for your own cast of characters. 🧶✨🐭