🧢 Beautiful ✨ Detailed πŸ’ Adorable

Field of Daisies Crochet Blanket Pattern

Field of Daisies Crochet Blanket Pattern
4.7β˜… Rating
12-15 Hours Time Needed
3.4K Made This
βœ‚οΈ

Beginner Friendly Level

Perfect for those just starting their crochet journey, with clear instructions and simple techniques

⏱️

Multi-Day Project

A rewarding 12+ hour journeyβ€”perfect for dedicated crafters who love detailed work.

πŸ€—

Soft Hug

Gentle, plush, and full of warmth, creating a sense of comfort and coziness wherever they find a home.

About This Field of Daisies Crochet Blanket Pattern

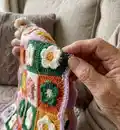
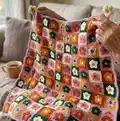
This pattern creates a full-size Field of Daisies crochet blanket made from 120 colorful flower motifs joined together. The design features simple round motifs forming daisy flowers with a three-colour scheme per motif and a neat edged border. It includes detailed motif rounds, edging instructions, an assembly diagram, and corner flower pompoms for a fun finishing touch.

Field of Daisies Crochet Blanket Pattern crochet pattern - detailed view of completed project

Worked in Red Heart Super Saver yarn, this blanket is lightweight yet warm and showcases striking color contrasts. You will make multiple motifs in prescribed color combinations and sew them together through the back loops only following the assembly diagram.

Why You'll Love This Field of Daisies Crochet Blanket Pattern

I absolutely love this pattern because the daisy motifs are cheerful and addictive to crochet, making progress feel fast and satisfying. I enjoy the color planning β€” swapping the six color groupings creates such a playful overall layout that looks like a garden of squares. The construction is straightforward, so I can relax while stitching, yet the finished result looks impressively intricate. The corner flower pompoms add a delightful handmade flourish I always get compliments on.

Field of Daisies Crochet Blanket Pattern step 1 - construction progress Field of Daisies Crochet Blanket Pattern step 2 - assembly progress Field of Daisies Crochet Blanket Pattern step 3 - details and accessories Field of Daisies Crochet Blanket Pattern step 4 - final assembly and finishing

Switch Things Up

I love customizing this blanket by switching the color placements for a totally different look; try reversing the color roles so each motif has a new focal color.

I often change the contrast colors to pastels for a soft baby blanket or to jewel tones for a richer, autumnal look.

I sometimes use a sport or DK weight yarn and a smaller hook to make mini motifs for a lap throw; adjust the gauge and layout accordingly.

I like to replace the corner flower pompoms with tassels or simple crocheted leaves for a subtler finish depending on the room decor.

I also experiment with adding an extra round of contrasting color around each motif before joining to create a mosaic look and more separation between squares.

I recommend trying single-color motifs in a gradient arrangement for a modern ombre blanket that still uses the same motif rounds.

I occasionally add a soft lining or backing for extra warmth and a neater interior finish when gifting to someone who wants a cozy throw.

I will often embroider tiny centers or add a button in the motif center for a playful texture detail that dresses up the flowers.

I advise blocking motifs lightly to even out stitch tension before assembly if you want a very flat, grid-like finished piece.

I sometimes replace the final scalloped edging with a simple ribbed border or add two rounds of single crochet in a neutral color for a cleaner modern edge.

Common Mistakes & How to Fix Them

βœ— Skipping the instruction to join motifs through the back loops only; sew through the back loops only to match the assembly diagram and keep the front motif faces unobstructed. βœ— Forgetting to break Color 1 after joining Color 2 on motifs; break Color 1 when instructed to avoid extra strands and keep your motif tidy. βœ— Counting ch at beginning of rounds incorrectly; remember that ch 2 at the beginning of a round does not count as a stitch and ch 3 at the beginning of a round counts as a dc. βœ— Overstuffing the Flower Pompoms which can distort the petals; stuff lightly before completing the 5th petal to maintain a flat floral appearance.

Field of Daisies Crochet Blanket Pattern

Make a bright, cheerful Field of Daisies Crochet Blanket with colorful daisy motifs joined together to create a cozy, eye-catching throw. This pattern uses simple motif rounds and easy joining techniques so you can work at your own pace while enjoying bold color play. Perfect for gifting or adding a floral accent to your home, the finished blanket is warm, playful, and totally handmade.

Beginner Friendly 12-15 Hours

Materials Needed for Field of Daisies Crochet Blanket Pattern

β€” Main Fabric

  • 01
    Red Heart Super Saver (7 oz/198 g; 364 yds/333 m) main yarn base
  • 02
    Contrast A Carrot (0256) - 2 balls or 545 yds/498.5 m
  • 03
    Contrast B Gold (0321) - 2 balls or 545 yds/498.5 m
  • 04
    Contrast C Paddy Green (0368) - 2 balls or 545 yds/498.5 m
  • 05
    Contrast D Pale Plum (0579) - 2 balls or 665 yds/608 m
  • 06
    Contrast E Soft White (0316) - 2 balls or 620 yds/567 m
  • 07
    Contrast F Light Raspberry (0774) - 2 balls or 545 yds/498.5 m

β€” Tools Required

  • 01
    Size U.S. H/8 (5 mm) Susan Bates Silvalume crochet hook or size needed to obtain gauge
  • 02
    Susan Bates yarn needle
  • 03
    Fiberfill stuffing for corner Flower Pompoms

Progress Tracker

0% Complete

β€” Motifs :

Info :

See Diagram. With Color 1, ch 4. Join with sl st to first ch to form ring.

Round 1 :

Ch 3. 9 dc in ring. Join Color 2 with sl st to top of beg ch 3. Break Color 1. 10 dc.

Round 2 :

With Color 2, ch 3. 1 dc in first dc. *2 dc in next dc. Rep from* around. Join with sl st to beg of ch 3. 20 dc.

Round 3 :

Skip first dc. *(1 dc. 1 tr) in next dc. 3 tr in next dc. (1 tr. 1 dc) in next dc. Sl st in next dc. Rep from * around, ending by joining with sl st to top of ch-3. Fasten off.

Round 4 :

Join Color 3 with sl st to any centre tr of 3-tr group. Ch 1. 1 sc in same sp as sl st. *1 hdc in next tr. 1 dc in each of next 2 sts. 1 tr in same st as sl st from previous (3rd) rnd. 1 dc in each of next 2 sts. 1 hdc next tr. 1 sc in next tr. Rep from * around, omitting last sc and joining with sl st to first sc.

Round 5 :

Ch 1. 1 sc in same sp as sl st. *1 hdc in next tr. 1 dc in next st. 2 dc in next st. (1 tr. Ch 1. 1 tr) in next st (corner made). 2 dc in next st. 1 dc in next st. 1 hdc in next tr. 1 sc in each of next 3 sts. Rep from * around, ending with 1 sc in each of last 2 sts. Join with sl st to first sc. Fasten off.

Infos :

Motif 1: With A as Color 1, F as Color 2, and E as Color 3 - make 20 Motifs. Motif 2: With B as Color 1, E as Color 2, and C as Color 3 - make 20 Motifs. Motif 3: With C as Color 1, D as Color 2, and B as Color 3 - make 20 Motifs. Motif 4: With D as Color 1, C as Color 2, and F as Color 3 - make 20 Motifs. Motif 5: With E as Color 1, B as Color 2, and A as Color 3 - make 20 Motifs. Motif 6: With F as Color 1, A as Color 2, and D as Color 3 - make 20 Motifs.

Infos :

Notes: Ch 2 at beg of rnd does not count as st. Ch 3 at beg of rnd counts as dc.

β€” Flower "POMPOMS" :

Info :

FLOWER "POMPOMS" (make 4) Flowers (make 2 for each Pompom)

Info :

With B, ch 4. Join with sl st to first ch to form ring.

Round 1 :

Ch 3. 9 dc in ring. Join E with sl st to top of beg ch 3. Break B. 10 dc.

Round 2 :

With Color 2, ch 3. 1 dc in first dc. *2 dc in next dc. Rep from* around. Join with sl st to beg of ch 3. 20 dc.

Round 3 :

Skip first dc. *(1 dc. 1 tr) in next dc. 3 tr in next dc. (1 tr. 1 dc) in next dc. Sl st in next dc. Rep from * around, ending by joining with sl st to top of ch-3. Fasten off.

β€” Assembly :

Info :

Sew Motifs tog through back loops only as shown in Assembly diagram on page 3.

β€” Edging :

Info :

1st rnd (RS). Join D with sl st to any corner. Ch 2. Work 1 rnd of hdc evenly around all sides, working 3 hdc in each corner. Join with sl st to first hdc.

Round 2 :

Ch 2. 1 hdc in each hdc around, working 3 hdc in each corner hdc. Join with sl st to first hdc. Fasten off.

Round 3 :

Skip first dc. *(1 dc. 1 tr) in next dc. 3 tr in next dc. (1 tr. 1 dc) in next dc. Sl st in next dc. Rep from * around, ending by joining with sl st to top of ch-3. Fasten off.

β€” Flower Pompom Assembly :

Info :

With 2 Flowers held WS tog, join with sl st anywhere around edge.

Round 1 :

Working through both thicknesses and back loops only, sl st around Flowers, stuffing lightly before completing 5th petal. Fasten off.

Info :

Sew one Flower Pompom to each corner of Blanket.

Assembly Instructions

  • Sew motifs together through the back loops only, following the Assembly Diagram on page 3 to achieve the pictured color layout and seam appearance.
  • Join the edging by joining Color D with sl st to any corner, ch 2 and work one round of hdc evenly around all sides, working 3 hdc in each corner; join with sl st to first hdc.
  • Work the second round of edging: ch 2, 1 hdc in each hdc around, making 3 hdc in each corner; join with sl st to first hdc and fasten off.
  • Make 4 Flower Pompoms by making 2 Flowers for each Pompom, join two Flowers WS together with sl st around the edges working through both thicknesses and back loops only, stuff lightly before completing the 5th petal and fasten off.
  • Sew one Flower Pompom to each corner of the blanket securely, using the yarn tail to stitch through both layers and weave in ends neatly.

Important Notes

  • πŸ’‘Work motifs using the three-color scheme provided and follow the assembly diagram to place motifs in the correct order and orientation.
  • πŸ’‘Use consistent tension and the recommended hook size to obtain the gauge of 12 sc and 15 rows = 4" [10 cm] and motif = 5Β½" [14 cm] square.
  • πŸ’‘Sew motifs through back loops only as instructed to create the raised daisy fronts and a neat joining seam.
  • πŸ’‘When assembling Flower Pompoms, stuff lightly before finishing the last petal to avoid over-bulking and maintain petal shape.

This Field of Daisies blanket brings a bright burst of handmade color to any room, with easy-to-follow motifs and a playful corner pompom finish. 🌼🌸 The rectangular layout and clean edging make it a cozy, wearable throw that doubles as decor and a treasured gift. Enjoy each motif as a small, meditative project and watch the floral field grow. 🧢✨

You ask,

we answer.

FAQs

What size will the finished piece be?

The finished blanket measures approximately 57" x 68" [145 x 173 cm] when motifs are made to gauge and assembled as shown.

Can I use a different yarn weight for this pattern?

Yes, you can use a different yarn weight, but this will change the final size. If using a different weight, adjust your hook size and make a gauge swatch to match the provided gauge.

Do I need to be experienced to make this blanket?

This pattern is rated beginner friendly and uses basic stitches (dc, tr, hdc, sc) but requires making many motifs and sewing them together, so basic motif and joining experience is helpful.

How long will it take to complete the blanket?

Most crocheters complete this project over multiple days β€” estimated at 12-15 hours total, depending on experience and assembly time.

How are the motifs joined together?

Motifs are sewn together through the back loops only; follow the Assembly Diagram on page 3 for the correct layout and sewing order.