๐Ÿงถ Beautiful โœจ Detailed ๐Ÿ’ Adorable

Elephant Amigurumi Pattern

Elephant Amigurumi Pattern
4.5โ˜… Rating
5-7 Hours Time Needed
3.1K Made This
โœ‚๏ธ

Intermediate Level

Ideal for those with basic crochet experience, featuring slightly more advanced stitches and techniques to expand your skills.

โฑ๏ธ

Weekend Treat

Takes 5-7 hours, making it an enjoyable project to finish over a couple of days.

๐Ÿงธ

Cute Companion

An adorable friend to cherish, handcrafted with love to bring comfort and joy for years to come.

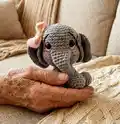
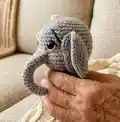
About This Elephant Amigurumi Pattern

This pattern teaches you how to crochet a small elephant amigurumi (approx. 10cm) using basic amigurumi techniques. You will make the head and body in one piece, then crochet the trunk, ears, legs, arms, tail and a pretty ribbon. Photo guidance and clear stitch counts are included to help you assemble and finish the toy with a professional look.

Elephant Amigurumi Pattern crochet pattern - detailed view of completed project

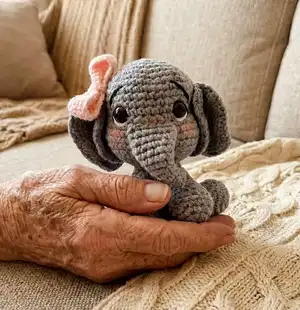
Perfect for small gift projects and collectors, this pattern uses simple shaping and embroidery for personality. Detailed finishing tips are provided to help you place the eyes, shape the face and add blush.

Why You'll Love This Elephant Amigurumi Pattern

I absolutely love this pattern because it balances simplicity with adorable detail โ€” the trunk and expressive eyebrows give so much personality. I enjoy how the head and body are worked together for a seamless look, which makes assembly quicker and neater. The pattern is perfect for experimenting with little accessories like the ribbon and blush. It always feels rewarding to finish a tiny friend that looks polished and photogenic.

Elephant Amigurumi Pattern step 1 - construction progress Elephant Amigurumi Pattern step 2 - assembly progress Elephant Amigurumi Pattern step 3 - details and accessories Elephant Amigurumi Pattern step 4 - final assembly and finishing

Switch Things Up

I love how easy it is to customize this elephant by changing yarn colors; try pastel greys or soft beige for a different look.

If you want a larger elephant, I often use a thicker yarn and a bigger hook โ€” it makes a cuddly, chunkier version that's perfect for toddlers.

I sometimes swap the plastic eyes for embroidered eyes or safety eyes of another size to change the character's expression.

For a different style, add small crochet accessories like a scarf, tiny hat, or a crocheted flower on the head.

You can embroider additional facial details or freckles to personalize each elephant's expression and personality.

Try using fuzzy or boucle yarn for a textured, plush finish; just use a slightly larger hook and be gentle while stuffing so the texture stays even.

I often add thin wire inside the trunk or limbs for a poseable version that holds a playful curve.

Make a set in coordinated colors โ€” one small and one medium โ€” to create a parent-and-baby duo as a gift set.

Change the ribbon color or make a tiny removable bow with a snap for interchangeable outfits and seasonal looks.

I find adding a tiny bell or charm under the ribbon makes a lovely finishing touch for a gift; secure it well so it is safe for the recipient.

Common Mistakes & How to Fix Them

โœ— Not using a stitch marker every round can lead to accidental increases and lost counts; place a marker at the start of each round and move it as you work to maintain accurate stitch counts. โœ— Forgetting to stuff gradually can create lumps and uneven shaping; stuff little by little, especially when forming the head and body, to keep a smooth, even surface. โœ— Closing the magic ring too tightly can make sewing and stuffing difficult later; leave a small tail or adjust the ring so you can flatten and shape the piece properly before finishing. โœ— Skipping the recommendation to leave long yarn tails for sewing will make assembly harder; always leave a long tail on ears, trunk, legs and arms so you can stitch them securely without reattaching yarn.

Elephant Amigurumi Pattern

Make a tiny, adorable elephant amigurumi with this detailed crochet pattern. You'll be guided step-by-step through each part โ€” head, body, trunk, ears, legs, arms, tail and a cute ribbon. The pattern includes clear stitch counts, assembly tips and photo references so you can finish a charming 10cm elephant that is perfect for gifting or collecting.

Intermediate 5-7 Hours

Materials Needed for Elephant Amigurumi Pattern

โ€” Main Fabric

  • 01
    Cotton or wool thread: Grey (main color)
  • 02
    Cotton or wool thread: White (for small details)
  • 03
    Cotton or wool thread: Black (for eyebrow/eye embroidery)
  • 04
    Cotton or wool thread: Pink (for ribbon and blush accents)
  • 05
    Fiberfill or padding of your choice for stuffing

โ€” Tools Required

  • 01
    Crochet hook no. 2.5mm
  • 02
    Wool/yarn needle for sewing and embroidery
  • 03
    Plastic eyes N6 (size 10)
  • 04
    Scissors
  • 05
    Stitch markers
  • 06
    Polyester stuffing / fiberfill
  • 07
    Pins for assembly and positioning pieces
  • 08
    Small paintbrush or makeup for applying blush (optional)

Progress Tracker

0% Complete

โ€” HEAD + BODY :

Info :

weave spiral

Round 1 :

Magic ring 6sc (6)

Round 2 :

1inc at all stitches (12)

Round 3 :

(1sc, 1inc) x6 (18)

Round 4 :

(2sc, 1inc) x6 (24)

Round 5 :

(3sc, 1inc) x6 (30)

Round 6 :

(4sc, 1inc) x6 (36)

Round 7-11 :

36sc (36)

Round 12 :

9sc, (1inc) x3, 3sc, 6ch (leave 6 free stitches), 3sc, (1inc) x3, 9sc (42)

Round 13-15 :

42sc (42)

Round 16 :

(5sc, 1dec) x6 (36)

Info :

Place eyes in Round N610, on the sides of the opening made.

Round 17 :

(4sc, 1dec) x6 (30)

Round 18 :

(3sc, 1dec) x6 (24)

Round 19 :

(2sc, 1dec) x6 (18). Fill

Round 20 :

(1sc, 1dec) x6 (12)

Round 21 :

(1sc, 1inc) x6 (18)

Round 22 :

(2sc, 1inc) x6 (24)

Round 23-28 :

24sc (24)

Round 29 :

(2sc, 1dec) x6 (18). Fill

Round 30 :

(1sc, 1dec) x6 (12)

Round 31 :

(1dec) x6 (6). Fasten off

โ€” TRUNK :

Round 1 :

Magic ring 4sc (4)

Round 2 :

(1sc, 1inc) x2 (6)

Round 3 :

6sc (6)

Round 4 :

(2sc, 1inc) x2 (8)

Round 5 :

8sc (8)

Round 6 :

(3sc, 1inc) x2 (10)

Round 7 :

10sc (10)

Round 8 :

(4sc, 1inc) x2 (12). Do not fill

Info :

Leave a long yarn for sewing

Info :

Join the edge of the trunk as shown in the images.

Info :

Join the trunk to the face in the opening that we left previously.

Info :

Embroider the eyes and eyebrows as shown in the images.

Info :

Shape the face as shown in the images.

โ€” EARS (x2) :

Round 1 :

Magic ring 6sc (6)

Round 2 :

1inc at all stitches (12)

Round 3 :

(1sc, 1inc) x6 (18)

Round 4 :

(2sc, 1inc) x6 (24)

Round 5 :

(3sc, 1inc) x6 (30)

Round 6 :

(1dec) x2, 1sc, (3sc in the same stitch) x22, 1sc, (1dec) x2 (66)

Info :

Leave a long yarn for sewing

Info :

Pin the top to shape the ear, then pin the ears to the head

โ€” LEGS (x2) :

Round 1 :

Magic ring 6sc (6)

Round 2 :

1inc at all stitches (12)

Round 3 :

(1sc, 1inc) x6 (18)

Round 4 :

Taking the back chain: 18sc (18)

Round 5 :

(1sc, 1dec) x6 (12). Fill

Round 6 :

(1dec) x6 (6)

Round 7 :

6sc (6)

Info :

Leave a long yarn for sewing.

Info :

Join the legs to the body from Round N625

โ€” ARMS (x2) :

Round 1 :

Magic ring 6sc (6)

Round 2 :

1inc at all stitches (12)

Round 3 :

(1sc, 1inc) x6 (18)

Round 4 :

Taking the back chain: 18sc (18)

Round 5 :

(1sc, 1dec) x6 (12). Fill

Round 6 :

(2sc, 1dec) x3 (9)

Round 7 :

9sc (9)

Round 8 :

(1sc, 1dec) x3 (6)

Round 9 :

6sc (6)

Info :

Leave a long yarn for sewing.

Info :

Join the arms to the body from Round N621

โ€” TAIL :

Round 1 :

8ch

Round 2 :

8st

Info :

Attach the tail to the body

โ€” RIBBON :

Round 1 :

Ring of 26ch

Round 2 :

26sc (26)

Round 3-5 :

26sc (26)

Round 6 :

8ch

Info :

Shape the ribbon by joining the last chain with the first chain as shown in the images.

Info :

Apply blush on the cheeks and on the trunk as seen in the images.

Info :

Join the ribbon to the head.

Info :

You already have your Elephant finished! Thanks for your purchase! If you have any questions or concerns, please email ternuraamigurumi@hotmail.com, on Etsy or Ravelry. I will contact you as soon as possible. Please share your finished Elephant with me! I love seeing the finished projects!

Assembly Instructions

  • Join the trunk to the face by inserting and sewing it into the opening left at Round 12, securing evenly around the edge so the trunk sits centered on the face.
  • Position and sew the ears to the head, pinning the top to shape each ear first so they curve naturally; sew with the long yarn tail left for each ear.
  • Attach the legs to the body starting from Round N625, spacing them evenly so the elephant sits balanced and stitch securely through the body rounds.
  • Sew the arms to the body from Round N621, positioning them slightly forward for a natural pose and securing with strong stitches.
  • Attach the tail to the lower back of the body using the tail chain ends and secure tightly so it does not come loose.
  • Place plastic eyes in Round N610 as instructed, embroider eyebrows and add blush to cheeks and trunk, following the photo steps for placement and shaping.

Important Notes

  • ๐Ÿ’กUse stitch markers to keep track of the first stitch of every round and to mark placement points for eyes and attachments.
  • ๐Ÿ’กStuff firmly but gradually to maintain smooth shaping; overstuffing can distort facial features and limb joins.
  • ๐Ÿ’กLeave long yarn tails on ears, trunk, legs and arms for sewing to avoid reattaching yarn and to make assembly easier.
  • ๐Ÿ’กPlace safety/plastic eyes and embroider details before final stuffing and closing to ensure correct positioning and secure attachment.

This sweet little elephant pattern is designed to be a charming keepsake you can finish in a weekend. It combines easy shaping with personality-packed details like the trunk and expressive eyebrows. Make one for yourself or as a handmade gift to brighten someones day. ๐Ÿ˜๐Ÿงถ

You ask,

we answer.

FAQs

What size will the finished piece be?

The finished amigurumi measures approximately 10 cm tall when using the recommended yarn and 2.5 mm hook.

Can I use different yarn weights for this pattern?

Yes, you can use different yarn weights, but the final size will change; use a larger hook for bulkier yarn or a smaller hook for finer yarn and adjust stuffing accordingly.

Do I need prior crochet experience for this pattern?

This pattern is rated intermediate, so basic knowledge of single crochet, increases, decreases and sewing pieces together is recommended.

How long does this project typically take to complete?

Most crocheters complete this project in 5-7 hours, though time may vary depending on experience and how much time you spend on assembly and finishing.