🧢 Beautiful ✨ Detailed πŸ’ Adorable

Amigurumi Holiday Lights Amigurumi Pattern

Amigurumi Holiday Lights Amigurumi Pattern
4.0β˜… Rating
2-3 Hours Time Needed
1.3K Made This
βœ‚οΈ

Beginner Friendly Level

Perfect for those just starting their crochet journey, with clear instructions and simple techniques

⏱️

Bite-Sized Project

Finishes in 2-4 hoursβ€”perfect for an afternoon of creative relaxation.

🎁

Tiny Treasure

Small, sweet, and gift-worthy creations that fit perfectly in the palm of your hand with detailed charm.

About This Amigurumi Holiday Lights Amigurumi Pattern

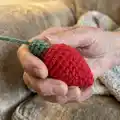
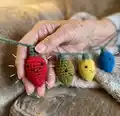
This pattern teaches you how to crochet small amigurumi bulbs that string together into a festive holiday garland. Each bulb is made in a single piece using basic single crochet, increases and decreases. You can make bulbs in any color combination to match your decor or holiday palette.

Amigurumi Holiday Lights Amigurumi Pattern crochet pattern - detailed view of completed project

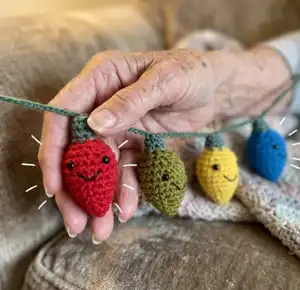
Optional safety eyes and embroidered faces add personality to each bulb. The bulbs are fast to make and easy to string together for an instant seasonal decoration or a thoughtful handmade gift.

Why You'll Love This Amigurumi Holiday Lights Amigurumi Pattern

I absolutely love this pattern because it turns basic crochet techniques into a delightful mini project that quickly becomes a charming decoration. I enjoy how fast each bulb works upβ€”you can make a whole garland in an afternoon. The simplicity makes it perfect for customizing colors and faces, and I love seeing how different yarns change the finished look. Making these bulbs is a joyful way to use leftover yarn and create something that brightens a room.

Amigurumi Holiday Lights Amigurumi Pattern step 1 - construction progress Amigurumi Holiday Lights Amigurumi Pattern step 2 - assembly progress Amigurumi Holiday Lights Amigurumi Pattern step 3 - details and accessories Amigurumi Holiday Lights Amigurumi Pattern step 4 - final assembly and finishing

Switch Things Up

I like to change the palette to suit different holidays; try pastels for spring or metallic yarns for a more glamorous look.

I sometimes use a thinner yarn and smaller hook to create mini keychain bulbs that make great gifts.

If I want a bolder, chunkier garland I switch to bulky yarn with a larger hook and those bulbs become very cuddly and decorative.

I often embroider small expressions or add tiny felt shapes to the bulb for personalized characters and more personality.

Try using safety eyes for an instant cute face, but for toys intended for children I always embroider faces instead for safety.

I also experiment with variegated yarns so each bulb gets a subtle color shift without changing yarns between bulbs.

To make a longer strand I chain a base with a stronger yarn and either sew or slip-stitch bulbs onto that chain at my chosen spacing.

For a more rustic look I use natural fiber yarns and muted tones then add twine loops for hanging instead of a crocheted chain.

I sometimes add a tiny loop to the top of each bulb so they can be hung individually as ornaments on a small tree.

Don't be afraid to combine techniques like beading, embroidery, or small crocheted leaves to turn bulbs into miniature motifs with extra charm.

Common Mistakes & How to Fix Them

βœ— Not counting stitches after increases and decreases leads to incorrect stitch counts; count at the end of each row to confirm the total. βœ— Adding too much stuffing before shaping causes lumps and distorted bulb shapes; stuff gradually and adjust as you close the piece. βœ— Placing safety eyes too close to the bottom looks awkward and can be unsafe for small children; attach eyes near the center-top of the bulb before finishing and secure tightly. βœ— Switching yarn colors without weaving in ends neatly creates messy joins; break yarn and weave in ends or carry color if preferred for a cleaner finish.

Amigurumi Holiday Lights Amigurumi Pattern

Create a string of adorable crochet holiday light bulbs to decorate your home or give as handmade gifts. This compact amigurumi pattern uses simple single crochet shaping so you can make a colorful garland in small bursts of time. Perfect for practicing increases and decreases while making charming, giftable bulbs you will love to display.

Beginner Friendly 2-3 Hours

Materials Needed for Amigurumi Holiday Lights Amigurumi Pattern

β€” Main Fabric

  • 01
    Worsted weight yarn (#4) in desired colors - small amounts per bulb (approx 10-25g each color depending on how many bulbs you make)
  • 02
    Green worsted weight yarn for caps/chain - small amount (approx 10-20g)
  • 03
    Polyfil stuffing for filling bulbs (small bag)

β€” Tools Required

  • 01
    Crochet hook size G (4.0 mm)
  • 02
    Worsted weight yarn in desired colors
  • 03
    Polyfil stuffing
  • 04
    Needle (yarn needle) for weaving ends and embroidery
  • 05
    Safety eyes (optional)
  • 06
    Black embroidery thread (optional) for facial details
  • 07
    Scissors

Progress Tracker

0% Complete

β€” Bulb :

Info :

Make a 3 stitch magic ring

Round 1 :

Inc around (6)

Round 2 :

*sc 2, inc 1. Repeat from * (8)

Round 3 :

*sc 1, inc 1. Repeat from * (12)

Round 4 :

*sc 2, inc 1. Repeat from * (16)

Round 5 :

*sc 3, inc 1. Repeat from * (20)

Round 6-8 :

sc around (20)

Round 9 :

*sc 3, dec 1. Repeat from * (16)

Round 10 :

*sc 2, dec 1. Repeat from * (12)

Info :

Attach safety eyes if desired. Stuff with Polyfil.

Round 11 :

dec around (6)

Round 12 :

switch to green yarn, sc around (6)

Round 13 :

sc around (6)

Info :

Break off yarn, weave in ends.

Info :

Embroider eyes and mouth if desired.

Info :

To string together bulbs, begin a chain with desired color and chain through the top of a bulb every 10 inches or spaced however far apart you wish.

Info :

Pattern by Jill Watt www.dappertoad.com Ravelry: http://www.ravelry.com/designers/jill-watt Craftsy: http://www.craftsy.com/user/754812/pattern-store

Assembly Instructions

  • Attach safety eyes to each bulb before finishing the top cap, ensuring they are centered on the bulb body and secured according to the safety eye instructions.
  • Stuff bulbs firmly but evenly through the opening before completing Round 11 so the shape remains smooth and full, then continue closing.
  • Switch to green yarn for the cap (Round 12) and finish the small top tube; break yarn and weave in ends securely to prevent unraveling.
  • Embroider eyes and a mouth with black embroidery thread if desired, using the photos as a guide for spacing and expression.
  • String bulbs onto a crocheted chain by chaining the desired length and slipping or sewing through the top of each bulb every ~10 inches or at your chosen spacing.

Important Notes

  • πŸ’‘Use a stitch marker to mark the start of each round so you maintain the correct stitch counts throughout the bulb shaping.
  • πŸ’‘Stuff little by little and check the shape frequently; overstuffing can distort the tapered bulb shape at the tip.
  • πŸ’‘Weave in ends securely after switching colors to prevent loose tails that could come undone during handling.
  • πŸ’‘Optional safety eyes should be used with caution for items intended for small children; embroider faces for child-safe toys.

These cheerful amigurumi holiday lights are a quick and delightful way to add handmade charm to any room for the season. Mix and match colors to create a garland that matches your style or decorate gifts with single bulbs for a personal touch. Make several as a set or string a whole strand for a festive display. πŸŽ„πŸ§Ά

You ask,

we answer.

FAQs

What size will the finished piece be?

Each finished bulb measures approximately 3-4 cm wide and 5-7 cm long depending on yarn tension and hook size.

Can I use different yarn weights for this pattern?

Yes, you can use different yarn weights, but this will affect the final size. Choose an appropriate hook for your yarn and expect larger or smaller bulbs accordingly.

Do I need prior crochet experience for this pattern?

This pattern is rated beginner friendly, so basic knowledge of single crochet, increases and decreases is sufficient to complete the bulbs.

How long does this project typically take to complete?

Most crocheters complete a handful of bulbs and string them into a garland in about 2-3 hours total, though time may vary based on experience and number of bulbs made.