๐Ÿงถ Beautiful โœจ Detailed ๐Ÿ’ Adorable

Duck and Goose Trinket Tray + Pin Cushion Amigurumi Pattern

Duck and Goose Trinket Tray + Pin Cushion Amigurumi Pattern
4.8โ˜… Rating
5-7 Hours Time Needed
1.4K Made This
โœ‚๏ธ

Intermediate Level

Ideal for those with basic crochet experience, featuring slightly more advanced stitches and techniques to expand your skills.

โฑ๏ธ

Weekend Treat

Takes 5-7 hours, making it an enjoyable project to finish over a couple of days.

๐Ÿก

Cozy Accent

A warm touch for your space that transforms ordinary corners into inviting nooks filled with handmade charm.

About This Duck and Goose Trinket Tray + Pin Cushion Amigurumi Pattern

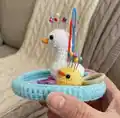
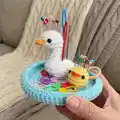
This pattern creates a small trinket tray with two tiny amigurumi friends: a goose and a ducky pin cushion. It combines a flat tray base with small stuffed figures perfect for holding pins and small sewing notions. The design uses continuous rounds and common amigurumi shaping techniques for compact, tidy results.

Duck and Goose Trinket Tray + Pin Cushion Amigurumi Pattern crochet pattern - detailed view of completed project

Detailed round-by-round instructions are included for each piece and the assembly steps are clearly described. Ideal for gifting or adding a playful, handmade accent to your sewing area.

Why You'll Love This Duck and Goose Trinket Tray + Pin Cushion Amigurumi Pattern

I absolutely love this pattern because it turns two simple amigurumi friends into a useful and decorative trinket tray that brightens any workspace. I enjoy the mix of flat tray work and three-dimensional shaping โ€” it keeps the project interesting and rewarding. The pieces are quick to make but full of personality, and I always enjoy choosing color combos for the duck and goose. Sewing the little beaks and placing the eyes brings the characters to life and never fails to make me smile.

Duck and Goose Trinket Tray + Pin Cushion Amigurumi Pattern step 1 - construction progress Duck and Goose Trinket Tray + Pin Cushion Amigurumi Pattern step 2 - assembly progress Duck and Goose Trinket Tray + Pin Cushion Amigurumi Pattern step 3 - details and accessories Duck and Goose Trinket Tray + Pin Cushion Amigurumi Pattern step 4 - final assembly and finishing

Switch Things Up

I love how easy it is to customize the colors for a whole range of looks; try pastel shades for a softer, nursery-friendly set or bright primaries for a playful sewing table accent.

If you want a larger tray, I change yarn weight and hook size โ€” switching to bulky yarn and a larger hook makes a chunkier, more display-friendly tray.

I sometimes add embroidered eyelids or eyebrows to change expressions on the duck and goose, which instantly gives each character a different personality.

Try swapping safety eyes for tiny felt circles or embroidered eyes if you prefer a softer, child-safe finish; felt glued or sewn on works beautifully.

I often experiment with stitch tension to create a firmer or squishier figure; tighter tension gives a neater amigurumi while looser tension is quicker and softer.

Want a functional upgrade? Add a small magnet or weighted base in the tray to keep it stable on busy surfaces โ€” I do this when I plan to hold more pins or small scissors.

I sometimes add tiny crocheted accessories like a scarf, hat, or a little flower to the tray characters to match seasons or holidays for gifting ideas.

For a travel-sized pin cushion, make a mini version using lighter yarn and a smaller hook; I find these make delightful keychain gifts.

If you want posable necks or limbs, I occasionally insert thin craft wire in the neck for shaping โ€” it lets me bend the goose neck into the perfect '2' shape every time.

I recommend testing placement before sewing by pinning the pieces to the tray; I always pin first and photograph the layout so I can reproduce the same arrangement for gifts.

Common Mistakes & How to Fix Them

โœ— Not inserting safety eyes at the recommended rounds can misplace the facial features; insert the safety eyes between the specified rounds (goose: between rounds 4-5, duck: between rounds 3-4) before you continue stuffing. โœ— Overstuffing the small bodies makes sewing and shaping difficult and lumpy; stuff gradually, add small amounts of polyfill, and shape as you go to maintain a smooth form. โœ— Crocheting the tray without using BLO on the rim round will prevent the rim from curving naturally inward; make sure to work the specified BLO round to achieve the correct tray edge. โœ— Skipping stitch counts after increases and decreases leads to uneven pieces; count stitches at the end of each round and check the totals in parentheses to stay accurate.

Duck and Goose Trinket Tray + Pin Cushion Amigurumi Pattern

Make a charming duck and goose trinket tray that doubles as a pin cushion โ€” perfect for your sewing desk or as a cute handmade gift. This pattern guides you through a small trinket base plus two tiny amigurumi characters, with clear round-by-round instructions. Youll enjoy creating a practical and decorative piece that keeps pins tidy and brightens your workspace.

Intermediate 5-7 Hours

Materials Needed for Duck and Goose Trinket Tray + Pin Cushion Amigurumi Pattern

โ€” Main Fabric

  • 01
    Type 4 (worsted) yarn - Color A: base trinket color (blue) - amount not specified
  • 02
    Type 4 (worsted) yarn - Color B: goose color (white) - amount not specified
  • 03
    Type 4 (worsted) yarn - Color C: ducky color (yellow) - amount not specified
  • 04
    Type 4 (worsted) yarn - Color D: color of beak (orange) - amount not specified
  • 05
    Polyfill stuffing for the goose and ducky bodies (amount as needed for small amigurumi)

โ€” Tools Required

  • 01
    Crochet hook size 3.0mm
  • 02
    Type 4 yarn (worsted weight) in the colors listed
  • 03
    Polyfill for stuffing
  • 04
    Darning needle
  • 05
    Scissors
  • 06
    4.0mm safety eyes OR black felt and fabric glue

Progress Tracker

0% Complete

โ€” Base Trinket Tray :

Round 1 :

8 sc into mr (8)

Round 2 :

incr into every st (16)

Round 3 :

(1 sc, 1 incr) x8 (24)

Round 4 :

(2 sc, 1 incr) x8 (32)

Round 5 :

(3 sc, 1 incr) x8 (40)

Round 6 :

(4 sc, 1 incr) x8 (48)

Round 7 :

(5 sc, 1 incr) x8 (56)

Round 8 :

(6 sc, 1 incr) x8 (64)

Round 9 :

BLO sc into every st (64)

Round 10-12 :

sc into every st (64)

Infos :

Slip stitch and fasten off, weave in the tail. The 'neater' side of the trinket should be facing the inside, so that the rims of the tray would naturally curve inwards. The base of your trinket dish is now complete.

โ€” Goose Body :

Round 1 :

6 sc into mr (6)

Round 2 :

incr into every st (12)

Round 3 :

(1 sc, 1 incr) x6 (18)

Round 4-5 :

sc into every st (18)

Info :

You may now insert the safety eyes between rounds 4-5. The safety eyes should be placed along the side of the goose's head. Begin to stuff the goose's body. Continue stuffing as you decrease.

Round 6 :

3 sc, 6 decr, 3 sc (12)

Round 7 :

2 sc, 4 decr, 2 sc (8)

Round 8-10 :

sc into every st (8)

Round 11 :

2 incr, 4 sc, 2 incr (12)

Round 12 :

3 incr, 6 sc, 3 incr (18)

Round 13 :

4 incr, 11 sc, 3 incr (25)

Round 14 :

6 incr, 14 sc, 5 incr (36)

Round 15 :

sc into every st (36)

Round 16 :

12 sc, 6 decr, 12 sc (30)

Round 17 :

9 sc, 6 decr, 9 sc (24)

Round 18 :

6 sc, 6 decr, 6 sc (18)

Round 19 :

3 sc, 6 decr, 3 sc (12)

Info :

Fasten off, leaving a long tail for sewing. You may need to bend the neck of the goose to create a "2" shape.

โ€” Goose beak :

Row 1 :

ch 4 (4)

Row 2 :

sc in the second st from hook. Sc in the last two st (3)

Info :

Fasten off, leaving a tail for sewing.

โ€” Mini Ducky :

Round 1 :

6 sc into mr (6)

Round 2 :

incr into every st (12)

Round 3 :

(3 sc, 1 incr) x3 (15)

Round 4-6 :

sc into every st (15)

Info :

You may now insert the safety eyes between rounds 3-4. Begin to stuff the duck's body. Continue stuffing as you decrease.

Round 7 :

1 sc, 7 dec (8)

Info :

Fasten off, leaving a long tail for sewing

โ€” Assembly :

Info :

Sew the goose's beak between rounds 4-5 of the goose's head. Using the long tail of the goose body, sew the goose onto the base trinket dish at the position you'd like.

Info :

Using yarn color D, sew on a beak between rounds 3-4 of the ducky. Using the long tail of the duck's body, sew it onto the base trinket dish at the position you'd like.

Info :

Congrats !! Your duck and goose trinket tray is now complete :โ€)

Assembly Instructions

  • Sew the goose's beak between rounds 4-5 of the goose's head, aligning the beak to the center of the face before securing with small whipstitches.
  • Using the long tail of the goose body, sew the goose onto the base trinket dish at the position you'd like, making evenly spaced stitches around the base for a secure attachment.
  • Using yarn color D, sew on a beak between rounds 3-4 of the ducky, tucking the beak slightly under the head curve so it sits naturally.
  • Using the long tail of the duck's body, sew it onto the base trinket dish at the position you'd like, ensuring the duck sits stable and facing the correct direction.
  • Weave in all loose ends and trim excess yarn, then adjust stuffing and neck shape (for the goose) so both figures sit nicely on the tray.

Important Notes

  • ๐Ÿ’กThis pattern is written in US terminology.
  • ๐Ÿ’กThis pattern is worked in continuous rounds, there is no need to sl st and ch 1 at the end of every row.
  • ๐Ÿ’กThe number written in parenthesis ( ) at the end of each row indicates the total number of stitches for that row.
  • ๐Ÿ’กFor the tray rim, work the specified BLO round so the rim will naturally curve inward for a neater edge.

This sweet Duck and Goose trinket tray brings charm to your craft table and keeps pins close at hand. ๐Ÿงต Handmade details and tiny amigurumi friends make it a delightful gift or a cheerful addition to your space. ๐Ÿงถ Enjoy stitching, assembling, and styling this cozy accent that mixes function with adorable design. โœจ

You ask,

we answer.

FAQs

What size will the finished piece be?

The finished trinket tray with duck and goose attached is small โ€” roughly the diameter of a small saucer and the amigurumi figures measure a few centimeters tall depending on yarn and tension.

Can I use different yarn weights for this pattern?

Yes, you can change yarn weight, but the final size will vary; use a larger hook for bulkier yarn and expect a chunkier tray or a smaller hook/yarn for a mini version.

Do I need prior crochet experience for this pattern?

This pattern is rated intermediate, so basic knowledge of single crochet, increases, decreases, and working in BLO is recommended for best results.

How long does this project typically take to complete?

Most crocheters complete this project in 5-7 hours, though time may vary based on experience level, yarn choice, and assembly detail.