🧢 Beautiful ✨ Detailed πŸ’ Adorable

Peppa Pig Amigurumi Pattern

Peppa Pig Amigurumi Pattern
4.2β˜… Rating
5-7 Hours Time Needed
2.0K Made This
βœ‚οΈ

Intermediate Level

Ideal for those with basic crochet experience, featuring slightly more advanced stitches and techniques to expand your skills.

⏱️

Weekend Treat

Takes 5-7 hours, making it an enjoyable project to finish over a couple of days.

🧸

Cute Companion

An adorable friend to cherish, handcrafted with love to bring comfort and joy for years to come.

About This Peppa Pig Amigurumi Pattern

This pattern teaches you how to crochet a Peppa Pig amigurumi with full shaping for the snout, cheeks and dress. Youll find clear round-by-round instructions for the head, body, arms, legs, feet and small details. The pattern uses simple single crochet shaping with occasional hdc and worked-in-back-loop rounds for texture.

Peppa Pig Amigurumi Pattern crochet pattern - detailed view of completed project

Includes materials list, abbreviations, and assembly steps so you can finish a neat toy. I also show options for felt eyes or crocheted eyes and how to place features accurately.

Why You'll Love This Peppa Pig Amigurumi Pattern

I absolutely love this pattern because it captures Peppas playful shape while remaining straightforward to follow. I enjoyed designing the snout and cheek shaping to get that recognizable profile. I love that the pattern gives options for felt or crocheted eyes so you can personalize the finish. Sewing and assembly are explained clearly, which makes the finishing process relaxing and rewarding. This pattern brings a smile every time I stitch a cheek or curl the tail.

Peppa Pig Amigurumi Pattern step 1 - construction progress Peppa Pig Amigurumi Pattern step 2 - assembly progress Peppa Pig Amigurumi Pattern step 3 - details and accessories Peppa Pig Amigurumi Pattern step 4 - final assembly and finishing

Switch Things Up

I love how versatile this pattern is to customize; you can change the dress color to any shade to create lots of different characters.

I often make a mini version by using fingering yarn and a 2.5 mm hook to create keychain-sized Peppas.

If you want an extra cuddly toy, use a bulky yarn and a larger hook for a chunky, softer Peppa.

I sometimes replace safety eyes with embroidered eyes for a baby-safe toy or glue felt discs for a flat, neat look.

Try embroidering different facial expressions; moving the mouth placement slightly changes the personality of your toy.

For added stability, insert a small circle of plastic or a cardboard disk into the bottom of the body before closing to help Peppa sit upright.

I like to add tiny crocheted accessories like a scarf or hat to personalize gifts for friends and family.

Make outfits removable by stitching a small seam allowance and using a snap or button, so kids can change Peppas clothes.

Experiment with texture for the dress by alternating BLO rounds or adding surface slip stitch stripes for a striped dress effect.

I recommend trying different stuffing levels to see what shape you prefer; slightly firmer stuffing gives a neater finish while softer stuffing feels more plush.

Common Mistakes & How to Fix Them

βœ— Skipping stitch markers during round changes can easily cause misplaced increases or decreases; place a marker at the start of each round and move it as you complete the round. βœ— Forgetting to stuff gradually leads to lumps and poor shaping; add stuffing bit by bit especially in the head and snout so the curves form correctly. βœ— Using inconsistent tension will produce an uneven body and misaligned parts; maintain even tension and check gauge by counting stitches between rows frequently. βœ— Attaching safety eyes too late or in the wrong row changes facial placement; attach eyes between rows 22 and 23, eight stitches apart, before closing the head. βœ— Overstuffing the body causes distortion and makes sewing parts difficult; stuff firmly but not overly tight and check the silhouette as you go. βœ— Cutting yarn tails too short leaves you unable to sew pieces securely; leave generous tails when finishing pieces intended for sewing so seams are strong.

Peppa Pig Amigurumi Pattern

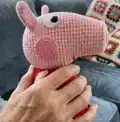
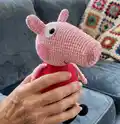
Make your own adorable Peppa Pig amigurumi with this detailed crochet pattern. Youll be guided step-by-step through head shaping, body construction, limbs and facial details so you can recreate this lovable character. The pattern includes notes on tools, materials, and assembly to help you finish a polished, gift-ready toy. Perfect for crafters who enjoy character amigurumi with clear shaping instructions.

Intermediate 5-7 Hours

Materials Needed for Peppa Pig Amigurumi Pattern

β€” Main Fabric

  • 01
    DK weight yarn, 100% cotton for main body (pink and red) - used for overall toy
  • 02
    Fingering weight yarn for cheeks and nostrils (pink) - used with smaller hook for detail
  • 03
    Black cotton yarn for feet details
  • 04
    White felt (two small circles) or white yarn to make felt-like eye discs
  • 05
    Optional piece of plastic to make bottom of the body rigid (optional)

β€” Tools Required

  • 01
    Crochet hook size 3.5 mm (main)
  • 02
    Crochet hook size 3.75 mm (for body option described)
  • 03
    Crochet hook size 2.5 mm (for cheeks and nostrils)
  • 04
    Tapestry needle for sewing pieces
  • 05
    Scissors
  • 06
    Stitch markers
  • 07
    Polyester toy stuffing
  • 08
    Safety eyes 12 mm (optional) or black yarn for crocheted pupils
  • 09
    Silicon glue (for felt eyes)
  • 10
    Piece of plastic to make bottom rigid (optional)

Progress Tracker

0% Complete

β€” Head :

Round 1 :

6 sc MR (6)

Round 2 :

6 inc (12)

Round 3 :

1 sc, inc (18)

Round 4 :

2 sc, inc (24)

Round 5 :

3 sc, inc (30)

Round 6 :

BLO sc in each st around (30)

Round 7-10 :

(4 rows) sc each st around (30)

Round 11 :

14 sc, inc (32)

Round 12-13 :

(2 rows) sc in each st around (32)

Round 14 :

7 sc, inc (36)

Round 15 :

15 sc, 6 hdc-inc, 15 sc (42)

Round 16 :

sc in each st around (42)

Round 17 :

15 sc [sc,inc] 6 times 15 sc (48)

Round 18 :

sc in each st around (48)

Round 19 :

15 sc [2 sc, inc] 6 times,15 sc (54)

Round 20-30 :

(11 rows) sc in each st around (54)

Info :

Attach safety eyes between row 22 and 23, 8 stitches apart.

Round 31 :

7 sc, dec (48)

Info :

Stuffing the head, add more stuffing as you go

Round 32 :

6 sc, dec (42)

Round 33 :

5 sc, dec (36)

Round 34 :

4 sc, dec (30)

Round 35 :

3 sc, dec (24)

Round 36 :

2 sc, dec (18)

Round 37 :

1 sc, dec (12)

Round 38 :

6 dec (6)

Info :

Close the opening and weave in the end.

β€” Ear (make 2) :

Round 1 :

5 sc MR (5)

Round 2 :

5 inc (10)

Round 3-8 :

(6 rows) sc in each st around (10) DO NOT stuffing

Info :

Cut the yarn leaving a tail to sew.

β€” Nostrils (make 2) :

Round 1 :

8 sc MR (8)

Info :

Cut the yarn leaving a tail to sew

β€” Cheek :

Info :

Make 2 (I used crochet hook 2,5mm and 2 ply yarn for cheeks and nostrils). You can use the yarn and hook of your preference increasing until your desired size.

Round 1 :

6 sc MR (6)

Round 2 :

6 inc (12)

Round 3 :

sc, inc (18)

Round 4 :

1 sc, inc [2 sc, inc] rep 5 x, 1 sc (24)

Round 5 :

3 sc, inc (30)

Round 6 :

2 sc, inc [4 sc, inc] rep 5 x, 2 sc (36)

β€” Arm (Make 2) :

Round 1 :

5 sc MR

Round 2-4 :

(3 rows) sc in each st around (5)

Info :

Make 3 pieces - DO NOT cut the yarn on the third piece (picture 1).

Round 5 :

When you finish the 3rd piece, insert your hook on the first stitch of the last row of the second piece, then join the second piece to the third (picture 2). Make 2 sc (picture 3). Join the first piece: make 5 sc (picture 4). Make 3 sc on the other side of the second piece (picture 5). Make 5 sc on the third piece. (15) (picture 6)

Round 6 :

sc, dec (10)

Round 7 :

5 dec (5 sc)

Round 8-17 :

(10 rows) sc each st around (5)

Info :

Fasten off leaving a long tail to sew. Do not stuff the arms or hands. Leave them as they are stitched.

β€” Body :

Info :

(Size up your crochet hook 0,25 if you want, with red yarn)

Round 1 :

6 sc MR (6)

Round 2 :

6 inc (12)

Round 3 :

sc, inc (18)

Round 4 :

1 sc, inc [2 sc, inc] 5 x, 1 sc (24)

Round 5 :

3 sc, inc (30)

Round 6 :

2 sc, inc [4 sc, inc] 5 x, 2 sc (36)

Round 7 :

5 sc, inc (42)

Round 8 :

3 sc, inc [6 sc, inc] 5 x, 3 sc (48)

Round 9 :

7 sc, inc (54)

Round 10 :

4 sc, inc [8 sc, inc] 5x, 4 sc (60)

Round 11 :

BLO sc in each stitch around (60)

Round 12-21 :

(10 rows) sc in each stitch around (60)

Round 22 :

8 sc, dec (54)

Round 23 :

sc in each stitch around (54)

Round 24 :

7 sc, dec (48)

Round 25 :

sc in each stitch around (48)

Round 26 :

6 sc, dec (42)

Round 27 :

sc in each stitch around (42)

Round 28 :

5 sc, dec (36)

Round 29 :

sc in each stitch around (36)

Round 30 :

4 sc, dec (30)

Round 31 :

sc each stitch around (30 sc)

Info :

Stuffing the body firmly. Cut the yarn, leaving a long tail to sew body to the head.

β€” Foot (make 2, black yarn) :

Round 1 :

6 sc MR

Round 2 :

6 inc (12)

Round 3-6 :

(4 rows) sc in each stitch around (12)

Round 7 :

2 sc, dec (9)

Round 8 :

sc each stitch around (9)

Round 9 :

sc, dec (6)

Round 10 :

sc each stitch around (6)

Info :

Stuffing the foot. Fasten off, leaving a tail to sew the foot to the leg.

β€” Leg (make 2, pink yarn) :

Round 1 :

6 sc MR (6)

Round 2-12 :

(11 rows) sc in each stitch around (6)

Info :

Add toy stuffing as you go. Fasten off, leaving a long tail to sew the leg to the body.

β€” Tail :

Round 1 :

chain 11

Round 2 :

From the second stitch from the hook, 3 sc in each chain stitch.

Info :

Fasten off, leaving a long tail to sew.

β€” Eyes :

Info :

Cut 2 circles of white felt or you can make 16 double crochet MR using white yarn. Black yarn: 6 sc in a MR or safety eyes 12mm.

β€” Assembly :

Info :

Follow assembly instructions to position ears, eyes, cheeks, nostrils and sew body to head as explained in the assembly section.

Assembly Instructions

  • Sew the ears to the head: I placed the ears at the row 28 and 29, 7 stitches apart.
  • Glue the eyes on the piece of felt. Attach safety eyes between row 22 and 23, 8 sts apart.
  • Glue or sew the cheeks on the face below eyes and glue or sew the nostrils on the snout.
  • Embroider the mouth between rows 15 and 16.
  • Sew the body to the head using the long tail left from the body, aligning neck openings and shaping seam smoothly.
  • Sew the arms on the sides between rows 29 and 30 to position them symmetrically.
  • Sew the legs on the body positioning them between rows 6 and 7, 7 stitches apart and sew the feet to the legs.

Important Notes

  • πŸ’‘Use stitch markers to keep track of your rounds, especially during increases and decreases and when changing shaping rows.
  • πŸ’‘Stuff pieces gradually while shaping, adding small amounts of fiberfill to preserve curves and avoid lumps.
  • πŸ’‘Leave long tails when fastening off pieces that require sewing so you have enough yarn to make secure seams.
  • πŸ’‘Attach eyes before closing the head and ensure they are placed between rows 22 and 23, eight stitches apart as instructed.

This Peppa Pig amigurumi pattern is a lovingly designed character you can finish in just a few delightful sessions. It includes full shaping for the snout and cheek details plus clear assembly steps to create a polished toy. Whether you keep it or gift it, this handmade Peppa will bring smiles and warm memories. 🧢✨

You ask,

we answer.

FAQs

What size will the finished piece be?

The finished amigurumi measures approximately 30 cm tall when using DK cotton yarn and the recommended hooks (3.5 mm and 3.75 mm as noted on the pattern).

Can I use different yarn weights for this pattern?

Yes, you can change yarn weight but this will affect the final size; use a hook appropriate for your chosen yarn and expect a size difference if you switch from DK to fingering or bulky yarn.

Do I need prior crochet experience for this pattern?

This pattern is rated intermediate; basic experience with single crochet, increases, decreases and working in the round is recommended for best results.

How long does this project typically take to complete?

Most crocheters complete this project in 5-7 hours, though time may vary based on experience level, yarn choice, and how much time you spend on assembly and finishing.