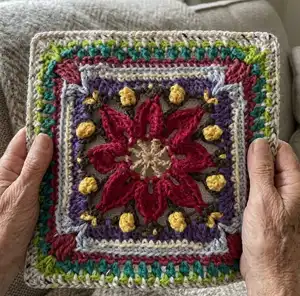
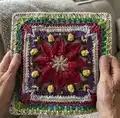
Create a richly textured crochet square inspired by vintage motifs and modern colorways. This pattern walks you through every round with clear instructions and stitch definitions so you can recreate the Mini or Large Macey Ann Square with confidence. Perfect for combining into blankets, cushions, or making as a showcase square for home decor.
Progress Tracker
0% Complete
— Stitch Definitions :
Infos :
double magic ring: Video at A Yarn of Serendipity. standing stitch: Start with a slst on your hook; Insert your hook into designated st or ch sp and finish st as normal. Video at A Yarn of Serendipity. invisible join: Do not join after completing last st of rnd; cut yarn and pull yarn tail through st; remove hook and insert from back-to-front-to-back of 2nd st of rnd; grab yarn and gently pull through; from the back, insert hook from bottom-to-top of the center of last st of rnd; pull yarn gently through st; anchor join by drawing through any back loop of first and last sts of rnd, and weave in ends. Video at A Yarn of Serendipity. sc: Insert hook into designated st; yo and pull up a loop; yo, pull through 2 loops on hook. FPsc: Insert hook from front-to-back-to-front around post, so post is in front of hook; yo and pull up a loop; yo and pull through remaining 2 loops on hook. BLsc: Insert hook into BL of st; yo, pull up a loop; yo, pull through 2 loops on hook. hdc: Yo, insert hook into st; yo, pull up a loop; yo, pull through 3 loops on hook. BLhdc: Yo, insert hook into BL of st; yo, pull up a loop; yo, pull through 3 loops on hook. FPhdc: Yo, insert hook from front-to-back-to-front around post, so post is in front of hook; yo, pull up a loop; yo, pull through all 3 loops on hook. long hdc: Yo, insert hook into st and pull up a loop almost to length of previous st; yo and pull through 3 loops. dc: Yo, insert hook into st; yo, pull up a loop; [yo, pull through 2 loops on hook] 2 times. FPdc: Yo, insert hook from front-to-back-to-front around post, so post is in front of hook; yo, pull up a loop; [yo, pull through 2 loops on hook] 2 times. long dc: Yo, insert hook into st and pull up a loop almost to length of previous st; [yo and pull through 2 loops] 2 times. tr: Yo 2 times, insert hook into st; yo, pull up a loop [yo, pull through 2 loops] 3 times. long tr: Yo 2 times, insert hook into st and pull up a loop almost to length of previous st; [yo and pull through 2 loops] 3 times. dtr: Yo 3 times; insert hook into st; yo, pull up a loop; [yo, pull through 2 loops] 4 times. trtr: Yo 4 times; insert hook into st; yo, pull up a loop; [yo, pull through 2 loops] 5 times. 2dc-cluster: Yo, insert hook in st, yo, pull through st; yo, pull through 2 loops on hook; yo, insert hook in same st, yo, pull through st; yo, pull through 2 loops on hook; yo, pull through all 3 loops on hook. PC (Popcorn stitch): Work 4 dc into same st; drop loop from hook; insert your hook from front-to-back-to-front under top 2 loops of 1st dc of group; grab dropped loop with hook and pull through hook. picot: Once you have completed st, ch 3; insert hook into back bar of first st, slst through all loops on hook. back-stitch: Identify the designated st one rnd below and fold the work toward you. Insert your hook vertically into the tip of the inverted 'v' of the stitch, come out at the base of the st and complete the stitch as usual. BL: When instructed to work into 'back loops,' insert hook ONLY under back loop; complete st as usual. Symbol Guide: * to repeat instructions after a single asterisk as directed. Parentheses indicate groups of sts worked together. Brackets [ ] repeat instructions within brackets as directed. Count totals: Total chain spaces are included in the st count; corner chain spaces are not included in the total.
— Macey Ann Square :
RND 1 :
RND 1: A, Buttercup - Mini/Large Starting in a double magic ring, • ch 5 (counts as a 1st dc of rnd and ch 2), dc in double magic ring; [ch 2, dc] 6 times, ch 2; cut yarn, invisible join to 4th ch of rnd. Counts: 8 dc, 8 ch-2 sp (24 total)
RND 2 :
RND 2: B, Rosy II – Mini / Royalty - Large Work in ch-2 sps only and start in any ch-2 sp, • (sc, ch 4, sc) in each ch-2 sp around; cut yarn, invisible join. Counts: 16 sc, 8 ch-4 sp (48 total)
RND 3 :
RND 3: B, Rosy II – Mini / Royalty - Large Starting in any ch-4 sp or slst into ch-4 sp and ch 1 (does not count as sc), • *(sc, 3 hdc, dc, tr, picot; tr, dc, 3 hdc, sc) in ch-4 sp, sk NEXT sc-this sc may be hidden by the previous sts; slst in NEXT sc; repeat from * around; cut yarn, invisible join. Counts: 16 sc, 48 hdc, 16 dc, 16 tr, 8 picot, 8 slst (112 total)
RND 4 :
RND 4: E, Ivory - Mini / Olive - Large Starting in slst between petals, • *working in BL, trtr in slst between 2 sc of rnd 2, ch 4; (sc, ch 1, sc) in top of picot, ch 4; repeat from * around; cut yarn, invisible join. Counts: 16 sc, 8 trtr, 16 ch-4 sp, 8 ch-1 sp (96 total)
RND 5 :
RND 5: C, Sage – Mini / Mulberry - Large Starting in any ch-1 sp, • *(sc, ch 2-new corner, sc) in ch-1 sp; ch 4, sk NEXT (sc, ch-4 sp); PC in trtr; ch 4, sk NEXT (ch-4 sp, sc); • sc in NEXT ch-1 sp; ch 4, sk NEXT (sc, ch-4 sp); PC in NEXT trtr; ch 4, sk NEXT (ch-4 sp, sc); repeat from * around; cut yarn, invisible join. Counts: 12 sc, 8 PC, 16 ch-4 sp, 4 ch-2 corner sp (84 total/21 per side)
RND 6 :
RND 6: F, Antique Cream – Mini / Ivory - Large Starting in any ch-2 corner sp, • *(dc, ch 1, dc; ch 2, dc, ch 1, dc) in ch-2 corner sp, sk sc; • 2dc-cluster in NEXT ch-4 sp of rnd 5, long dc around both ch-4 of rnd 4 AND 5 as one; 2dc-cluster in ch-4 sp of rnd 5 just worked; FPhdc around NEXT PC; • hdc in NEXT ch-4 sp; long hdc around ch-4 of rnd 4 AND 5 as one; sc in ch-4 sp of rnd 5 just worked; FPsc around NEXT sc; • sc into NEXT ch-4 sp; long hdc around ch-4 of rnd 4 AND 5 as one; hdc in ch-4 sp of rnd 5 just worked; FPhdc around NEXT PC; • 2dc-cluster in NEXT ch-4 sp of rnd 5; long dc around NEXT ch-4 of rnd 4 AND rnd 5 as one; 2dc-cluster in ch-4 sp of rnd 5 just worked, sk sc; repeat from * around; cut yarn, invisible join. Counts: 16 dc, 16 2dc-cluster, 8 FPhdc, 8 long-dc, 8 long-hdc, 8 hdc, 8 sc, 4 FPsc, 8 ch-1 sp, 4 ch-2 corner sp (84 total/21 per side)
RND 7 :
RND 7: F, Antique Cream – Mini / Ivory - Large Starting in any ch-2 corner sp, • *(sc, ch 2, sc) in ch-2 corner sp; sc in each across to NEXT ch-2 corner sp; repeat from * around; cut yarn, invisible join. Counts: 92 sc, 4 ch-2 corner sp (92 total/23 per side)
Info :
COMPLETE ROUND 8 ONLY, FOR MINI SQUARE
RND 8 :
RND 8: A, Buttercup - Mini Starting in any ch-2 corner sp, • *(sc, ch 2, sc) in ch-2 corner sp; sc in NEXT st, [sc back-stitch in rnd 6 st directly below, sc in rnd 7] 11 times; repeat from * around; cut yarn, invisible join. Counts: 56 sc, 44 sc back-stitch, 4 ch-2 corner sp (100 total/25 per side)
Info :
COMPLETE ROUNDS 8a-13, FOR LARGE SQUARE
RND 8a :
RND 8a: D, Deep Teal - Large Starting in any ch-2 corner, • *(2 dc, ch 2, 2 dc) in ch-2 corner sp; long tr in ch-2 corner sp of rnd 5; FPdc around NEXT dc of rnd 6; sk NEXT 2 sc of rnd 7; long dc over NEXT sc and into ch-1 sp of rnd 6; • sc in NEXT sc; • working in BL, sc in NEXT 15 sc of rnd 7; sc in NEXT sc; long dc over NEXT sc and into ch-1 sp of rnd 6; sk NEXT 2 sc of rnd 7; FPdc around NEXT dc of rnd 6; long tr in NEXT ch-2 corner sp of rnd 5; repeat from * around; cut yarn, invisible join. Counts: 8 sc, 60 BLsc, 16 dc, 8 FPdc, 8 long dc, 8 long tr, 4 ch-2 corner sp (108 total/27 per side)
RND 9 :
RND 9: B, Royalty - Large Working over ch-2 corner of rnd 8a, and in ch-2 corner sp of rnd 6, • *(3 dtr) in ch-2 corner sp of rnd 6; ch 1, sk dc; • BLhdc in NEXT 4 sts; BLsc in NEXT 17 sts; BLhdc in NEXT 4 sts; sk dc, ch 1; repeat from * around; cut yarn, invisible join. Counts: 12 dtr, 32 BLhdc, 68 BLsc, 8 ch-1 sp (120 total/30 per side)
RND 10 :
RND 10: E, Olive - Large Starting in ch-1 sp after any group of 3 dtr, • *sc in ch-1 sp after 3 dtr, [ch 3, sk st, sc in NEXT st] 12 times; • ch 3, sk st, sc in NEXT ch-1 sp, ch 4; repeat from * around; cut yarn, invisible join. Counts: 56 sc, 52 ch-3 sp, 4 ch-4 corner sp (212 total/53 per side)
RND 11 :
RND 11: F, Ivory - Large Working over (behind) ch-4 corner, start in 2nd dtr of 3 dtr group of rnd 9, • *(tr, ch 2, tr) in 2nd dtr; • working behind ch-4 sp just skipped, 2 dc in NEXT dtr; sk sc; • [sc in NEXT ch-3 sp, sk st, ch 1] 12 times; sc in NEXT ch-3 sp, sk sc; • working behind ch-4 sp, 2 dc in NEXT dtr; repeat from * around; cut yarn, invisible join. Counts: 8 tr, 16 dc, 52 sc, 48 ch-1 sp, 4 ch-2 corner sp (124 total/31 per side)
RND 12 :
RND 12: C, Mulberry - Large Starting in any ch-2 corner sp, • *(2 dc, ch 2, 2 dc) in any ch-2 corner sp, dc in NEXT 3 st; • [dc back-stitch in NEXT ch-3 sp of rnd 10 directly below, dc in NEXT ch-1 sp] 12 times; • dc back-stitch in NEXT ch-3 sp of rnd 10 directly below, dc in NEXT 3 st; repeat from * around; cut yarn, invisible join. Counts: 88 dc, 52 dc back-stitch, 4 ch-2 corner sp (140 total/35 per side)
RND 13 :
RND 13: C, Mulberry - Large Starting in any ch-2 corner sp, • *(2 dc, ch 2, 2 dc) in ch-2 corner sp; working in BL, dc in each st across to NEXT ch-2 corner sp; repeat from * around; cut yarn, invisible join and weave in ALL yarn ends. Counts: 16 dc, 140 BLdc, 4 ch-2 corner sp (156 total/39 per side)
Info :
Blocking is a great way to put the finishing touches on your square. It allows you to reach your final shape and size. It also opens up your stitches, making them even and more defined; giving it a more professional appearance. You can either wet block or steam block, but always make sure you are careful when steam blocking acrylic yarn. This pattern and all pictures are copyright protected. You may only print a copy of this pattern for your use. You may sell items made with this pattern, but please link back to my website and credit me with the design. Do not distribute this pattern or photos in any other form.
Thank you for choosing the Macey Ann Square pattern — a beautiful textured square to brighten your handmade home decor. This pattern blends post stitches, popcorns, and picots for a charming layered look you can customize with color. Enjoy making yours and sharing finished squares with friends and family. 🧶✨