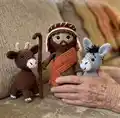
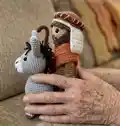
Make a charming shepherd with his faithful bull and donkey using this detailed crochet pattern. You will find clear step-by-step rounds, helpful photos and assembly tips so you can create adorable handmade figures. Perfect for gifting or display, this pattern uses sport/4-ply yarn and small hooks for fine detail. Enjoy a satisfying, creative crochet session with these lovable characters.
Progress Tracker
0% Complete
— Arms (make 2) :
Round 3-6 :
10 sc (4 rounds)
Info :
Change to brown yarn. Cut the beige yarn.
Round 9-20 :
10 sc (12 rounds)
Info :
Stuff only the lower 2/3 of the arm. Fold the arm in half and crochet through two layers, 5 sc. Fasten off and weave in the yarn tail inside the piece.
Info :
Sleeves decoration: Hold the arm with the hand pointing up, attach brown yarn color to the first unused front loop of round 7.
Round 1 :
(1 sc, ch 2)*10, slst
Info :
Fasten off and weave in the yarn tail inside the piece. Crochet the 2nd arm the same way.
— Body :
Round 3 :
(1 sc, inc)*8 (24)
Round 4 :
(3 sc, inc)*6 (30)
Round 5 :
2 sc, inc, (4 sc, inc)*5, 2 sc (36)
Round 6 :
(5 sc, inc)*6 (42)
Round 7 :
(13 sc, inc)*3 (45)
Info :
Trace the bottom of the piece on a cardboard and cut it out.
Round 9-15 :
45 sc (7 rounds)
Round 16 :
(13 sc, dec)*3 (42)
Round 17-18 :
42 sc (2 rounds)
Round 19 :
6 sc, dec, (12 sc, dec)*2, 6 sc (39)
Round 20-21 :
39 sc (2 rounds)
Info :
Apply some glue to the cardboard. Place the cardboard inside the bottom of the piece.
Round 22 :
(11 sc, dec)*3 (36)
Round 23-24 :
36 sc (2 rounds)
Round 25 :
5 sc, dec, (10 sc, dec)*2, 5 sc (33)
Round 26-27 :
33 sc (2 rounds)
Info :
Start stuffing as you go.
Round 28 :
(9 sc, dec)*3 (30)
Round 29-30 :
30 sc (2 rounds)
Round 31 :
4 sc, dec, (8 sc, dec)*2, 4 sc (27)
Info :
Join the arms to the body in next round symmetrically on the sides.
Round 33 :
4 sc on the body, through both stitches of the 1st arm and the body crochet 5 sc, then on body 8 sc, through both stitches of the 2nd arm and the body crochet 5 sc, then 5 sc on the body (27)
Round 34 :
(7 sc, dec)*3 (24)
Round 35 :
(6 sc, dec)*3 (21)
Info :
Change to beige yarn. Cut the brown yarn.
Round 36 :
(5 sc, dec)*3 (18)
Info :
Stuff the body with fiberfill. Continue crocheting the head with beige yarn.
— Head (Shepherd) :
Round 39 :
(5 sc, inc)*6 (42)
Round 40 :
(13 sc, inc)*3 (45)
Round 41-47 :
45 sc (7 rounds)
Round 48 :
(7 sc, dec)*5 (40)
Round 49 :
3 sc, dec, (6 sc, dec)*4, 3 sc (35)
Info :
Insert the eyes between round 44 and 45 with 7 sts apart.
Round 50 :
(5 sc, dec)*5 (30)
Round 51 :
(4 sc, dec)*5 (25)
Round 52 :
(3 sc, dec)*5 (20)
Info :
Stuff the head with fiberfill.
Round 53 :
(2 sc, dec)*5 (15)
Round 54 :
(1 sc, dec)*5 (10)
Info :
Fasten off, pull the hole closed and weave in the yarn tail inside the piece.
Round 1 :
FLO - (1 sc, ch1)*45, slst
Info :
Hold the body upside down, and attach brown yarn to the first unused front loop of round 7. Fasten off and weave in ends.
Info :
Make the head sculpting: embroider highlights around the eyes with white thread, pull the thread ends and tie a knot. Embroider eyelashes and eyebrows with brown thread as instructed in the photos and text. Embroider nose between round 43-44 with several horizontal stitches.
— Beard :
Info :
Use dark brown yarn, hook 2.25 mm
Round 1 :
ch 24. Start in the second chain from the hook: 23 sc, ch 1, turn
Round 2 :
3 sc, 3 hdc, 3 dc, 2 tr, 1 inc-tr, 2 tr, 3 dc, 3 hdc, 3 sc
Info :
Fasten off, leaving a long tail for sewing. Embroider the mustache with three stitches long. Sew or glue the top part of the beard to face. Fasten off and weave in the ends.
— Headscarf :
Info :
Use terracotta yarn, hook 2.25 mm
Round 3 :
(1 sc, inc)*6 (18)
Round 4 :
(2 sc, inc)*6 (24)
Round 5 :
(3 sc, inc)*6 (30)
Round 6 :
2 sc, inc, (4 sc, inc)*5, 2 sc (36)
Round 7 :
(5 sc, inc)*6 (42)
Round 8 :
3 sc, inc, (6 sc, inc)*5, 3 sc (48)
Round 9-12 :
48 sc (4 rounds)
Round 13 :
FLO - 20 sc, change to terracotta yarn and cut the milk yarn - FLO - 28 sc (48)
Info :
Continue crocheting in turning rows. Row 1: ch 2, 28 hdc, turn (28). Row 2: ch 2, 1 hdc, inc-hdc, 24 hdc, inc-hdc, 1 hdc, turn (30). Row 3-5: ch 2, 30 hdc, turn (3 rows). Fasten off and weave in tail.
Info :
Make a list along the side of the headscarf: attach milk yarn right after the last milk yarn of round 13. Make 9 sc along the side edge. In the corner, make 3 sc into the same stitch. Continue crocheting 29 sc along the bottom. In the corner, make 3 sc into the same stitch. Finally, 10 sc along the side edge, and slst in the first ch. Fasten off and cut the yarn.
Info :
Now crochet hair: attach dark brown yarn to back loops of the 12th round. Rnd 1: BLO - 48 sc. Rnd 2: start crocheting the strands (ch 3, start in the second chain from the hook 2 sc, 3 slst in the base)*16. Finish crochet slst in the next stitch. Fasten off and weave in the ends.
— Roll headpiece :
Info :
Use dark brown yarn, hook 2.25 mm. Do not stuff.
Info :
Then continue crocheting 5 sc without counting the rows. Crochet a tube around the circumference of the head (tube ca. 23 cm long). Twist terracotta and milk yarn together, then use them to wrap the tube. Put the headscarf on head. The back side of the hair should be placed lower than the front side. Sew on or glue. Put the second piece around the headscarf.
— Shepherd's cloak :
Info :
Use terracotta yarn. Crochet in turning rows, at the end of the row, do ch 2 and turn. Hook 2.25 mm
Row 1 :
ch 55, start in the third chain from the hook: 53 hdc
Row 2 :
inc-hdc, 52 hdc (54)
Row 4 :
inc-hdc, 53 hdc (55)
Info :
Fasten off and cut the yarn. Leave a long tail for sewing. Sling the cloak on the shepherd's shoulders. Connect the ends of the robe.
— Shepherd's stick :
Info :
Use dark brown yarn, hook 2.25 mm. Do not stuff.
Info :
Then continue crocheting 6 sc without counting the rows. Crochet total 20 cm long, finish with slst. Fasten off and cut the yarn. Leave a long tail for sewing. Take a piece of wire about 20 cm long. Wrap the ends of the wire with duct tape to prevent any sharp edges. Insert the wire into the shepherd's stick and sew up the hole. Sew the stick to the shepherd's hand.
— Bull — Legs (make 4) :
Info :
Use brown yarn, hook 2.00 mm
Round 2 :
(1 sc, inc)*3 (9)
Info :
Change to white yarn. Cut the brown yarn.
Round 3 :
(2 sc, inc)*3 (12)
Info :
Change to dark brown yarn. Cut the white yarn.
Round 4-8 :
12 sc (5 rounds)
Info :
Fasten off and cut the yarn. Crochet three more legs in the same way.
— Bull — Body :
Info :
Use dark brown yarn, hook 2.00 mm. We start crocheting body from tummy. Ch 9. Stitches are worked around both sides of the foundation chain.
Round 1 :
Start in the second chain from the hook: - 7 sc, crochet 3 sc into last stitch. Continue on the other side of the foundation chain - 6 sc, inc (18)
Round 2 :
inc, 6 sc, 3 inc, 6 sc, 2 inc (24)
Round 3 :
1 sc on the tummy, through both stitches of the 1st leg and the tummy crochet 3 sc, then on tummy 4 sc, through both stitches of the 2nd leg and the tummy crochet 3 sc, then 2 sc on the tummy, through both stitches of the 3rd leg and the tummy crochet 3 sc, then on tummy 4 sc, through both stitches of the 4th leg and the tummy crochet 3 sc, then on tummy 1 sc (24)
Round 4 :
continue crocheting using the remaining stitches of the legs: 1 sc in a tummy, 9 sc in the first leg, 4 sc in a tummy, 9 sc in the second leg, 2 sc in a tummy, 9 sc in the third leg, 4 sc in a tummy, 9 sc in the fourth leg, 1 sc in a tummy (48)
Round 5-10 :
48 sc (6 rounds)
Round 11 :
dec, 13 sc, (2 sc, dec)*5, 13 sc (42)
Round 12 :
10 sc, (2 sc, dec)*5, 10 sc, dec (36)
Round 13 :
10 sc, (2 sc, dec)*4, 10 sc (32)
Round 14 :
8 sc, (2 sc, dec)*4, 8 sc (28)
Round 15 :
6 sc, (2 sc, dec)*4, 6 sc (24)
Info :
Stuff the body firmly.
Round 16 :
(2 sc, dec)*6 (18)
Round 18 :
6 sc, 6 hdc, 6 sc (18)
Info :
Fasten off and cut the yarn, leave a long tail for sewing.
— Bull — Head :
Info :
Start with white yarn, hook 2.00 mm. Ch 6. Stitches are worked around both sides of the foundation chain.
Round 1 :
Start in the second chain from the hook: - 4 sc, crochet 3 sc into last stitch. Continue on the other side of the foundation chain - 3 sc, inc (12)
Round 2 :
inc, 3 sc, 3 inc, 3 sc, 2 inc (18)
Round 3-4 :
18 sc (2 rounds)
Info :
Change to dark brown yarn. Cut the white yarn.
Round 5 :
(2 sc, inc)*6 (24)
Round 7 :
(3 sc, inc)*6 (30)
Round 9 :
2 sc, inc, (4 sc, inc)*5, 2 sc (36)
Round 10-15 :
36 sc (6 rounds)
Round 16 :
(4 sc, dec)*6 (30)
Round 17 :
(3 sc, dec)*6 (24)
Info :
Insert the eyes between round 9 and 10 with 10 sts apart. Stuff the head with fiberfill.
Round 18 :
(2 sc, dec)*6 (18)
Round 19 :
(1 sc, dec)*6 (12)
Info :
Do not close the hole. Make the head sculpting and embroider nostrils and eyebrows with black thread. Pull the ends and tie a knot. Weave in ends.
— Bull — Ears (make 2) :
Round 2 :
(1 sc, inc)*3 (9)
Round 4 :
(2 sc, inc)*3 (12)
Round 5 :
(3 sc, inc)*3 (15)
Round 6-7 :
15 sc (2 rounds)
Round 8 :
(3 sc, dec)*3 (12)
Round 9 :
(2 sc, dec)*3 (9), slst
Info :
Fasten off and cut the yarn, leave a long tail for sewing.
— Bull — Horns (make 2) :
Round 5-6 :
6 sc (2 rounds)
Info :
Fasten off and cut the yarn, leave a long tail for sewing.
— Assembling :
Info :
Fix the body to bottom of the head over round 10-14 with pins, sew around with a strong seam. When there is a small opening left, add some more fiberfill between the head and the neck, then sew closed.
Info :
Pin the ears symmetrical on the sides of head between 13th and 15th rounds, 10 sts apart and sew them. Sew the horns between the ears.
Tail :
Attach the brown yarn in the center of the back. The tail are sewn 6 rounds above the leg. Make ch 11. Start in the second chain from the hook 10 slst. Fasten off and cut the yarn. Make a tassel at the end of the tail by attaching a few pieces of beige yarn.
— Donkey — Legs (make 4) :
Info :
Use brown yarn, hook 2.00 mm (change to white and then grey as instructed)
Round 2 :
(1 sc, inc)*3 (9)
Info :
Change to white yarn. Cut the brown yarn.
Round 3 :
(2 sc, inc)*3 (12)
Info :
Change to grey yarn. Cut the white yarn.
Round 4-8 :
12 sc (5 rounds)
Info :
Fasten off and cut the yarn. Crochet three more legs in the same way.
— Donkey — Body :
Info :
Use grey yarn, hook 2.00 mm. We start crocheting body from tummy. Ch 9. Stitches are worked around both sides of the foundation chain.
Round 1 :
Start in the second chain from the hook: - 7 sc, crochet 3 sc into last stitch. Continue on the other side of the foundation chain - 6 sc, inc (18)
Round 2 :
inc, 6 sc, 3 inc, 6 sc, 2 inc (24)
Round 3 :
1 sc on the tummy, through both stitches of the 1st leg and the tummy crochet 3 sc, then on tummy 4 sc, through both stitches of the 2nd leg and the tummy crochet 3 sc, then 2 sc on the tummy, through both stitches of the 3rd leg and the tummy crochet 3 sc, then on tummy 4 sc, through both stitches of the 4th leg and the tummy crochet 3 sc, then on tummy 1 sc (24)
Round 4 :
continue crocheting using the remaining stitches of the legs: 1 sc in a tummy, 9 sc in the first leg, 4 sc in a tummy, 9 sc in the second leg, 2 sc in a tummy, 9 sc in the third leg, 4 sc in a tummy, 9 sc in the fourth leg, 1 sc in a tummy (48)
Round 5-10 :
48 sc (6 rounds)
Round 11 :
dec, 13 sc, (2 sc, dec)*5, 13 sc (42)
Round 12 :
10 sc, (2 sc, dec)*5, 10 sc, dec (36)
Round 13 :
10 sc, (2 sc, dec)*4, 10 sc (32)
Round 14 :
8 sc, (2 sc, dec)*4, 8 sc (28)
Round 15 :
6 sc, (2 sc, dec)*4, 6 sc (24)
Round 16 :
(2 sc, dec)*6 (18)
Round 18 :
6 sc, 6 hdc, 6 sc (18)
Info :
Fasten off and cut the yarn, leave a long tail for sewing.
This shepherd set includes three delightful amigurumi figures — a shepherd, a bull and a donkey — perfect for display or gifting. The pattern is detailed with step-by-step rounds, photos and helpful tips to guide you through shaping and assembly. Make your own little scene and customize colors for a unique handmade touch. 🧶✨