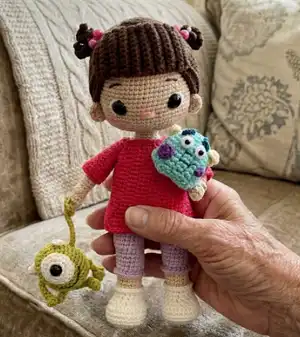
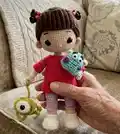
Bring a sweet handmade friend to life with this Doll Boo amigurumi pattern. You will enjoy clear, photo-supported steps and thoughtful shaping to create an expressive face, playful hair, and tiny accessories. The pattern includes full instructions for body, head, limbs, hair, dress and two mini monsters so you can craft a complete scene-ready toy. Perfect as a gift or a charming addition to your handmade toy collection.
Progress Tracker
0% Complete
— Head :
Info :
Hook №2,begin crocheting in main beige color. Stuff in the process.
Round 1 :
1 rnd: 6 sc in MR
Round 2 :
2 rnd: 6 inc (12)
Round 3 :
3 rnd: (1 sc, inc) x6 (18)
Round 4 :
4 rnd: (2 sc, inc) x6 (24)
Round 5 :
5 rnd: (3 sc, inc) x6 (30)
Round 6 :
6 rnd: (4 sc, inc) x6 (36)
Round 7 :
7 rnd: (5 sc, inc) x6 (42)
Round 8 :
8 rnd: (6 sc, inc) x6 (48)
Round 9 :
9 rnd: (7 sc, inc) x6 (54)
Round 10 :
10 rnd: (8 sc,inc)x6 (60)
Round 11 :
11 rnd:(9 sc, inc)x6 (66)
Round 12-27 :
12-27 rnd: 60 sc(16 rounds)
Info :
Insert eyes between 21-22 rows in the distance of 13 sc
Round 28 :
28 rnd: (9 sc,dec)x6 (60)
Round 29 :
29 rnd: (8 sc,dec)x6 (54)
Round 30 :
30 rnd: (7 sc, dec) x6 (48)
Round 31 :
31 rnd: (6 sc, dec) x6 (42)
Round 32 :
32 rnd: (5 sc, dec) x6 (36)
Round 31 :
31 rnd: (4 sc, dec) x6 (30)
Round 32 :
32 rnd: (3 sc, dec) x6 (24)
Round 33 :
33 rnd: (2 sc, dec) x6 (18)
Info :
Cut the yarn. Hide the thread.
— Hairstyle (2 pcs.) :
Info :
Hook №2,begin crocheting in brown color, 2 pcs.
Round 1 :
1 rnd: 6 sc in MR
Round 2 :
2 rnd: 6 inc (12)
Round 3 :
3 rnd: (1 sc, inc) x6 (18)
Round 4 :
4 rnd: (2 sc, inc) x6 (24)
Round 5 :
5 rnd: (3 sc, inc) x6 (30)
Round 6 :
6 rnd: (4 sc, inc) x6 (36)
Round 7 :
7 rnd: (5 sc, inc) x6 (42)
Round 8 :
8 rnd: (6 sc, inc) x6 (48)
Round 9 :
9 rnd: (7 sc, inc) x6 (54)
Round 10 :
10 rnd: (8 sc, inc)x6 (60)
Round 11 :
11 rnd: (9 sc, inc) x6 (66)
Round 12 :
12 rnd: (10 sc , inc) x6 (72)
Round 13-15 :
13-15 rnd: 72 sc(3 rounds)
Info :
Leave a long end for sewing.
— Bang :
Info :
Hook №2,begin crocheting in brown color?turning rounds
Round 1 :
1 rnd: 11 ch, from second 10 sc ,ch,turn
Info :
Next, we always crochet BLO, turning rounds
Round 2-17 :
2-17 rnd: 10 sc,ch,turn (16 rounds)
Info :
Leave a long end for sewing.
— Ponytail (2 pcs) :
Info :
Hook №2,begin crocheting in brown color, 2 pcs.
Round 1 :
1 rnd: 4 sc in MR
Round 2 :
2 rnd: (9 sc,from second 8 sc,1 sc about 1 rnd of MR)x4
Info :
Leave a long end for sewing.
— Ears (2 pcs.) :
Info :
Hook №2,begin crocheting in main beige color.
Round 1 :
1 rnd: 3 ch in MR, 4 hdc
Info :
Leave a long end for sewing.
— Face Decoration :
Infos :
Head design can be viewed by clicking on the button below. Needle sculpting fot the eyes area and the eyes details.
Infos :
Making the nose we make a stitch 3 sc long between 21-22 rows, the distance from the eye to the nose on each side is 5 sc
— Eye :
Info :
Hook №2,crocheting with white color :
Round 1 :
1 rnd: 6 sc in MR
Round 2 :
2 rnd: 6 inc (12)
Round 3 :
3 rnd: (1 sc, inc) x6 (18)
Round 4-5 :
4-5 rnd: 18 sc(2 rounds)
Info :
Leave a long end for sewing. We insert the eye into the center of the MR, burn the leg with a lighter. Sew the eye to the body, fill during sewing.
— Hands 2 PSC :
Info :
Hook №2,begin crocheting in main beige color. Stuff in the process.
Round 1 :
1 rnd: 5 sc in MR
Round 4 :
4 rnd: 5 sc, bubble, 4 sc(10)
Round 5 :
5 rnd: (3 sc,dec)x2 (8)
Round 6-18 :
6 -18 rnd: 8 sc(13 rounds)
Info :
Cut the thread and hide.
— Legs (2 PCS) :
Info :
Hook №2,crocheting with white color, stuff in process :
Round 1 :
1 rnd : 8 ch, from second 6 sc,3sc in the last chain, on the other side of the chain 5 sc, inc (16)
Round 2 :
2 rnd : inc, 5 sc, inc.1 sc, inc, 5 sc,inc, 1 sc(20)
Round 3 :
3 rnd : 1 sc, inc, 5 sc,inc, 3 sc,inc, 5 sc, inc,2 sc(24)
Round 4 :
4 rnd : 2 sc, inc, 5 sc,inc, 5 sc,inc, 5 sc, inc,3 sc(28)
Info :
Prepare the insoles. On thick cardboard or plastic (for example, a cover from cotton swabs), we circle the part, cut it out, try it on and put it aside. We make 2 insoles for 2 shoes at once, glue after we crochet the fifth row
Round 6-7 :
6-7 rnd: 28 sc
Round 8 :
8 rnd: 8 sc,6 dec, 8 sc(22)
Round 9 :
9 rnd: 7 sc, 4 dec, 7 sc(18)
Info :
BLO, Change color for main
Round 11 :
11 rnd: (4 sc,dec)x3 (15)
Round 12-15 :
12-15 rnd: 15 sc(4 rounds)
Info :
Change color for lilac
Round 16 :
16 rnd: (4 sc,inc)x3 (18)
Round 19 :
19 rnd: 4 sc,inc,8 sc,inc, 4 sc (20)
Round 20-21 :
20-21 rnd: 20 sc (2 rounds)
Round 22 :
22 rnd: dec,16 sc,dec (18)
Info :
Next, we crochet knees inc strictly in the center
Round 23 :
23 rnd: 2 sc,dec, 3 sc,4 inc, 3 sc,dec, 2 sc (20)
Round 25 :
25 rnd: 2 sc,inc, 3 sc,4 dec, 3 sc,inc, 2 sc (18)
Round 26-27 :
26-27 rnd: 18 sc (2 rounds)
Round 28 :
28 rnd: (8 sc,inc)x2 (20)
Round 29-32 :
29-32 rnd: 20 sc (4 rounds)
Info :
Cut the thread and hide.
Info :
We crochet the front loops of the 10th row with a white thread, keep the foot with the foot towards us: 10 rnd: 18 sc, Cut the thread and hide.
Info :
We crochet the front loops of the 16th row with a purple thread, keep the foot with the foot away from us: 16 rnd: 18 sc, Cut the thread and hide.
— Body :
Info :
Hook №2,crocheting with lilac color, stuff in process:
Round 1 :
1 rnd: 6 sc in MR
Round 2 :
2 rnd: 6 inc (12)
Round 3 :
3 rnd: (1 sc,inc)x6 (18)
Info :
Next, we crochet the legs, as in the photo
Round 4 :
4 rnd: 2 sc in a circle, 4 sc with the leg (so that the legs are facing straight ahead) 6 sc in a circle, 4 sc with the leg, 2 sc in a circle (18)
Round 5 :
5 rnd: 2 sc in a circle, on the remaining 16 sc of the legs, 6 sc in a circle, on the remaining 16 sc of the legs, 2 sc in a circle (42)
Round 6-12 :
6-12 rnd: 42 sc( 7 rounds)
Info :
Change color for main
Round 13 :
13 rnd: (12 sc,dec)x3 (39)
Round 14-17 :
14-17 rnd: 39 sc(4 rounds)
Round 18 :
18 rnd: 7 sc in a circle, 4 sc in a circle, 16 sc in a circle, 4 sc in a circle, 8 sc in a circle (39)
Round 19 :
19 rnd: 7 sc in a circle, in the remaining 4 sc of the hand, 16 sc in a circle, in the remaining 4 sc of the hand,8 sc in a circle (39)
Round 21 :
21 rnd: (11 sc,dec)x3 (36)
Round 22 :
22 rnd: (1 sc,dec)x12 (24)
Round 23 :
23 rnd: (2 sc,dec) x6 (18)
Round 24-26 :
24-26 rnd: 18 sc(3 rounds)
Info :
Leave a long tail thread for piece attaching
— Sleeves (2 PCS) :
Info :
Hook №2,crocheting with pink color alpina lily ,2 sleeves:
Round 1 :
1 rnd: 18 ch,sl st, close in a circle
Round 2-4 :
2-4 rnd: 18 sc (3 rounds)
Round 5 :
5 rnd: (7 sc,dec)x2 (16)
Round 6-7 :
6-7 rnd: 16 sc (2 rounds)
Info :
Cut the thread and hide
— Dress :
Info :
Hook №2,crocheting with pink color alpina lily :
Round 1 :
1 rnd: 54 ch,sl st, close in a circle
Round 3 :
3 rnd: (16 sc,dec)x3 (51)
Round 5 :
5 rnd: (15 sc,dec)x3 (48)
Round 6-15 :
6-15 rnd: 48 sc (10 rounds)
Round 16 :
16 rnd: 9 sc, 6 sc with sleeve, 18 sc, 6 sc with sleeve,9 sc (48)
Round 17 :
17 rnd: 9 sc, 10 sc in remaining sleeve loops, 18 sc, 10 sc in remaining sleeve loops, 9 sc (56)
Round 19 :
19 rnd: 6 sc,2 dec, 8 sc,2 dec,12 sc, 2 dec, 8 sc,2 dec, 6 sc (48)
Round 20 :
20 rnd: 5 sc,2 dec, 6 sc,2 dec,12 sc,2 dec,6 sc, 2 dec, 5 sc (40)
Info :
Cut the thread and hide. Crochet the dress in the first row, keep as shown in the photo
Info :
Cut the thread and hide.
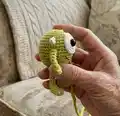
— Head + Body (Mike Wazowski) :
Info :
Hook №2,crocheting with green color,stuff in process :
Round 1 :
1 rnd: 6 sc in MR
Round 2 :
2 rnd: 6 inc (12)
Round 3 :
3 rnd: (1 sc, inc) x6 (18)
Round 4 :
4 rnd: (2 sc, inc) x6 (24)
Round 5 :
5 rnd: (3 sc, inc) x6 (30)
Round 6-7 :
6-7 rnd: 30 sc (2 rounds)
Round 8 :
8 rnd: (9 sc,inc) x3 (33)
Round 9-10 :
9-10 rnd: 33 sc (2 rounds)
Round 11 :
11 rnd: (10 sc,inc)x3 (36)
Round 12-13 :
12-13 rnd: 36 sc (2 rounds)
Round 14 :
14 rnd: (2 sc,dec)x9 (27)
Round 15 :
15 rnd: (1 sc,dec)x9 (18)
Round 16 :
16 rnd: (1 sc,dec)x6 (12)
Round 17 :
17 rnd: 6 dec Pull the hole through the front loops, cut the thread and hide.
— Eye (Mike Wazowski) :
Info :
Hook №2,crocheting with white color :
Round 1 :
1 rnd: 6 sc in MR
Round 2 :
2 rnd: 6 inc (12)
Round 3 :
3 rnd: (1 sc, inc) x6 (18)
Round 4-5 :
4-5 rnd: 18 sc(2 rounds)
Info :
Leave a long end for sewing. We insert the eye into the center of the MR, burn the leg with a lighter. Sew the eye to the body, fill during sewing.
— Legs (Mike Wazowski) :
Info :
Hook №2,crocheting with green color, 2 pcs. :
Round 1 :
1 rnd: 14 ch ,from third 3 dc, 2 hdc,8 sc, Leave a long end for sewing.
This delightful Doll Boo amigurumi pattern is made to spark joy with every stitch and assembly step. Whether you gift it or keep it, this little companion brings handmade charm to any shelf or playtime. Enjoy the process and the personality you create with tiny details and thoughtful shaping. 🧶💖