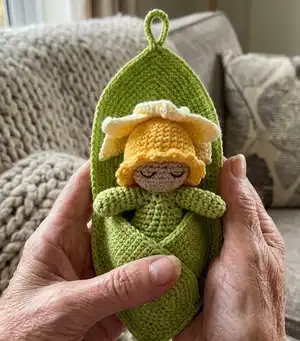
Create a sweet Daffodil Baby amigurumi with this charming crochet pattern. You will make a tiny sleeping baby wearing a daffodil hat that nestles into a leafy cradle. Clear round-by-round instructions and helpful assembly photos guide you through every step so you can create a delightful handmade gift.
Progress Tracker
0% Complete
— Head :
Info :
Advice: pull the initial yarn tail out between rounds 2 and 3, it would serve as the marker and help you to count the rounds.
Round 1 :
6 sc into magic ring (6 sts)
Round 2 :
(inc) X 6 (12 sts)
Round 3 :
(1 sc, inc) X 6 (18 sts)
Round 4 :
(2 sc, inc) X 6 (24 sts)
Round 5-9 :
sc around (24 sts)
Round 10 :
(2 sc, dec) X 6 (18 sts)
Round 11 :
(1 sc, dec) X 6 (12 sts)
Info :
After R11 stuff the head tightly.
Round 12 :
(dec) X 6 (6 sts)
Info :
In remaining 6 sc sew 6 stitches from inside to outside in sequence, pull the yarn, secure and hide it.
— Body&Arms :
Info :
Green -yellow yarn (Here I used the same color and thickness yarn as for the cradle, but more delicate and pretty; but you might as well use cradle yarn)
Round 1 :
6 sc into magic ring (6 sts)
Round 2 :
(inc, 2 sc) X 2 (8 sts)
Round 3 :
(inc, 3 sc) X 2 (10 sts)
Round 4-5 :
(2 rounds): sc around (10 sts)
Round 6 :
(dec, 3 sc) X 2 (8 sts)
Round 7-8 :
(2 rounds): sc around (8 sts)
Info :
Make 1 sl st more and leave short tail.
Round 1 :
6 sc into magic ring (6 sts)
Round 2 :
(inc) X 6 (12 sts)
Round 3 :
(1 sc, inc) X 6 (18 sts)
Round 4 :
(2 sc, inc) X 6 (24 sts)
Round 5 :
(inc, 11 sc) X 2 (26 sts)
Round 6 :
sc around (26 sts)
Round 7 :
(inc, 12 sc) X 2 (28 sts)
Round 8-11 :
(4 rounds): sc around (28 sts)
Round 12 :
(dec, 12 sc) X 2 (26 sts)
Round 13 :
(dec, 11 sc) X 2 (24 sts)
Round 14 :
(2 sc, dec) X 6 (18 sts)
Round 15-16 :
(2 rounds): sc around (18 sts)
Info :
Now place the one arm closely to the body and join them together with 2 sc *. For the arm use its last stitch and the next following stitch. Work 7 sc and join the second arm with 2 sc, when 7 sc again. Now you have round 17.
Round 17 :
(6 sc of the arm, 7 sc of the body) X 2 (26 sts)
Info :
*These inner connecting sc will not be used in the next rounds.
Round 18 :
(2 sc, dec, 2 sc, (1 sc, dec) X 2, 1 sc) X 2 (20 sts)
Round 19 :
(dec) X 10 (10 sts)
Info :
Fasten and hide the tail. Stuff the body and arms is not very tight, it should be a little flat.
Info :
Place the head onto the body, pin it. Note - the initial, neater part of the head will be at the bottom, where the neck is (the less neat part of the head will be covered by the hat). Carefully sew on the head with fine stitches with beige yarn (split in half...).
— FLOWER-HAT :
Round 1 :
6 sc into magic ring (6 sts)
Round 2 :
inc X 6 (12 sts)
Round 3 :
(1 sc, inc) X 6 (18 sts)
Round 4 :
sc around (18 sts)
Round 5 :
(2 sc, inc) X 6 (24 sts)
Round 6 :
sc around (24 sts)
Round 7 :
(3 sc, inc) X 6 (30 sts)
Round 8-12 :
(5 rounds): sc around (30 sts)
Info :
Make 1 sl st more in R12.
Round 13 :
2 ch, skip 1 st, (1 sc, 1 ch, skip 1 st) X 14, sl st in 1st ch (31 sts)
Round 14 :
1 ch, (2 sc, 1 dc, 2 sc) X 15 (76 sts), sl st
Info :
Make clean fastening off on the edge of the cap.
— PETALS (make 6) :
Info :
Make 6 petals according to the chart: Make chain of 6, then start in 2nd ch from the hook:
Round 1 :
4 sc , (1 sc, 1 dc, 1 sc) in 6th ch, 4 sc, inc 3 in 1st ch (14 sts)
Round 2 :
5 sc, (1 sc, 1 dc, 1 sc) in one st, 7 sc, (15 sts)
Round 3 :
(2 sc, inc) X 2, 1 sc, (1 sc, 1 dc, 1 sc) in one st, 1 sc, inc, (2 sc, inc) X 2 (23 sts)
Round 4 :
(2 sc, inc) X 2, 4 sc, (1 sc, 1 dc, 1 sc) in one st, 4 sc, (inc, 2 sc) X 2, 2 sl st (29 sts)
Info :
For the five petals cut the yarn off. For the last petal do not cut the yarn.
Info :
Working on the other side of the chain, grab the initial tail into the crocheting to hide it.
Info :
Divide the petals into two triples. For the first triplet (here the petal with uncut yarn): Work 1 sl st more for this petal and join 2nd petal, making 2 sl sts in its last and previous stitches (better in the sts of the previous round). Join 3rd petal in the same way. Make 1 sl st in 1st petal. Cut the yarn off. Pull all the tails into the center hole.
Info :
For the second triplet: Attach the green-yellow yarn in the previous st (before the last st) of a petal. Work 3 sc in the 2nd and the 3rd petals (in the penultimate, last and previous sts - better in the sts of the previous round). It turned out the first round (9 sts) of a stem.
Round 2 :
sc around (9 sts)
Round 3 :
4 dec, sl st (5 sts)
Info :
Leave a long tail. Pull all the tails into the center hole.
Info :
Then pull this bundle of tails through the center hole of the first triplet of petals. Align the two triplets, pull up the tails well and sew the petals together with small stitches near the green stem with the pale yellow yarn. Don't cut the yarn! When the petals are securely stitched, trim off the bundle of tails. Thread the green tail into the needle and make stitch into each sts of the 3rd round. Pull the yarn, secure and hide.
Info :
Place the pale yellow flower on top of the yellow cap, pin in the center and sew tightly with tiny stitches using the same pale yellow yarn.
— FACE :
Info :
Put the hat on the doll's head and mark the places for the eyes with pins. Remove the hat. Embroider the eyes a few stitches with 2-strand black embroidery thread as shown in the photos.
Info :
It is difficult to embroider eyes, it is better to practice beforehand on a piece of cloth.
Info :
Put the hat back on and sew it on with yellow yarn.
— LEAF-CRADLE :
Info :
Be sure to check the chart as you work otherwise it is very easy to get confused. Green-yellow yarn
Info :
Make chain of 26, then start in 2nd ch from the hook:
Round 1 :
24 sc , inc 3 in 26th ch, 24 sc, inc 3 in 1st ch (54 sts)
Round 2 :
inc, 23 sc, inc, 1 sc, inc 3, 1 sc, inc, 23 sc, inc, 1 sc, inc 3 (61 sts)
Round 3 :
14 sc, inc, 14 sc, inc 3, 14 sc, inc, 15 sc, inc 3 (67 sts)
Round 4 :
2 sc, inc, 26 sc, inc, 2 sc, inc 3, 2 sc, inc, 26 sc, inc, 3 sc, inc 3 (75 sts)
Round 5 :
36 sc, inc 3, 37 sc, inc 3 (79 sts)
Round 6 :
4 sc, inc, 7 sc, inc, 12 sc, inc, 7 sc, inc, 4 sc, inc 3, 4 sc, inc, 7 sc, inc, 12 sc, inc, 7 sc, inc, 5 sc, inc 3 (91 sts)
Round 7 :
44 sc, inc 3, 45 sc, inc 3 (95 sts)
Round 8 :
6 sc, inc, 32 sc, inc, 6 sc, inc 3, 6 sc, inc, 32 sc, inc, 7 sc, inc 3 (103 sts)
Round 9 :
24 sc, inc, 25 sc, inc 3, 25 sc, inc, 25 sc, inc 3 (109 sts)
Round 10 :
4 sc, inc, 43 sc, inc, 4 sc, inc 3, 4 sc, inc, 44 sc, inc, 4 sc, inc 3 (117 sts)
Round 11 :
57 sc, inc 3, 58 sc, inc 3 (121 sts)
Round 12 :
13 sc, inc, 31 sc, inc, 13 sc, inc 3, 13 sc, inc, 31 sc, inc, 14 sc, inc 3 (129 sts)
Round 13 :
63 sc, inc 3, 63 sc, sl st, 2 sl st in one st, chain of 15, sl st (133 sts + 15 ch)
Info :
Working on the other side of the chain, grab the initial tail into the crocheting to hide it. Make clean fastening off on the edge. The leaf turns out not exactly symmetrical in shape, this will be corrected in the process of ironing.
— SMALL LEAF (make 2) :
Info :
Make chain of 16, then start in 2nd ch from the hook:
Round 1 :
14 sc, (1 sc,1 dc,1 sc in one stitch – hereafter I refer to this set as "sds" for convenience, but it counts as three stitches), 14 sc, inc 3 (34 sts)
Round 2 :
14 sc, inc, sds, inc, 16 sc (37 sts)
Round 3 :
2 sc, inc, 5 sc, inc, 9 sc, sds, 9 sc, inc, 5 sc, inc, 2 sc, inc 3 (46 sts)
Round 4 :
2 sc, inc, 3 sc, inc, 12 sc, inc, 1 sc, sds, 1 sc, inc, 12 sc, inc, 3 sc, inc, 5 sc (54 sts)
Round 5 :
inc, 24 sc, sds, 24 sc, inc, 3 sc (58 sts)
Round 6 :
2 sc, inc, 3 sc, inc, 18 sc, inc, 1 sc, sds, 1 sc, inc, 18 sc, inc, 3 sc, inc, 5 sc (66 sts)
Round 7 :
31 sc, sds, 32 sc, 2 sl st (68 sts)
Info :
Make clean fastening off on the edge.
— CRADLY ASSEMBLY :
Info :
Put the small leaves on top of each other as shown in the photo. Check first - staple with pins, then pin to a large leaf and see if the baby fits well.
Info :
Sew them together along the edge of the top leaf with fine stitches of green-yellow yarn. Try to sew so that this double leaf is convex. Place the double leaf on top of the large leaf, pin it. Check the cradle again.
Info :
If all is well, sew the leaves together along the edge with small tight stitches. The edge of the double leaf can be neatly pulled down by pulling the green-yellow yarn through it and fastening it to the side - so that the baby sits more snugly in the cradle.
Info :
The large leaf is too flexible, the cradle with the baby can not be suspended. I strengthened the cradle with wire. Make a loop out of a piece of wire slightly longer than your leaf, then bend the ends. Place the wire in the center of the leaf and pin it. Very carefully, with small inconspicuous stitches, sew on the wire in several separate places. Tie tight knots. Thread the tails of the yarn into the needle and hide them.
Info :
Make clean fastening off on the edge. Carefully and gently iron the leaves through the damp cloth. Since the leaves are not exactly symmetrical, adjust their shape while ironing by slightly stretching one side and squeezing the other.
Info :
Place the pale yellow flower-hat on the doll's head and pin. Sew the hat on with yellow yarn and make final adjustments so the baby fits nicely in the cradle.
This tiny Daffodil Baby is a sweet, handmade treasure perfect for springtime displays or heartfelt gifts. The pattern combines simple amigurumi shaping with delicate flower and leaf details to create a charming keepsake. Make one for yourself or a loved one and enjoy the little smiles it brings. 🧶🌼