About This Daisy The Duck Amigurumi Pattern
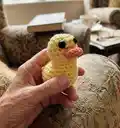
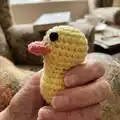
This pattern makes a tiny Daisy the Duck amigurumi using 4ply yarn and a 3.5mm hook. The design is compact and palm-sized with a shaped body, simple beak, and safety eyes. It focuses on basic single crochet rounds, increases and decreases to form the duck shape. Photos and clear placement notes help you assemble and shape the finished piece.
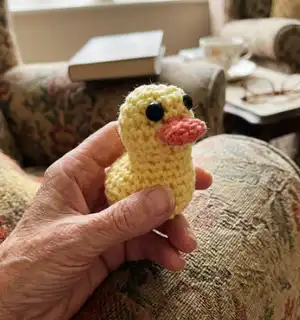
Perfect for beginners who want a quick, satisfying project to practice shaping and finishing. The finished duck measures approximately 4cm x 3cm x 4cm and is ideal for gifts or small decorations.
Why You'll Love This Daisy The Duck Amigurumi Pattern
I absolutely love this pattern because it turns simple stitches into a charming little character with minimal fuss. I enjoy how quickly it works up—perfect for an afternoon make when I want instant satisfaction. The shaping is clever yet easy, giving the duck personality without complicated techniques. Sewing the beak and positioning the eyes always feels so rewarding and brings the little duck to life. I also love that the finished size makes it ideal for gifting, keychains, or tiny shelf decor.
Switch Things Up
I love experimenting with color choices: try pastel yellow for a softer Daisy or use variegated yarn for a playful look.
I often change the beak color to bright orange or coral to give the duck different personalities.
If you want a larger duck, I recommend using a bulkier yarn and increasing the hook size — this creates a chunkier, cuddlier result.
For a tiny keychain, use a thinner yarn and smaller hook to make a miniaturized version suitable for a bag charm.
I sometimes replace safety eyes with embroidered eyes for baby-safe toys or softer aesthetics.
Add tiny crocheted wings or a little tail by working small semicircles and stitching them to the back for extra detail.
Consider attaching a jump ring and chain to turn Daisy into a keyring or zipper pull for a functional accessory.
I like to embroider tiny eyelashes or cheeks to change expression and make each duck unique.
Try stuffing the body firmer for a sturdier toy or softer for a squishier, more cuddly feel depending on intended use.
Mix and match yarn textures like soft chenille for a plush look, or cotton for a neat, compact finish.
Common Mistakes & How to Fix Them
✗ Placing safety eyes too close together will distort the face; insert them between row 4 and row 5 and space them 4-5 stitches apart as directed.
✗ Understuffing the back end causes the duck to tip forward and lose balance; add extra stuffing to the rear end to ensure it sits flat and stable.
✗ Skipping stitch counts after increases and decreases leads to incorrect shaping; count your stitches at the end of each round to maintain the correct totals.
✗ Sewing the beak crooked will change the duck's expression; fold the beak rectangle carefully, stitch the short edges shut, and line the bottom edge with the join of row 7/8 for correct placement.
✗ Using inconsistent tension can make the body lopsided; maintain even tension throughout and reshape by squeezing gently if needed to even out the form.