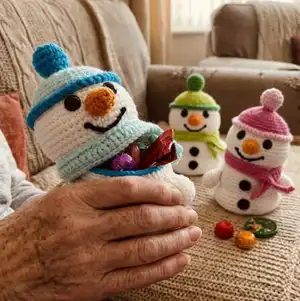
Make a charming crocheted snowman with this clear, photo-supported pattern. You will create a cuddly toy with a removable hat, scarf, and cute facial details. The pattern uses DK-weight yarn and a 3.0 mm hook to produce a small, gift-ready snowman. Follow the step-by-step rounds and helpful tips to crochet, assemble and finish a delightful winter companion.
Progress Tracker
0% Complete
— ARM (make 2, use yarn in WHITE) :
Round 1 :
magic ring of 6 sc - 6
Round 2 :
*2sc in next st* around - 12
Round 3 :
*2sc in next st, sc in next st* around - 18
Round 4 :
*sc in next st* around - 18
Round 5 :
*sc in next st* around - 18
Round 6 :
*inv_dec, sc in next st* around - 12
Round 7 :
*inv_dec, sc in next 4 st* x2 - 10
Round 8 :
flatten the opening so that the stitch you made last sits on the side; both side-stitches remain unworked; crochet the opening closed with: sc in next 4 stitch-pairs - 4
Info :
→ see page 18 for details on crocheting openings closed
Info :
fasten off & weave in the yarn-end
— OPTIONAL: BUTTON (make 2, use yarn in BUTTON-COLOR) :
Info :
I usually make them in black. Instead of crocheting them you can use small buttons, mini pompoms etc (15 mm in diameter).
Round 1 :
magic ring of 6 sc - 6
Info :
fasten off & leave long yarn-ends hang for later sewing; pull ring closed and create a seamless connection between round's end and beginning; to create a seamless connection guide the yarn-end through the first stitch – from back to front, and from there through the last stitch – between back loop and front loop; → see page 19 for details
— NOSE (make 1, use yarn in ORANGE) :
Round 1 :
magic ring of 6 sc - 6
Round 2 :
*sc in next st* around - 6
Round 3 :
*2sc in next st, sc in next st* x3 - 9
Round 4 :
*2sc in next st, sc in next 2 st* x3 - 12
Round 5 :
get a second stitch-marker and mark stitch #2 within this round; you need this position later for crocheting the nose to the head; *sc in next st* around (slip stitch in last st) - 12
Info :
fasten off & weave in the yarn-end on the inside. leave the additional stitch-marker in place
— BODY (make 1, begin with yarn in CONTRAST-COLOR) :
Info :
You start here with the body's inner part. If you'd like it to be in another color begin with contrast-color. I usually use the same color I use for the hat's brim & pompom. Otherwise begin in white.
Info :
Info 2: The number of in- or decreases per round changes frequently, sometimes from round to round. I'm not mentioning this every time. So please pay attention. :)
Round 1 :
magic ring of 8 sc - 8
Round 2 :
*2sc in next st* around - 16
Round 3 :
*2sc in next st, sc in next st* around - 24
Info :
change of sequence from here on there are 6 increases per round instead of 8
Round 4 :
*2sc in next st, sc in next 3 st* around - 30
Round 5 :
*2sc in next st, sc in next 4 st* around - 36
Round 6 :
*2sc in next st, sc in next 5 st* around - 42
Round 7 :
*2sc in next st, sc in next 6 st* around - 48
Round 8 :
*2sc in next st, sc in next 7 st* around - 54
Round 9 :
*2sc in next st, sc in next 17 st* x3 - 57
Round 10 :
*sc in next st* around - 57
Round 11 :
*sc in next st* around - 57
Round 12 :
*sc in next st* around - 57
Round 13 :
*inv_dec, sc in next 17 st* x3 - 54
Round 14 :
*inv_dec, sc in next 7 st* x6 - 48
Round 15 :
*inv_dec, sc in next 4 st* x8 - 40
Round 16 :
in back loops (→ see page 21): *sc in next st* around - 40
Round 17 :
*sc in next st* around - 40
Round 18 :
*sc in next st* around - 40
Round 19 :
*sc in next st* around - 40
Round 20 :
*sc in next st* around - 40
Round 21 :
*sc in next st* around - 40
Round 22 :
*2sc in next st, sc in next 9 st* x4 - 44
Info :
change to WHITE with last st. secure the yarn-ends of both colors with several knots on the body's inside; cut off the excess yarn;
Round 23 :
in back loops: *sc in next st* around - 44
Round 24 :
*sc in next st* around - 44
Round 25 :
in this round the arms are crocheted to the body (→ see page 22 for details on that). sc in next 9 st, now place one of the arms in front of the body; guide your hook through the arm's first stitch and from there through the next stitch of the body; that's the first stitch-pair; push both stitches close together; crochet the first arm on with: sc in next 4 stitch-pairs, continue on body with: sc in next 18 st, crochet second arm on with: sc in next 4 stitch-pairs, continue on body with: sc in next 9 st - 44
Round 26 :
*sc in next st* around - 44
Round 27 :
*sc in next st* around - 44
Round 28 :
*sc in next st* around - 44
Info :
add the edge between the white part and the part in contrast-color (→ see page 23); this later forms the edge around the body's opening; I usually use the color I used for the inner-part; place the body in front of you with the opening facing towards you; connect yarn in CONTRAST-COLOR to one of the front loops between the white part and the part in contrast-color on the body's back side; crochet with slip stitches around the body until all the front loops are used: *slip stitch in next front loop* around - 44; fasten off and create a seamless connection between round's end & beginning; for the seamless connection guide the yarn-end through the round's first stitch – from back to front; from there guide it through the round's last stitch – between front loop and back loop; pull yarn through to create the seamless connection;
Round 29 :
*inv_dec, sc in next 20 st* x2 - 42
Round 30 :
*sc in next st* around - 42
Round 31 :
in front loops (→ see page 21): *2sc in next st, sc in next 6 st* around - 48
Round 32 :
sc in next 4 st, *2sc in next st, sc in next 7 st* x5, 2sc in next st, sc in next 3 st - 54
Round 33 :
*2sc in next st, sc in next 8 st* around - 60
Round 34 :
*sc in next st* around - 60
Round 35 :
*sc in next st* around - 60
Round 36 :
*sc in next st* around - 60
Round 37 :
*inv_dec, sc in next 8 st* around - 54
Round 38 :
sc in next 4 st, *inv_dec, sc in next 7 st* x5, inv_dec, sc in next 3 st - 48
Info :
attach the buttons (→ see page 24). I'm using crocheted buttons here; use the two yarn-ends to sew each button to the body with a few stitches; secure the yarn-ends on the body's inside and cut off the excess yarn; the buttons have a distance of about 3 rounds between them; use the "bend" between upper and lower body as reference; the upper button sits 1 round above that bend, the lower button sits 2 rounds below it;
Round 39 :
*inv_dec, sc in next 6 st* around - 42
Round 40 :
sc in next 3 st, *inv_dec, sc in next 5 st* x5, inv_dec, sc in next 2 st - 36
Round 41 :
in back loops: *dec, sc in next 4 st* around - 30
Round 42 :
*inv_dec, sc in next 3 st* around - 24
Info :
change of sequence the last two rounds have 8 decreases per round instead of of 6
Round 43 :
*inv_dec, sc in next st* x8 - 16
Round 44 :
*inv_dec* around - 8
Info :
fasten off, close the remaining opening & hide yarn-end. to close the opening weave the yarn-end through the front loops of each of the remaining stitches; pull tight to close the opening; → see page 25. straighten out the inner part
— HEAD (make 1, begin with yarn in WHITE) :
Info :
Here too you begin with the head's inner part and end with the pompom on top of the hat.
Round 1 :
magic ring of 6 sc - 6
Round 2 :
*2sc in next st* around - 12
Round 3 :
*2sc in next st, sc in next st* around - 18
Round 4 :
*2sc in next st, sc in next 2 st* around - 24
Round 5 :
*2sc in next st, sc in next 3 st* around - 32
Round 6 :
*2sc in next st, sc in next 4 st* around - 40
Round 7 :
*sc in next st* around - 40
Round 8 :
*sc in next st* around - 40
Round 9 :
*sc in next st* around - 40
Round 10 :
*sc in next st* around - 40
Round 11 :
*sc in next st* around - 40
Round 12 :
*sc in next st* around - 40
Round 13 :
in back loops: *2sc in next st, sc in next 9 st* x4 - 44
Round 14 :
*sc in next st* around - 44
Round 15 :
have 3 additional stitch-markers ready; three stitches need to be marked within this round; crochet the round first, then mark them; in back loops: *2sc in next st, sc in next 10 st* x4 - 48; mark stitches #26 & #28; these are the positions you later need for the mouth; also mark front loop #17 of the previous round with an additional marker; this position is later needed for the scarf; tie a knot to make the marker more secure if you like;
Round 16 :
*2sc in next st, sc in next 7 st* around - 54
Round 17 :
get 2 more stitch-markers ready; two more stitches needed for the mouth need to be marked here; again, mark them once the round is done; sc in next 5 st, *2sc in next st, sc in next 8 st* x5, 2sc in next st, sc in next 3 st - 60; mark stitches #30 & #38;
Info :
get the nose ready; it gets partially crocheted to the head in this round (→ see page 25 for details);
Round 18 :
sc in next 32 st, now place the nose in front of the head with its opening facing up and the nose's marked stitch pointing towards the head; only use the nose's back loops for crocheting (the inner loops closest to the nose's inside); guide your hook through the back loop of the nose's marked stitch (from the nose's inside towards the outside) and from there through the head's next stitch; push both stitches close together; you now have the first stitch-pair on your hook; partially crochet the nose on with: sc in next 3 stitch-pairs (only the inner loops of the nose); continue on head with: sc in next 25 st - 60
Info :
let the nose hang there for the next couple of rounds; just keep crocheting along the head;
Round 19 :
*sc in next st* around - 60
Round 20 :
*sc in next st* around - 60
Round 21 :
get 2 more markers ready; the upper part of the nose is crocheted to the head with 3 stitches here (→ see page 25 for details); on each side of the nose 3 unused stitches will remain; sc in next 32 st, stuff the nose; now skip 3 stitches on the nose and begin crocheting in the next; only use the nose's back loops here as well; crochet the nose's upper part on with: sc in next 3 stitch-pairs, continue on the head with: sc in next 25 st - 60; mark stitches #30 & #39 within this round; these positions are for the eyes;
Info :
optional but recommended if you're making this figure for a child: secure the nose's sides to the head (→ see page 25). use a piece of yarn in ORANGE or WHITE, let it come from the head's inside and sew the nose's sides to the head; only use the back loops for sewing here as well; once done secure the yarn-ends on the head's inside with several knots and cut off the excess yarn;
Info :
embroider the mouth (→ see page 27). use the 4 marked stitches below the nose; begin with the upper two that sit wider apart; get a strand of yarn in BLACK; let it come from the head's inside; guide it out of one of the upper two marked stitches and then back towards the head's inside through the other one; pull yarn through to create a straight mouth-line; let the yarn come out of one of the two marked stitches below the mouth-line; guide the needle under the mouth-line (make sure to not splice it) and then back again through the same stitch; slowly pull tight to pull the mouth-line down; repeat with the second marked stitch to create the smile; secure the yarn-ends on the head's inside with knots;
Info :
create the corners of the mouth: take two strands of yarn and make a knot in each of them; take the first strand and guide both ends through the first corner of the mouth; pull through until only the knot is left, sitting at the corner of the mouth; secure the yarn-ends on the head's inside; repeat with the second corner of the mouth and the other knotted strand of yarn;
Round 22 :
*inv_dec, sc in next 8 st* around - 54
Round 23 :
sc in next 3 st, *inv_dec, sc in next 7 st* x5, inv_dec, sc in next 4 st - 48
Round 24 :
*inv_dec, sc in next 6 st* around - 42
Info :
change to HAT-COLOR with last st. secure the yarn-ends of both colors with several knots on the head's inside; cut off the excess yarn;
Round 25 :
in back loops: *2sc in next st, sc in next 6 st* around - 48
Round 26 :
*sc in next st* around - 48
Info :
insert the eyes. use the two marked stitches to the right and left above the nose; use your crochet hook to widen the stitches; put the eyes in and secure them with their closures; push the head's bottom part to the inside; push it inside so that the first round of visible front loops forms the edge between inside and outside of the head; the second round of front loops is the one with the marker in one of its front loops; this round runs around the head's lower part;
Round 27 :
*inv_dec, sc in next 6 st* around - 42
Round 28 :
sc in next 3 st, *inv_dec, sc in next 5 st* x5, inv_dec, sc in next 2 st - 36
Round 29 :
*inv_dec, sc in next 4 st* around - 30
Round 30 :
sc in next 2 st, *inv_dec, sc in next 3 st* x5, inv_dec, sc in next st - 24
Round 31 :
*inv_dec, sc in next 2 st* around - 18
Round 32 :
*inv_dec, sc in next st* around - 12
Round 33 :
*inv_dec* around - 6
Info :
change to POMPOM-COLOR with last st. secure the yarn-ends of both colors with several knots on the head's inside; cut off the excess yarn;
Round 34 :
in front loops: *2sc in next st* around - 12
Round 35 :
*2sc in next st, sc in next st* around - 18
Round 36 :
*sc in next st* around - 18
Round 37 :
*sc in next st* around - 18
Info :
begin stuffing the pompom. stuff more as you go
Round 38 :
*inv_dec, sc in next st* around - 12
Round 39 :
*inv_dec* around - 6
Info :
fasten off, close the remaining opening & hide the yarn-end. leave the stitch-marker that you placed in round 15 where it is for now
— SCARF (use yarn in SCARF-COLOR) :
Info :
I usually use the color I used for the hat. Info 2: The head should be completed before you begin with this pattern, since the scarf is directly crocheted to the head. See page 30 for details on crocheting the scarf.
Round 1 :
chain 64, ch 1 + turn, begin in 2nd st from hook, sc in next 10 st, → continue next page
Round 2 :
within this row a loop/a hole is created on the scarf's first end; later you can pull the second end through it; ch 1 + turn, begin in 2nd st from hook, sc in next 6 st, chain 4, skip 4 stitches, *2sc in next st, sc in next 10 st* x4, sc in next 10 st - 68
Round 3 :
ch 1 + turn, begin in 2nd st from hook, *sc in next st* across - 68
Round 4 :
ch 1 + turn, begin in 2nd st from hook, in back loops: *slip stitch in next st* across - 68
Info :
chain 1, fasten off & weave in the yarn-ends on the scarf's back side. now tuck one end through the other's hole
This cozy Snowman Amigurumi pattern is perfect for handmade gifts and winter decor — customize colors to match your holiday palette. The step-by-step photos and detailed rounds guide you through shaping, attaching features, and finishing touches for a professional look. Happy crocheting and enjoy making a tiny friend to brighten the season! ❄️🧶