🧢 Beautiful ✨ Detailed πŸ’ Adorable

Cute Cat Amigurumi Pattern

Cute Cat Amigurumi Pattern
4.6β˜… Rating
5-7 Hours Time Needed
3.9K Made This
βœ‚οΈ

Beginner Friendly Level

Perfect for those just starting their crochet journey, with clear instructions and simple techniques

⏱️

Weekend Treat

Takes 5-7 hours, making it an enjoyable project to finish over a couple of days.

🧸

Cute Companion

An adorable friend to cherish, handcrafted with love to bring comfort and joy for years to come.

About This Cute Cat Amigurumi Pattern

This pattern creates a chunky plush cat amigurumi made with velvet-style yarn for a soft, tactile finish. You will crochet a rounded body, small ears, arms, legs and tail, then add glued eyes and embroidered facial details. The instructions use simple single crochet shaping so you can focus on shaping and finishing.

Cute Cat Amigurumi Pattern crochet pattern - detailed view of completed project

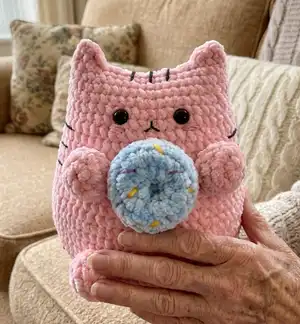
Perfect for gifting or cuddling, the finished toy measures about 21-23 cm with the recommended materials. The pattern includes tips for eye placement, sewing parts and embroidered accents.

Why You'll Love This Cute Cat Amigurumi Pattern

I absolutely love this pattern because it turns ultra-soft plush yarn into the cutest little companion with minimal fuss. I enjoy how quickly the body grows with simple rounds of single crochet and shaping, making it satisfying to see fast progress. The embroidery and glue-on eyes let me personalize each cat’s expression, which I find so rewarding. I also love that the pattern uses basic stitches, so I can share it with friends who are new to amigurumi and watch them succeed.

Cute Cat Amigurumi Pattern step 1 - construction progress Cute Cat Amigurumi Pattern step 2 - assembly progress Cute Cat Amigurumi Pattern step 3 - details and accessories Cute Cat Amigurumi Pattern step 4 - final assembly and finishing

Switch Things Up

I love to change the color palette to make each cat unique; try pastel pinks, baby blues or neutral greys for different moods.

I sometimes swap the plush yarn for a lighter weight and a smaller hook to make a mini keychain version that is super portable.

I also like to make the cat larger by using bulky yarn and a bigger hook for a cuddly pillow-sized companion.

I often add tiny crocheted accessories like a donut or bow to give the cat personality and to create sets or themed gifts.

I experiment with different eye sizes and placements to change expression; moving eyes slightly up or down dramatically alters the face.

I like to embroider subtle cheek stitches or whisker lines using embroidery thread to add delicate detail without bulk.

I sometimes use safety eyes for durability, but gluing works nicely for plush yarn; always check position before applying glue.

I recommend trying contrasting yarn for the donut sprinkles or using textured yarn to make the donut pop visually.

I enjoy combining techniques like felt accents or small sewn patches to create more character and detail.

If you want poseable limbs, try inserting thin wire into the arms before stuffing to achieve gentle positioning.

Common Mistakes & How to Fix Them

βœ— Forgetting to count rounds when increasing will make the cat oval or lopsided; count after each increase round and mark the start of the round with a stitch marker. βœ— Placing eyes without measuring causes uneven facial placement; count down exactly five rounds from the top and space the eyes five stitches apart before gluing. βœ— Overstuffing the body makes seams bulge and distorts the shape; stuff gradually and evenly until the cat has a firm but soft feel. βœ— Not leaving a long tail for sewing the appendages can make attachment difficult; always leave a long yarn tail on arms, legs and tail for neat sewing. βœ— Using a different yarn weight without adjusting the hook leads to the wrong finished size; change hook size to match your chosen yarn and check gauge on a small swatch.

Cute Cat Amigurumi Pattern

Make a sweet, squishy plush cat using soft plush yarn and simple crochet stitches. This pattern guides you step-by-step through creating the body, ears, arms, legs, tail and cute facial details so you can finish a lovable toy you will want to keep or gift. It uses basic increases and decreases and includes clear placement notes for eyes and embroidery to get a perfectly balanced face.

Beginner Friendly 5-7 Hours

Materials Needed for Cute Cat Amigurumi Pattern

β€” Main Fabric

  • 01
    Himalaya Dolphin Baby plush yarn - for cat, approximately 1-1.5 skeins
  • 02
    Same plush yarn in 2 additional colors (small amounts) for donut accessory
  • 03
    YarnArt Jeans (or similar cotton yarn) - small amount to embroider lines on donut and body
  • 04
    Black yarn (YarnArt Jeans used) - small amount for body lines
  • 05
    Embroidery thread - for nose and facial details
  • 06
    Polyester stuffing - as needed

β€” Tools Required

  • 01
    Crochet hook size 4 mm
  • 02
    Safety eyes black 10 mm (2 pieces)
  • 03
    Glue for eyes (glue gun recommended)
  • 04
    Scissors
  • 05
    Yarn needle for sewing and embroidery
  • 06
    Stitch markers
  • 07
    Polyester stuffing
  • 08
    Pins for assembly (optional)

Progress Tracker

0% Complete

β€” Body :

Round R1 :

make ch2, in the second ch from the hook: 6 sc (6)

Round R2 :

6inc (12)

Round R3 :

(1sc, inc )*6 (18)

Round R4 :

(2sc, inc)*6 (24)

Round R5 :

(3 sc, inc)*6 (30)

Round R6 :

(4sc, inc)*6 (36)

Round R7 :

(5sc, inc)*6 (42)

Round R8 :

(6sc, inc)*6 (48)

Round R9 :

(3sc, inc)*12 (60)

Round R10 :

(4sc, inc)*12 (72)

Round R11-16 :

(6 rounds) without changes (72)

Round R17 :

(4sc, dec)*12 (60)

Round R18-21 :

(4 rounds): without changes (60)

Round R22 :

(8sc, dec)*6 (54)

Round R23-24 :

(2 rounds): without changes (54)

Round R25 :

(7sc, dec)*6 (48)

Round R26-27 :

(2 rounds): without changes (48)

Round R28 :

(6sc, dec)*6 (42)

Round R29-33 :

(5 rounds): without changes (42)

β€” Crochet ears :

Info :

Fold the bode in half and work, joining 2 sides

Round R34 :

3 dc, 14 sl st, 3 dc

Info :

Cut off the yarn and hide the end.

β€” Arms and legs :

Info :

Arms and legs are crocheted in the same way (make 4)

Round R1 :

Make ch2, in the second ch from the hook: 6sc (6)

Round R2 :

6inc (12)

Round R34 (2 rounds) :

without changes (12)

Info :

Leave a long end for sewing

β€” Glue eyes :

Info :

Count 5 round from the top. Glue eyes between rounds 5 and 6 The distance between eyes is 5 stitches.

β€” Embroidery and facial details :

Info :

Embroidery a mouth (as it is shown on the pictures)

Info :

Embroidery cheeks: Make several stitches (you may use embroidery thread/ cotton thread or plush yarn, as you like more).

Info :

Embroider lines on the body: count 2 rounds down from the eyes, the width of the lines is 5-6 stitches.

β€” Tail :

Round R1 :

Make ch2, in the second ch from the hook: 6sc (6)

Round R2 :

6inc (12)

Round R3-4 :

(2 rounds): without changes (12)

Round R5 :

(1sc, dec)*4 (8)

Round R6-13 :

(8 rounds): without changes (8)

Info :

Leave a long end for sewing

Info :

Sew the tail at level of rounds 10-11

β€” Sew arms and legs :

Info :

Count from the ears 8 rounds and sew arms. Lightly stuff the arms. The distance between arms is 8 stitches.

Info :

Sew legs at level of rounds 11-12 of the body. The distance between legs is 8 stitches. Lightly stuff the legs.

β€” Finishing :

Info :

Your cat is ready. Add any additional embroidery lines or small accessories as desired.

Assembly Instructions

  • Glue eyes: Count 5 rounds from the top and glue the black 10 mm eyes between rounds 5 and 6 with a small distance of 5 stitches between them.
  • Sew arms: Count down 8 rounds from the ears, position arms evenly (distance between arms is 8 stitches), lightly stuff and sew securely.
  • Sew legs: Sew legs at the level of rounds 11-12 of the body, space them 8 stitches apart and lightly stuff before finishing.
  • Sew tail: Leave a long end for sewing, then sew the tail at the level of rounds 10-11 on the body.
  • Attach ears: Fold each crocheted ear in half, join the two sides and hide the ends, then sew ears to the top of the head symmetrically.
  • Finish face: Embroider the mouth as shown in the pictures and add cheeks and body lines using embroidery or cotton thread for detail.

Important Notes

  • πŸ’‘Use stitch markers to track round starts and increases so shaping remains even and predictable.
  • πŸ’‘Stuff evenly and gradually to avoid lumps; firm but not overstuffed filling gives best shape.
  • πŸ’‘Leave long yarn tails on appendages for easy sewing and secure attachment when assembling parts.
  • πŸ’‘Measure eye placement carefully before gluing to ensure a symmetrical face; check spacing on both sides.

This adorable Cute Cat amigurumi is made with plush velvet yarn for a soft, huggable finish. The pattern features simple shaping, embroidered details and a cute donut accessory to personalize your cat. Perfect as a handmade gift or a cozy companion to brighten any shelf or nursery. 🧢✨😊

You ask,

we answer.

FAQs

What size will the finished piece be?

The size of the finished toy is 21-23 cm when using the recommended materials and 4 mm hook.

Can I use different yarn weights for this pattern?

Yes, you can use different yarn weights but the finished size and stitch spacing will change; adjust your hook accordingly and check the look on a small sample.

Do I need prior crochet experience for this pattern?

This pattern is beginner friendly and uses basic stitches like single crochet, increases and decreases; beginners with basic knowledge should be able to follow it.

How long does this project typically take to complete?

Most crocheters complete this project in 5-7 hours, depending on experience level, yarn type, and time spent on finishing details.

How should I attach safety eyes for this plush toy?

Glue eyes are recommended: count five rounds from the top and glue the eyes between rounds 5 and 6 leaving five stitches between them; use a glue gun for secure adhesion.