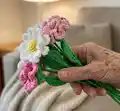
Create a charming handmade bouquet with 25 delicate crochet flowers including roses, daisies, blue flowers, buds and carnations. This pattern guides you through making petals, sepals, leaves and stems step-by-step with photos and diagrams. You will learn to wrap stems with yarn and assemble beautiful floral arrangements for gifting or decoration. Perfect for making a colourful, long-lasting bouquet to brighten any room.
Progress Tracker
0% Complete
— General Notes :
Info :
The bouquet includes 25 flowers: 5 roses, 5 daisies, 5 blue flowers, 5 buds and 5 carnations. Stems are 10 inches (25 cm) tall in the example. The pattern uses cotton yarn YarnArt 'Begonia' 169m/50g and a 2 mm hook. Thicker yarn will create larger flowers; thinner yarn will create smaller flowers. For thin yarn leaves can be worked doubled to enlarge them.
Infos :
For stems use flower wire 1.1 mm thick and 10 in (25 cm) long, or 0.8-0.9 mm for smaller flowers. Use silicone glue, universal glue or hobby glue for gluing parts. Use pliers to cut wire to the required length for stems.
— Stems (wire wrapping) :
Info :
I will make each flower 25 cm (10 inches) long. The length of the stem is selected according to the size of the flowers that will be planted on the stem. If the flowers are small, a stem length of 25 cm (10 inches) is fine. If the volume of your flowers is larger, you can make the stem length 30 cm (12 inches).
Step 1 :
Using pliers, cut the required length of wire for the stem.
Step 2 :
Apply glue to the edge of the wire and fasten the yarn firmly on the edge of the wire. Gradually apply glue to the wire and wind the yarn tightly around the wire.
Step 3 :
Continue winding the yarn until the wire is completely covered, trim the ends and set the stem aside to dry.
— Leaf :
Info :
Leaf chart is provided. Leaves are worked on a short chain foundation attached to the stem edge and worked in rows; photos show technique of increasing stitch height towards the outer curve.
Row 1 :
CH 7. (Attach yarn to the wire and CH 7 as the foundation chain.)
Row 2 :
CH 1, SC 1 in the first chain (I perform the second row in the backside of the chains - you may perform as convenient for you).
Row 2 cont :
HDC 1 in the second chain, DC 1 in the third chain, DC 2 in the fourth chain, TR 2 in the fifth chain, DTR 3 in the sixth chain, DTR 7 in the seventh chain.
Row 3 :
Then perform stitches in the same chains according to the stitches that have already been made: DTR 3 in the same chain where DTR 3 have already been made; TR 2 in the same chain where TR 2 have already been made; DC 2 in the same chain where DC 2 have already been made.
Row 3 cont :
Continue: DC 1 in the same chain where DC 1 have already been made, HDC 1 in the next chain, SC 1 in last chain. CH 1. SL ST in the first SC of this row to turn.
Row 4 :
CH 1. SC 1 in the same SC; SC 1 in the HDC. Continue along the edge filling stitches following diagram and photos so the leaf curves and the inner edge is filled.
Row 5 :
Work SC along the outer edge into each tall stitch as illustrated: SC 2 in the first DTR of thirteen, SC 3 in the sixth DTR, SC 1 in the seventh DTR, CH 2, then continue working SC 1 into each of the tall stitches and repeat symmetrical on return side to finish leaf shape.
Row 6 :
Finish row: ST in the first SC of this row. Fasten off and trim the ends of the yarn. (If cotton yarn is used, the leaf can be easily ironed.)
Info :
The same leaves are made for each type of flower. Make as many leaves as required and glue to the stem later.
— Sepal :
Row 1 :
Magic ring. CH 1, SC 14 in the magic ring. Tighten the ring and SL ST in the first SC to close (this forms a small circular base).
Row 2 :
CH 3 from the first SC (counts as first tall stitch), DC 1 in the first SC, DC 1 in next SC, DC 1 in following SC; repeat along to create 7 small points (see diagram). This row forms the seven sepal points. Fasten off or continue to next shaping round depending on the sepal diagram.
Info :
Check the size of the hole of the sepal is suitable for the thickness of the stem. The magic ring may be slightly expanded or tightened to adjust fit. If cotton yarn is used, the sepal can be ironed to shape.
— Rose (petal strip) :
Row 1 :
CH 41 (foundation chain for rose spiral).
Row 2 :
CH 2, HDC 1 in the second chain from hook (I perform the second row in the backside of the chains; perform as convenient for you). HDC 1 in each chain across. Repeat HDC in each chain until the end of the row.
Row 3 :
CH 2 from the first HDC, HDC 1 in each HDC across (repeat until the end). Because the second row began with CH 2, the last (forty-fifth) HDC of the third row should be performed in the second chain of the beginning of the second row - align rows as in photos and diagram.
Row 4 :
Repeat until the end of the row in HDC 1 in each HDC; this builds the spiral strip that will be rolled into a rose. Shape and fasten off leaving a long tail for gluing and winding.
Row 5 :
CH 1, create a series of petal arches: DC and chain groups to form decorative scallops along the outer edge (the photo tutorial shows sequence: DC 1, CH 3, DC 2 in one group then continue regular spacing). Continue until you have 21 petals along the strip (follow photos to match spacing). Fasten off and trim ends.
Assembly (rose) :
Determine the edge of the wire on which the yarn began to be wound. Apply glue to the first petal and on the areas shown, start winding the ribbon (strip) on the stem with the first petal, close the stem well so that it is not visible. Gradually wind the ribbon on the stem, apply glue and wind further until the entire rose is formed. Fasten and trim yarn ends. Glue sepal and central part in place under the flower as shown in photos.
— Flower (yellow example) :
Central part Row 1 :
Magic ring. CH 1, SC 10 in the magic ring. Tighten the magic ring and SL ST in the first SC of this row.
Central part Row 2 :
CH 3 from the first SC (counts as tall stitch), TR 2 in the second SC (this and subsequent steps create the petals foundation). Follow photos to make a first layer of petals by repeating the petal unit around the center until you have the required number (see photos and diagram showing five petal groups for this flower).
Second layer Row 3 :
After first layer complete, CH 4 and create arches attaching with SL ST to form attachment points for the second layer of petals. TR 3-clusters are worked in arches creating scallops; repeat to make five or more petal arches as shown in photos.
Row 4 :
Work the second layer petals into arches: TR clusters, CHs and stitches as pictured; attach each petal to the place of the beginning of the first arch then continue. Fasten and trim yarn ends. Press or iron if cotton yarn is used and desired.
Row 5 :
Work a finishing round of DC and SC to define outer shape: CH 1 then DC 9 under the first arch of CH 3, SC 1 in next chain; repeat until the end of the row so the flower becomes a twisted ribbon which is then glued and rolled into the rose shape when assembling.
— Flower (small 5-petal example) :
Row 1 :
Magic ring. CH 1, SC 6 in the magic ring. Tighten the ring, SL ST in the first SC.
Row 2 :
CH 3 from the first SC. TR 2 in the second SC, CH 2, TR 2 in the fourth SC; repeat to make 4 petals around. ST in the fifth SC to complete the round.
Row 3 :
Make the next 3 petals in the same way to finish the first layer of the flower. ST in the beginning of this row. Pull the yarn through the first SC of the previous row to the other side and finish off carefully. Fasten and trim the edges of yarn. Make the central part as a separate element and attach if needed.
— Central part of the flower :
Row 1 :
Magic ring. CH 1, SC 6 in the magic ring. Tighten and SL ST into the first SC to close.
Row 2 :
SC 12 in the ring by increasing evenly around (SC 2 in each SC of previous round). Fasten and trim. This small round forms the central disc used under petals for some flower types.
— Blue flower, Daisy and Bud variations :
Info :
Follow same central part and petal-building logic as the yellow flower but vary stitch heights and counts shown in the chart diagrams. Use two shades for blue flowers (inner and outer petals) and white + yellow for daisies with the small central round in yellow.
— Sepal & small pieces finishing :
Step :
Make sepal elements (magic ring, SC 14, then petal points) and press/iron if cotton yarn is used. Check the hole fit on the stem and adjust magic ring tension. Fasten and trim yarn ends.
— Assembly Instructions :
Item 1 (Attach rose) :
Apply glue to the first petal edge and to small areas on the strip, then wind the strip around the top of the prepared stem. Close the stem so it is not visible and glue to secure. Continue winding until rose is complete and glue the end to the bottom of the rose. Fasten and trim ends.
Item 2 (Attach sepal and central parts) :
Apply glue to the edges of the wire and to the areas of the sepal as indicated in photos. Place the sepal under the flower and glue in place. If the sepal hole is too small, slightly expand the magic ring; if too loose, tighten the ring. Glue central part to the flower as needed.
Item 3 (Attach leaves) :
Glue the narrow edge of the leaf to the stem using small amounts of glue where the leaf edge meets the stem. Press and hold until set. Repeat for each leaf placement shown in photos for a balanced bouquet arrangement.
Item 4 (Finishing bouquet) :
Arrange stems into a bouquet and tie or wrap a ribbon around the base. Trim stems to even length if desired. Allow all glued joints to dry fully before handling the bouquet regularly.
— Tips and Diagrams :
Info :
Charts are provided for Rose (CH 41 foundation and petal motifs), Sepal diagram, Chart for a leaf and Flower diagram. Symbols in the diagrams: circle = magic ring, dot = slip stitch (st), 0 = chain (ch), + = single crochet (sc), T = half double crochet (hdc), tall T = double crochet (dc), TR = treble crochet (tr), DTR = double treble crochet (dtr). Use these to follow the pictorial charts supplied.
These delicate crochet flowers make a beautiful long-lasting bouquet you can keep forever. Use colorful cotton yarn to create roses, daisies, buds and more, then assemble them with wrapped wire stems for display or gifting. Enjoy the crafting process and the cheerful handmade result every time you look at your bouquet. 🧶🌷