🧢 Beautiful ✨ Detailed πŸ’ Adorable

Phone Bag with Star Lily pocket Crochet Pattern

Phone Bag with Star Lily pocket Crochet Pattern
4.0β˜… Rating
5-7 Hours Time Needed
1.7K Made This
βœ‚οΈ

Intermediate Level

Ideal for those with basic crochet experience, featuring slightly more advanced stitches and techniques to expand your skills.

⏱️

Weekend Treat

Takes 5-7 hours, making it an enjoyable project to finish over a couple of days.

✨

Stylish Touch

An elegant detail to elevate any look, combining traditional techniques with contemporary design sensibilities.

About This Phone Bag with Star Lily pocket Crochet Pattern

This pattern creates a compact phone bag featuring a decorative Star Lily pocket and a Romanian cord shoulder strap. You will work special puff stitches and reverse single crochet for textured detail and a neat edge. The instructions include step-by-step rounds, special stitch explanations, and photo references for clarity.

Phone Bag with Star Lily pocket Crochet Pattern crochet pattern - detailed view of completed project

Built for intermediate crocheters, the pattern uses a 3.5mm hook and approx. 150 meters of yarn. Clear assembly notes show how to attach the pocket, button loop, spring O-rings and label for a professional finish.

Why You'll Love This Phone Bag with Star Lily pocket Crochet Pattern

I absolutely love this pattern because it combines a pretty Star Lily motif with practical function β€” a pocket that decorates and protects your phone. The Romanian cord strap is sturdy and elegant, and I enjoy the textured look the puff stitches create. I love that the design can be customized with your favorite color palette, making each bag uniquely personal. It is satisfying to see a small project come together quickly with a polished, gift-ready finish.

Phone Bag with Star Lily pocket Crochet Pattern step 1 - construction progress Phone Bag with Star Lily pocket Crochet Pattern step 2 - assembly progress Phone Bag with Star Lily pocket Crochet Pattern step 3 - details and accessories Phone Bag with Star Lily pocket Crochet Pattern step 4 - final assembly and finishing

Switch Things Up

I love how versatile this phone bag is β€” I often change the color palette to create different moods: try pastels for a soft spring look or jewel tones for a richer finish.

If you want a smaller version, I switch to a finer yarn and a smaller hook to create a mini bag perfect for coins or keys.

To make the bag sturdier, I sometimes line the interior with a lightweight fabric and slip stitch it in place for a polished inside finish.

I also enjoy swapping the Romanian cord for a metal chain or pre-made strap for a different style and faster finish.

Try adding beads or embroidery to the Star Lily petals for extra texture β€” I often embroider a small center detail to personalize the motif.

I occasionally replace the button with a magnetic snap for a cleaner closure and quicker access to my phone.

For a boho vibe, I make the strap longer and add tassels to each end before attaching the O-rings.

If you like structured bags, use a tighter tension and a denser cotton yarn; for softer drape, pick a looser tension and blended yarn.

I sometimes make a set of matching accessories β€” such as a coin pouch or earbud holder β€” using the same Star Lily motif to create a coordinated gift set.

Don’t be afraid to experiment with contrast colors inside the petals; I find switching just one round to a bright accent color makes the motif pop beautifully.

Common Mistakes & How to Fix Them

βœ— Skipping the stitch marker at the start of rounds leads to misplaced round starts and uneven rows; use a stitch marker and move it each round to stay accurate. βœ— Pulling puff stitch loops unevenly causes the petals to look lumpy and inconsistent; when forming each puff pull loops evenly and align them before finishing the puff. βœ— Making the Romanian cord with tight tension makes the strap too stiff and short; keep your tension loose for a flexible, comfortable strap and measure as you go. βœ— Not hiding yarn tails or finishing the buttonhole securely can cause the bag to look unfinished and the button to come loose; weave in ends and reinforce the button with several stitches for durability.

Phone Bag with Star Lily pocket Crochet Pattern

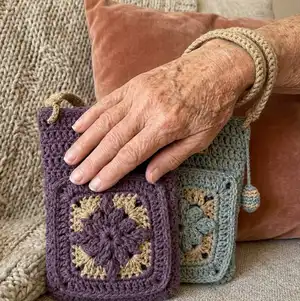
Make a stylish, compact phone bag with a decorative Star Lily pocket and a comfortable Romanian cord strap. This pattern guides you step-by-step through the special puff and reverse stitches, pocket assembly, and attaching a spring O-ring strap. Perfect as a handmade gift or a functional everyday accessory, the design uses basic tools and clear photos to help you finish a polished bag.

Intermediate 5-7 Hours

Materials Needed for Phone Bag with Star Lily pocket Crochet Pattern

β€” Main Fabric

  • 01
    Polyester yarn or lightweight hard cotton yarn (approx.150 meters total) - main color (e.g., green)
  • 02
    Khaki yarn - contrast color for pocket border and strap details (small amount)

β€” Tools Required

  • 01
    Crochet hook size 3.5mm
  • 02
    Tapestry needle
  • 03
    Button 2.5cm
  • 04
    Stitch marker
  • 05
    Spring O-ring buckles 2cm (2 pieces)
  • 06
    Scissors
  • 07
    Leather label (optional)

Progress Tracker

0% Complete

β€” Special Stitches :

Info :

Front post half double puff stitch (FPHDCPUFF) Yarn over, insert your hook from front to back between the posts of the double crochet in the row below Photo 1 and draw through, there will be 3 loops on the hook Photo 2. Repeat 2 more times, there will be 7 loops on the hook. Photo 3. Yarn over and draw the yarn through 6 loops on the hook, Photo 4. Yarn over and draw the yarn through 2 loops on the hook. Photo 5.

Info :

Reverse Single Crochet Stitch (RSC) This step is similar to how you work a regular single crochet but this works backward. Be sure to have the right side of your work facing you. Instead of working from right to left, you work from left to right, Photo 6. It creates a somewhat twisted. Yarn over and draw the yarn through the stitch. Photo 7. Yarn over and draw the yarn through the 2 loops on the hook One reverse single crochet (RSC) is complete. Photo 8.

β€” Star Lily Pocket :

Round 1 :

Start with CH 5, SLST into the 1st ST to form a ring. CH 3, 11 DC into the ring. SLST into the top of CH 3 from the beginning. (12)

Round 2 :

CH 3, 2 DC into the base of CH 3, Photo 10, [FPHDCPUFF, CH 2, FPHDCPUFF, Photo 11 & 12, 3 DC into next ST Photo 13] x 3 times, FPHDCPUFF, CH 2, FPHDCPUFF, SLST into top of CH 3. Fasten off, cut the yarn. Crochet over yarn tail in the next round. Photo 14.

Round 3 :

Change to khaki yarn and make a slip knot, insert hook into any one of the CH 2-SP, Photo 15. CH 3, DC, CH 3, 2 DC into the same CH 2-SP. 2 DC, CH 1, skip 1 ST, 2 DC. [*2 DC, CH 3, 2 DC* into the CH 2-SP, 2 DC, CH 1, skip 1 ST, 2 DC.] x 3 times. SLST into the top of CH 3. Fasten off, cut the yarn. Crochet over yarn tail in the next round. Photo 16.

Round 4 :

Change to green yarn and make a slip knot, insert hook into any one of the CH 3-SP. *1 SC, CH 2, 1 SC* into CH 3-SP, [4 SC, FPHDCPUFF into the middle DC of 3 DC from round 2, Photo 17 & 18, 4 SC, *1 SC, CH 2, 1 SC* into CH 3-SP] x 3 times. 4 SC, FPHDCPUFF into the middle DC of 3 DC from round 2, 4 SC, SLST into SC from the beginning, SLST again into CH 2-SP. Photo 19.

Round 5 :

CH 3, DC in to the CH 2-SP, CH 3, 2 DC into the same CH 2-SP, Photo 20. [11 DC, *2 DC, CH 3, 2 DC* into the CH 2-SP] x 3 times. 11 DC, SLST into the top of CH 3 from the beginning. Continue SLST around the CH and DC until the end. Cut a yarn, leave a long yarn approx. 100cm for sewing. Photo 21.

β€” Bag body :

Round 1 :

CH 22, DC into 3rd chain from hook, 18 DC, 3 DC into last CH. Working on the opposite side of the chain, 18 DC, 2 DC into last CH, SLST into 1st DC from the beginning. (42)

Round 2-13 :

CH 2, DC into the base of CH 2, 41 DC, SLST into top of CH 2 from the beginning. (42)

Round 14 :

CH 2, 13 DC, CH 18 (for the button hole loop) Photo 22, SLST into the base of CH 18, Photo 23, continue 29 DC, SLST into the top of CH 2.

Round 15 :

CH 1, RSC around the edge of the bag, across the button hole loop Photo 25 until to the end of the round Photo 26. Fasten off, cut the yarn, and hide the yarn tail. Photo 27.
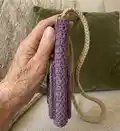
β€” Shoulder Strap (Romanian cord) :

Info :

(Refer to video clip PBSLP-3) Start with CH 2 Photo 28, 1 SC in 2nd CH from hook Photo 29, turn your work from right to left and you will work in the one loop on the bottom ST Photo 30. 1 SC through the one loop on the bottom of ST, Photo 31. Turn your work from right to left again, this time you need to work through 2 loops in the next row Photo 32. 1SC through 2 loops. Repeat until 100cm long or your desired length.

β€” Crochet the strap to the spring O-ring :

Info :

(Refer to video clip PBSLP-4) Insert your hook through the center of the ring, yarn over, pull through the ring Photo 33. Yarn over and pull through both loops on hook Photo 34, repeat for 3 more times Photo 35. SLST into the side the strap until you reach another end Photo 36, repeat the same method to attached the ring. Continue SLST into another side the strap until the end. Fasten off, cut the yarn, and hide the yarn tail. Photo 37. Open the spring O-ring and attached to each side of the bag. Photo 38.

β€” Attach the Star Lily pocket :

Attach the Star Lily pocket (P1) :

Place the pocket to the bottom center of the bag Photo 39. Sew it to the bag through the back loops of the pocket. Feel free to stitch through the front to back for a strong seam Photo 40. Sew the button onto the bag's top portion so that it aligns with the buttonhole loop on the opposite side. Photo 41. Sew the leather label to the above center of the pocket. Photo 42. If you do not have the spring O-ring, sew the strap direct to both side of the bag.

Assembly Instructions

  • Place the pocket at the bottom center of the bag and sew through the back loops of the pocket for a secure seam.
  • Sew the button onto the bag's top portion so it aligns with the buttonhole loop created in Round 14 for a neat closure.
  • Attach the leather label centered above the pocket using small, even stitches to keep it flat and secure.
  • Open the spring O-ring and attach each strap end to the rings, then close the rings and secure them to the bag sides.
  • If you do not have spring O-rings, sew the strap directly to both sides of the bag and reinforce with extra stitches for strength.

Important Notes

  • πŸ’‘Use stitch markers to mark the first stitch of each round to avoid losing your place during rounds and shaping.
  • πŸ’‘When forming a puff, pull the loops evenly and keep them in line so the petals look even and the puff pulls through smoothly.
  • πŸ’‘When making the strap, keep your tension loose so your stitches are not too tight and the Romanian cord remains flexible.

This beautiful Phone Bag with Star Lily pocket is finished and ready to carry or gift! 🌸🧢 The combination of puff stitches and a neat RSC edge gives a professional finish you will love. ✨ Enjoy customizing colors and hardware to make it uniquely yours. πŸ‘œ

You ask,

we answer.

FAQs

What size will the finished piece be?

The finished bag measures approximately 12 cm wide by 17 cm high with a strap about 100 cm long (adjustable to your preference).

Can I use different yarn weights for this pattern?

Yes, you can use different yarn weights but this will affect the final size; adjust your hook size accordingly and make a gauge swatch to check proportions.

Do I need prior crochet experience for this pattern?

This pattern is rated intermediate, so familiarity with DC, SC, puff techniques and working in rounds is recommended for best results.

How long does this project typically take to complete?

Most crocheters complete this project in about 5-7 hours, though time will vary based on experience and how many details you add.