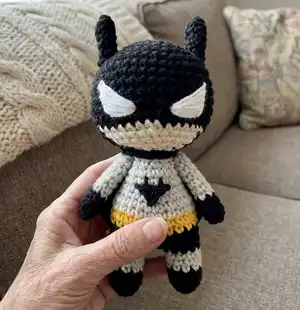
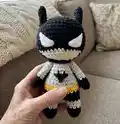
Make a cute mini Batman amigurumi with clear, photo-guided rounds and simple shaping. This charming pattern uses basic stitches and color changes to create a tiny superhero with a raincoat and embroidered logo. Ideal for gifting or decorating, you will enjoy sewing and finishing details that bring personality to the mini figure. Follow the full round-by-round instructions and assembly notes to complete your handmade Batman.
Progress Tracker
0% Complete
— Notes :
Infos :
Skill level – intermediate. Pattern does not contain crochet tutorials! You should have basic crochet skills. Approx. 12 (4.7") tall using the materials stated in the pattern. You may use any size yarn for this amigurumi, just make sure to use the hook size suggestion on the yarn label. This pattern is for personal use only. Publishing, distributing and sharing to social networks is prohibited.
Infos :
– Crochet continuously in a spiral, unless otherwise specified. – In order to not lose track of the number of worked stitches in each round, use a stitch marker to mark the beginning of each round — a thin thread of contrasting color. – Crochet tightly enough so the filler is not visible through the holes between loops. – Tightly and gradually fill all the details of the toy in the process of crocheting. – Size of the finished toy can vary depending on the materials used, the density of crocheting and filling, etc.
— Legs :
Info :
*Stuff legs and body firmly, stuffing as you go.
Leg 1 :
Start working with black yarn.
Round 3 - Round 5 :
10 sc (10)
Info :
Continue on with gray.
Round 6 - Round 8 :
10 sc (10)
Info :
Close and break the yarn.
Leg 2 + body :
Start working with black yarn.
Round 3 - Round 5 :
10 sc (10)
Info :
Continue on with gray.
Round 6 - Round 8 :
10 sc (10)
Info :
Continue on with black. Crochet 2 sc. Move the marker to the last loop. Stuff the legs.
Round 9 :
2 ch, 10 sc, 2 sc, 10 sc (24) *it means that we sew 2 ch and attach sc to the second leg, then crochet 9 sc in a circle, 2 sc into the loops of those 2 air loops and 10 sc along the circle of the second leg, total24 loops.
Round 10 - Round 11 :
24 sc (24)
Info :
Continue on with yellow.
Round 12 - Round 13 :
24 sc (24)
Info :
Continue on with gray.
Round 14 - Round 15 :
24 sc (24)
Round 16 :
(2 sc, dec)x6 (18)
Round 17 - Round 19 :
18 sc (18)
Round 20 :
(1 sc, dec)x6 (12)
Round 21 :
12 sc (12) Stuff the body firmly.
Info :
Close and break the yarn.
— Head :
Info :
Crochet with black yarn.
Round 3 :
(1 sc, inc)x6 (18)
Round 4 :
(2 sc, inc)x6 (24)
Round 5 :
(3 sc, inc)x6 (30)
Round 6 :
(4 sc, inc)x6 (36)
Round 7 :
(5 sc, inc)x6 (42)
Round 8 - Round 13 :
42 sc (42)
Round 14 :
(5 sc, dec)x2, 2 sc, BEIGE 3 sc, dec, 5 sc, dec, 4 sc, BLACK 1 sc, dec, 5 sc, dec (36)
Round 15 :
(4 sc, dec)x2, 2 sc, BEIGE 2 sc, dec, 4 sc, dec,4 sc BLACK dec 4 sc, dec (30)
Round 16 :
(3 sc, dec)x2, 2 sc, BEIGE 1 sc, dec, 3 sc, dec,3 sc, BLACK dec, 3 sc, dec (24)
Round 17 :
(2 sc, dec)x2, 2 sc, BEIGE dec, 2 sc, dec, 2 sc, BLACK dec, 2 sc, dec (18)
Info :
Continue on with gray.
Round 18 :
(sc, dec)x6 (12) Add stuffing. Leave the thread for sewing.
— Arms :
Info :
Arm x 2: Crochet with black yarn.
Round 2 - Round 4 :
6 sc (6)
Info :
Continue on with gray.
Round 5 - Round 11 :
6 sc (6)
Info :
Do not stuff of the arm. Close. Break the yarn and leave a long tail to sew arms to body.
— Ears :
Info :
Ear x2: Crochet with black yarn.
Round 3 - Round 4 :
8 sc (8)
Round 5 :
(1 sc, inc)x4 (12)
Round 7 :
6 sc (12) Leave the thread for sewing.
— Raincoat :
Info :
Crochet with black yarn.
Round 1 :
16 ch, starting from second ch from hook, 15 sc (15)
Round 2 - Round 6 :
ch, turn, 15 hdc (15)
Round 7 :
ch, turn, dec, 11 hdc, dec (13)
Round 8 :
ch, turn, dec, 9 hdc, dec (11)
Round 9 :
ch, turn, dec, 7 hdc, dec (9)
Round 10 :
ch, turn, dec, 5 hdc, dec (7)
Info :
Using black, SC evenly around the raincoat. Crochet 12 ch to fix a raincoat on a neck. Close and break the yarn, leaving a little tail.
— Finishing :
Step 1 :
Sew the head to the body.
Step 2 :
Sew the arms to the body symmetrically.
Step 3 :
Embroider the eyes with white thread.
Step 4 :
Sew the ears to the head.
Step 5 :
Embroider the Batman logo onto the chest with black thread or embroider the logo in yellow and black felt.
Step 6 :
Sew the raincoat onto the back.
Create this adorable Mini Batman in your favorite colors and share a little hero with someone special. This compact amigurumi is perfect for gift-giving, shelf displays, or as a playful desk buddy. Each stitch brings a smile — happy crocheting and enjoy the tiny superhero magic! 🧶🦇