🧢 Beautiful ✨ Detailed πŸ’ Adorable

Cow Squishmallow Plushie Amigurumi Pattern

Cow Squishmallow Plushie Amigurumi Pattern
4.8β˜… Rating
5-7 Hours Time Needed
1.9K Made This
βœ‚οΈ

Intermediate Level

Ideal for those with basic crochet experience, featuring slightly more advanced stitches and techniques to expand your skills.

⏱️

Weekend Treat

Takes 5-7 hours, making it an enjoyable project to finish over a couple of days.

🧸

Cute Companion

An adorable friend to cherish, handcrafted with love to bring comfort and joy for years to come.

About This Cow Squishmallow Plushie Amigurumi Pattern

This pattern creates a soft, squishy cow-inspired plushie in the style of a Squishmallow, crocheted in plush chenille yarn. It includes detailed round-by-round instructions for the head/body, nose, ears, strawberries and horns, plus assembly notes. The finished toy is cuddly and lightweight, perfect for gifting or display.

Cow Squishmallow Plushie Amigurumi Pattern crochet pattern - detailed view of completed project

The pattern uses simple amigurumi techniques and clear photos to guide assembly and placement. You can customize colors and small details to make each plushie unique.

Why You'll Love This Cow Squishmallow Plushie Amigurumi Pattern

I absolutely love this pattern because it transforms simple stitches into a delightfully squishy companion that feels like a hug. I enjoy how the chenille yarn gives the cow a plush, tactile surface that is both forgiving and luxurious to work with. I especially love adding the tiny strawberries and horns β€” they add a playful personality with very little extra work. Making multiples in different colors is one of my favorite ways to personalize gifts for friends and family. I am passionate about sharing patterns that are satisfying to make and rewarding to gift.

Cow Squishmallow Plushie Amigurumi Pattern step 1 - construction progress Cow Squishmallow Plushie Amigurumi Pattern step 2 - assembly progress Cow Squishmallow Plushie Amigurumi Pattern step 3 - details and accessories Cow Squishmallow Plushie Amigurumi Pattern step 4 - final assembly and finishing

Switch Things Up

I love customizing the color layout for different looks β€” try pastel shades for a softer, sleepy cow or high-contrast patches for a playful look.

I often change the yarn weight and hook to create mini keychain versions or larger cuddle-size plushies; just swap the hook and yarn and keep the same stitch counts for shape guidance.

I sometimes embroider tiny freckles or a smile on the face instead of using felt to add personality and avoid extra gluing steps.

For safer toys for small children, I replace plastic eyes with embroidered eyes using contrast yarn to keep everything soft and washable.

I like to add wire in the horns or a tiny pipe cleaner inside the ears if I want a slightly posable feel, but that is optional.

Try contrasting colors for the strawberry leaves β€” mint green or a brighter lime will change the mood of the piece dramatically.

Consider adding a tiny crocheted bow or scarf to make themed or seasonal versions perfect for gifting.

When I want a firmer plush, I use less stuffing and tighter tension; for squishier finishes I stuff more lightly and use slightly looser tension.

I also experiment with surface crochet or slip-stitched stripes to give a textured look to the body without altering the shaping rounds.

Finally, I recommend pinning pieces in place and photographing them before sewing to make sure placement and symmetry are exactly how I want them.

Common Mistakes & How to Fix Them

βœ— Skipping stitch markers when working continuous rounds can cause you to lose the start of the round; place a marker at the first stitch of each round and move it as you progress. βœ— Forgetting to stuff gradually leads to lumps or uneven shaping; stuff the body little by little while you crochet and shape as you go for an even finish. βœ— Not counting stitches after increases or decreases produces uneven round counts; count your stitches every few rounds, especially after complex decrease rows, to stay accurate. βœ— Pulling your tension too tight on chenille yarn makes the fabric stiff and hard to work; relax your grip slightly and practice a swatch to match gauge and maintain squishiness.

Cow Squishmallow Plushie Amigurumi Pattern

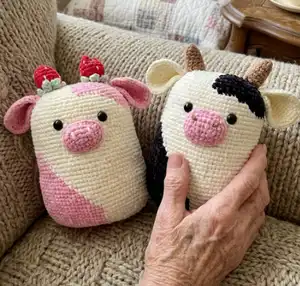
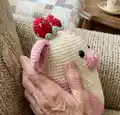
Make an irresistibly soft Cow Squishmallow plushie with this clear, photo-backed crochet pattern. You will learn to shape a cuddly rounded body, add charming facial features, and assemble tiny strawberries and horns for personality. The pattern uses plush chenille yarn for a squishy finish and includes full round-by-round instructions. Perfect for gifting or keeping as a cozy handmade companion.

Intermediate 5-7 Hours

Materials Needed for Cow Squishmallow Plushie Amigurumi Pattern

β€” Main Fabric

  • 01
    Soft chenille yarn (100g) - White (approx. 100g)
  • 02
    Soft chenille yarn (100g) - Pink (approx. 100g)
  • 03
    Soft chenille yarn (100g) - Red (for strawberries, approx. 50g)
  • 04
    Soft chenille yarn (100g) - Mint green (for leaves, approx. 20g)

β€” Tools Required

  • 01
    Crochet hook size 3.5mm
  • 02
    Stitch maker (stitch marker)
  • 03
    Sewing needle
  • 04
    Scissors
  • 05
    Cotton filling (polyester stuffing)
  • 06
    Hot glue gun
  • 07
    Plastic safety eyes (pair)

Progress Tracker

0% Complete

β€” Head :

Info :

The pink text is the wool color

Row 1 :

10 Ch, 14 Ch hook on the 2nd stitch 13 SC, 9 SC, 3 SC in one st, 9 SC, 12 SC, INC (48)

Row 2 :

2 INC, 11 SC, 8 SC, 5 INC, 8 SC, 11 SC, 3 INC (58)

Row 3 :

(SC, INC) 2 times, 11 SC, 8 SC, (SC, INC) 5 times, 8 SC, 11 SC, (SC, INC) 3 times (68)

Row 4 :

17 SC, 31 SC, 20 SC(68)

Row 5 :

(2SC, INC) 2 times, 11 SC, 8 SC, (2SC, INC) 5 times, 8 SC, 11 SC, (2SC, INC) 3 times (78)

Row 6-7 :

19 SC, 36 SC, 23 SC(78)

Row 8 :

18 SC, 38 SC, 22 SC(78)

Row 9 :

17 SC, 40 SC, 21 SC(78)

Row 10 :

16 SC, 42 SC, 20 SC(78)

Row 11 :

15 SC, 44 SC, 19 SC(78)

Row 12 :

14 SC, 46 SC, 18 SC(78)

Row 13 :

13 SC, 48 SC, 17 SC(78)

Row 14 :

12 SC, 50 SC, 16 SC(78)

Row 15 :

11 SC, 52 SC, 15 SC(78)

Row 16 :

10 SC, 54 SC, 14 SC(78)

Row 17 :

9 SC, 56 SC, 13 SC(78)

Row 18 :

8 SC, 58 SC, 12 SC(78)

Row 19 :

7 SC, 60 SC, 11 SC(78)

Row 20 :

6 SC, 62 SC, 10 SC(78)

Row 21 :

5 SC, 64 SC, 9 SC(78)

Row 22 :

4 SC, 66 SC, 8 SC(78)

Row 23 :

3 SC, 75 SC(78)

Row 24-29 :

78 SC(78)

Info :

Cut the yarn, leaving a long tail for sewing

Row 30 :

30 SC, 13 SC, 35 SC(78)

Row 31 :

29 SC, 16 SC, 33 SC(78)

Row 32 :

27 SC, 19 SC, 31 SC(78)

Row 33 :

(11SC, DEC) 2 times, 11SC, DEC, 10 SC, SC, DEC, (11SC, DEC) 2 times (72)

Row 34 :

20 SC, 32 SC, 20 SC(72)

Row 35 :

(3SC, DEC) 3 times, 4 SC, 4 SC, (3SC, DEC) 6 times, SC, 3 SC, (3SC, DEC) 3 times (60)

Row 36 :

16 SC, 29 SC, 15 SC(60)

Row 37 :

2 SC, DEC, 12 SC, 10 SC, (2SC, DEC) 2 times, 11 SC, 13 SC, DEC (56)

Row 38 :

15 SC, 27 SC, 14 SC(56)

Row 39 :

(5SC, DEC) 2 times, SC, 4 SC, DEC, (5SC, DEC) 3 times, (5SC, DEC) 2 times (48)

Info :

*stuffing*

Row 40 :

(2 SC, DEC) 3 times, SC, SC, DEC, (2SC, DEC) 5 times, (2 SC, DEC) 3 times (36)

Row 41 :

(SC, DEC) 3 times, SC, DEC, (SC, DEC) 5 times, (SC, DEC) 3 times (24)

Info :

Cut the yarn, leaving a long tail for sewing

β€” Nose :

Row 1 :

6 Ch hook on the 2nd stitch 4 SC, W, 3 SC, INC (12)

Row 2 :

INC, 3 SC, 3 INC, 3 SC, 2 INC (18)

Row 3 :

SC, INC, 3 SC, (SC, INC) 3 times, 3 SC, (SC, INC) 2 times (24)

Row 4 :

2 SC, INC, 3 SC, (2 SC, INC) 3 times, 3 SC, (2 SC, INC) 2 times (30)

Info :

Cut the yarn, leaving a long tail for sewing.

β€” Ear :

Info :

(Make 2)

Row 1 :

6 SCin a MR (6)

Row 2 :

INC 6 times (12)

Row 3 :

(SC, inc) 6 times (18)

Row 4 :

(2 SC, inc) 6 times (24)

Row 5 :

(3 SC, inc) 6 times (30)

Row 6 :

(4 SC, inc) 6 times (36)

Row 7 :

(5 SC, inc) 6 times (42)

β€” Strawberry :

Info :

(Make 2)

Row 1 (Red) :

6 SCin a MR (6)

Row 2 :

(SC, inc) 3 times (9)

Row 3 :

(2 SC, inc) 3 times (12)

Row 4 :

(3 SC, inc) 3 times (15)

Row 5 :

(4 SC, inc) 3 times (18)

Row 6-7 :

18 SC(18)

Row 8 :

(SC, inc) 6 times (12)

Row 9 :

6 DEC (6)

Row 10 (Mint) :

slst, 4 Ch hook on the 2nd stitch: slst, 2 SC(repeat 5 times)

β€” Horn :

Info :

(make 2)

Row 1 :

6 Sc in a Mr (6)

Row 2 :

(Sc, Inc) 3 times (9)

Row 3 :

9 Sc (9)

Row 4 :

(2Sc, Inc) 3 times (12)

Row 5 :

12 Sc (12)

Row 6 :

(3Sc, Inc) 3 times (15)

Row 7 :

15 Sc (15)

Info :

*Stuffing*

β€” Assembly :

Info :

Sew the nose on the face and create the nostrils

Info :

Making sure the eyes are centred

Info :

Sew the two strawberry to form the horn

Info :

And sew 2 ears to almost 2 strawberries

Assembly Instructions

  • Sew the nose on the face and create the nostrils using the long tail left after finishing the nose, secure with small stitches to shape the nostrils.
  • Position and attach the plastic safety eyes centered on the face as shown in photos, making sure they are symmetrical before fastening.
  • Sew the two strawberry pieces together to form the horn assembly and secure them to the top of the head between the ears.
  • Attach the two horns near the top center of the head and then sew the two ears near the sides, arranging the strawberries and ears for a balanced look.

Important Notes

  • πŸ’‘Use stitch markers to keep track of the beginning of each round when working in continuous rounds.
  • πŸ’‘Stuff firmly and evenly during the stuffing step to avoid lumps and to maintain the rounded Squishmallow shape.
  • πŸ’‘Leave long tails when finishing pieces that will be sewn on later; this makes assembly faster and neater.

This adorable Cow Squishmallow is designed to be soft, squishy, and full of personality β€” perfect for cuddles and gifts. Customize the colors and tiny strawberry horns to make your own unique friend. Happy crocheting and enjoy the cozy squish! 🧢🧡

You ask,

we answer.

FAQs

What size will the finished piece be?

The finished plushie size depends on your tension and yarn, but using recommended chenille yarn and a 3.5mm hook yields a small squishy plush approximately 18-22 cm tall.

Can I use different yarn weights for this pattern?

Yes, you can use different yarn weights but the final size and fluffiness will change; adjust hook size accordingly and expect a different finished dimension.

Do I need prior crochet experience for this pattern?

This pattern is rated intermediate and assumes you are comfortable with magic ring, single crochet, increases, decreases, and basic assembly techniques.

How long does this project typically take to complete?

Most crocheters finish this project in 5-7 hours, though time will vary based on experience level and how much time you spend on assembly and detailing.