🧢 Beautiful ✨ Detailed πŸ’ Adorable

Puppy Dog Friend Amigurumi Pattern

Puppy Dog Friend Amigurumi Pattern
4.0β˜… Rating
5-7 Hours Time Needed
3.8K Made This
βœ‚οΈ

Intermediate Level

Ideal for those with basic crochet experience, featuring slightly more advanced stitches and techniques to expand your skills.

⏱️

Weekend Treat

Takes 5-7 hours, making it an enjoyable project to finish over a couple of days.

🧸

Cute Companion

An adorable friend to cherish, handcrafted with love to bring comfort and joy for years to come.

About This Puppy Dog Friend Amigurumi Pattern

This pattern creates a small, sitting puppy amigurumi with a slightly elongated muzzle and floppy ears. It uses basic amigurumi construction in spirals and simple shaping to achieve a cute facial expression and pose. The pattern is written in UK crochet terms with clear round-by-round instructions for each part. You will finish the puppy with safety eyes, a nose, and careful sewing for a tidy look.

Puppy Dog Friend Amigurumi Pattern crochet pattern - detailed view of completed project

Ideal for anyone comfortable with single crochet (UK double crochet) increases and decreases. The finished puppy sits about 9cm tall using the recommended yarn and hook.

Why You'll Love This Puppy Dog Friend Amigurumi Pattern

I absolutely love this pattern because it captures a classic, comforting puppy shape with minimal fuss and lots of personality. I adore the slightly fiddly muzzle that gives this dog a distinct face β€” it really brings out the character. The floppy ears and outstretched front paws make it look like the puppy is always asking for a hug, which I find endlessly charming. The pattern is flexible so I can change yarn colors or sizes to create many variations, and each one feels like a small, handmade friend.

Puppy Dog Friend Amigurumi Pattern step 1 - construction progress Puppy Dog Friend Amigurumi Pattern step 2 - assembly progress Puppy Dog Friend Amigurumi Pattern step 3 - details and accessories Puppy Dog Friend Amigurumi Pattern step 4 - final assembly and finishing

Switch Things Up

I love how easily this puppy can be customized by changing colours; try pastel shades for a sweeter, softer toy or bold tones for a playful look.

I often change yarn weight and hook size to make mini keychain versions or larger huggable companions; thicker yarn and a larger hook gives a chunky puppy.

I sometimes embroider a smile or freckles to add expression, or use felt accents for a different texture on the muzzle and inner ears.

For a posable tail, I insert pipe-cleaner or thin wire before finishing and sew the end securely so it can be posed to help the puppy stand.

If I want a more realistic dog, I adjust ear placement and length to match breeds β€” higher ears for perkier dogs or longer floppy ears for hound-like looks.

I also try swapping safety eyes for embroidered eyes for a softer, child-safe toy when gifting to young children.

To make the puppy sit straighter, I reduce stuffing in the body base slightly and sew the back paws a touch closer together for extra stability.

I sometimes create outfits β€” little scarves or crocheted collars β€” to add personality and make the puppy gift-ready.

If I want a themed puppy, I mix yarn colours to add patches, spots, or a two-tone muzzle for instant character.

Finally, I always experiment with paw length and stuffing levels to create different poses β€” relaxed hanging paws or outstretched hugging paws change the whole emotion of the toy.

Common Mistakes & How to Fix Them

βœ— Skipping the note about working into back loops for the muzzle can flatten the muzzle shape; follow the instruction to work into the back loops only where stated to keep the muzzle profile correct. βœ— Placing safety eyes before checking muzzle position can misalign features; temporarily position the muzzle and mark where the eyes should go before attaching permanently. βœ— Overstuffing the body causes the puppy to tip forward and not sit neatly; stuff moderately and check the base shape as you go so it remains stable when seated. βœ— Forgetting to leave long tails for sewing makes assembly fiddly; leave long yarn tails on head and body pieces for easy sewing and secure attachment.

Puppy Dog Friend Amigurumi Pattern

Make a sweet, golden puppy amigurumi with this friendly, step-by-step crochet pattern. You will create a cuddly little dog complete with floppy ears, a muzzle, paws and a tail β€” perfect as a gift or a little companion. The pattern is written in UK terms with clear shaping and assembly notes to help you finish a neat, sitting puppy. Follow the full instructions for each piece and sew everything together for a lovable result.

Intermediate 5-7 Hours

Materials Needed for Puppy Dog Friend Amigurumi Pattern

β€” Main Fabric

  • 01
    1 ball of Catania (cotton) in gold, color 249 (or your chosen colour) - approximately one 50g ball
  • 02
    Scrap of darker brown or pink yarn for embroidering the nose if not using a safety nose
  • 03
    Small amounts of yarn for details or alternate colours if desired

β€” Tools Required

  • 01
    Crochet hook size 2.5mm
  • 02
    Large-eye needle (or smaller hook) to finish ends and sew pieces together
  • 03
    Scissors
  • 04
    Polyester stuffing
  • 05
    Pair of 8 or 9mm safety eyes
  • 06
    6 or 7mm safety nose (optional)
  • 07
    Stitch markers (optional)
  • 08
    Pins for assembly (optional)
  • 09
    Pipe-cleaner or wire for tail posability (optional)

Progress Tracker

0% Complete

β€” Muzzle :

Info :

Make this first, you need it to help place the eyes when making the head.

Round 1 :

7ch, 2dc into 2nd ch from hook, dc in next 4 dc, 5 dc in last ch, working in the back loops of the chain, dc in each of the next 4 loops, 3dc in last loop (which is the back of the first chain you used, where you put the 2dc). You now have 18 dc around an oval. Slip stitch into the first dc of the row to join the ring.

Round 2 :

2dc in the same place as the joining stitch, dc in each of next 6 dc, 2dc in next dc, dc in next dc, 2dc in next dc, dc in each of next 6 dc, 2dc in next dc, dc in next dc, join as before. (22 stitches)

Round 3 :

In the back loops of each stitch only, dc into each dc, join (22)

Round 4 :

dc into each dc (22)

Round 5 :

dc into each dc (22)

Info :

Pull thread through, leaving a long end to sew the muzzle onto the head. Put the nose, if you are using one, in the middle of one long side just above the edge formed by working into the back loops only. I found that the back of my nose-piece fitted better into this muzzle with the narrower part at the front - I usually use the wider part first for both eyes and noses, but that would distort this shape. Stuff - you may need to add stuffing once you have most of this sewn to the head.

β€” Head :

Round 1 :

6 dc into a magic ring.

Round 2 :

2dc into each dc (12 stitches)

Round 3 :

(1dc, 2dc in next dc) x 6 (18)

Round 4 :

(2 dc, 2dc in next dc) x 6 (24)

Round 5 :

(3 dc, 2dc in next dc) x 6 (30)

Round 6 :

(4 dc, 2dc in next dc) x 6 (36)

Round 7 :

(5 dc, 2dc in next dc) x 6 (42)

Round 8 :

(6 dc, 2dc in next dc) x 6 (48)

Round 9-15 :

1dc in each dc to end (48) – that's 6 rows without shaping.

Round 16 :

(6 dc, dec) x 6 (42)

Round 17 :

(5 dc, dec) x 6 (36)

Round 18 :

(4 dc, dec) x 6 (30)

Round 19 :

(3 dc, dec) x 6 (24)

Round 20 :

(2 dc, dec) x 6 (18)

Info :

Place the muzzle so that it sits between row 12 and about row 18 and sew it in place. Put the safety eyes in just above and either side of it as shown, between rows 11 and 12 about 5 stitches apart - but actually wherever looks good to you once you have placed the muzzle.

Info :

Stuff the head.

Round 21 :

(1 dc, dec) x 6 (12)

Round 22 :

(dec) x 6 (6)

Info :

Cut yarn, leaving a long tail for sewing to the body - or you can leave the end on the body instead. No need to pull the stitches tight, but you can if you like.

β€” Ears :

Info :

Make two.

Round 1 :

6 dc into a magic ring.

Round 2 :

2dc into each dc (12 stitches)

Round 3 :

(1dc, 2dc in next dc) x 6 (18)

Round 4 :

(2 dc, 2dc in next dc) x 6 (24)

Round 5 :

(3 dc, 2dc in next dc) x 6 (30)

Round 6 :

(4 dc, 2dc in next dc) x 3 - do not finish the row (33)

Info :

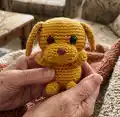
Leave a tail to sew on, make another one. Fold in half, so that the side you have done the half-row more on sits against the other side, and stitch through the places you would put your hook to sew together, so that the tops of the row still show and the ear is quite flat - see picture.

Info :

Stitch to the head between about the 6th and 8th rows, just about half way back - see pictures - with the seam facing forwards, but really put them wherever they look good to you.

β€” Body :

Round 1 :

6 dc into a magic ring.

Round 2 :

2dc into each dc (12)

Round 3 :

(1dc, 2dc in next dc) x 6 (18)

Round 4 :

(2 dc, 2dc in next dc) x 6 (24)

Round 5 :

(3 dc, 2dc in next dc) x 6 (30)

Round 6 :

(4 dc, 2dc in next dc) x 6 (36)

Round 7-12 :

dc into each dc (36) - that's 6 more rows straight.

Round 13 :

(4 dc, dec) x 6 (30)

Round 14 :

dc into each dc (30)

Round 15 :

(3 dc, dec) x 6 (24)

Round 16 :

dc into each dc (24)

Info :

Leave a long end, stuff and sew to the head around the 19th row (which also has 24 stitches, so you can sew stitch to stitch if you like). Don't overstuff, or the base will be too round for your puppy to sit neatly without falling over all the time.

β€” Tail :

Round 1 :

3 dc into a magic ring.

Round 2 :

2dc in each dc (6 stitches).

Round 3-11 :

dc into each dc (6 stitches) - that's 9 rows without shaping.

Info :

Leave an end for sewing. Flatten the very end where you finished, and stitch just that row to the back of the dog, around row 6 of the body.

β€” Front Paws :

Round 1 :

6 dc into a magic ring.

Round 2 :

(1dc, 2dc in next dc) x 3 (9)

Round 3-6 :

dc in each dc to end (9) - that's 4 rows.

Info :

Leave an end for sewing, make a second one, stitch to body either side of where the nose droops between about rows 12 and 15, 5 stitches visible between them - or however you think is good. Mine is supposed to be holding his paws out for a hug.

β€” Back Paws :

Round 1 :

6 dc into a magic ring.

Round 2 :

(1dc, 2dc in next dc) x 3 (9)

Round 3-5 :

dc in each dc to end (9) - that's 3 rows.

Info :

Leave an end for sewing, make a second one, stitch them to the body between rows 4 and 7 right at the bottom of the front with only one stitch or so showing between them - but maybe pin it first, to be sure your dog can 'sit' neatly - remember you have a tail at the back to place too.

Info :

Do fiddle with this pattern to make it more the way you want it. The tail could be longer or thicker. The back paws could be stitched to the bottom of the body so the dog is standing up, and you could use the tail as a third point for balance so it could manage to stand, if you make it stiff, sew it on solidly and perhaps make it shorter or longer - maybe try putting a pipe-cleaner or wire in it. The front paws could be longer, and/or less stuffed so they hang at the sides (under the head, as from shoulders, perhaps). Enjoy.

Assembly Instructions

  • Sew the muzzle onto the head so that it sits between row 12 and about row 18, securing evenly along the edge so the muzzle sits centered on the face.
  • Place safety eyes just above and either side of the muzzle between rows 11 and 12, approximately 5 stitches apart or wherever looks best for expression, then secure the safety backings.
  • Attach the ears to the head between about the 6th and 8th rows with the seam facing forwards, adjusting placement to suit the look you want and sewing firmly.
  • Leave long yarn tails on head and body pieces, stuff the body moderately, then sew the head to the body around the 19th row (both have 24 stitches) so you can sew stitch-to-stitch for a neat join.
  • Sew front paws to the body either side of the muzzle between about rows 12 and 15 with roughly five stitches visible between them to create the outstretched 'hug' pose.
  • Sew back paws to the body between rows 4 and 7 at the bottom front so the puppy can sit; pin and test positioning so the puppy sits neatly with the tail at the back.
  • Flatten the end of the tail and stitch that row to the back of the body around row 6 to secure the tail in place.

Important Notes

  • πŸ’‘This pattern is written in UK terms; refer to the abbreviation list for US equivalents to avoid stitch confusion.
  • πŸ’‘Work in continuous spirals (amigurumi style) unless instructed otherwise and use a stitch marker to mark the start of each round.
  • πŸ’‘Stuff gradually and check shaping as you go; under- or over-stuffing can change the puppy's posture and final appearance.
  • πŸ’‘Leave long yarn tails for sewing pieces together to make assembly easier and more secure.

This Puppy Dog Friend pattern is a tiny bundle of charm, perfect for gifting or adding to your amigurumi collection. It uses simple shaping and classic amigurumi construction to create an expressive little companion you will adore. Make a whole litter in different colours and share the hugs! 🧢🐢

You ask,

we answer.

FAQs

What size will the finished piece be?

The finished amigurumi measures about 9cm (3 3/4") tall when using the recommended Catania yarn and a 2.5mm hook.

Can I use different yarn weights for this pattern?

Yes, but changing yarn weight and hook size will change the finished size; adjust the hook accordingly and expect a larger or smaller puppy.

Do I need prior crochet experience for this pattern?

This pattern is intermediate and assumes familiarity with magic rings, increases, decreases and working in the back loops when instructed.

What safety materials are recommended for eyes and nose?

The pattern suggests pair of 8 or 9mm safety eyes and a 6 or 7mm safety nose; alternatively you can embroider the nose with a darker yarn scrap.

How should I join the head to the body?

Stuff the body and leave a long end, then sew the head to the body around the 19th row so you can align the 24 stitches and sew stitch-to-stitch for a neat seam.