🧢 Beautiful ✨ Detailed πŸ’ Adorable

Clownfish (Nemo) Amigurumi Pattern

Clownfish (Nemo) Amigurumi Pattern
3.9β˜… Rating
2-3 Hours Time Needed
2.8K Made This
βœ‚οΈ

Intermediate Level

Ideal for those with basic crochet experience, featuring slightly more advanced stitches and techniques to expand your skills.

⏱️

Bite-Sized Project

Finishes in 2-4 hoursβ€”perfect for an afternoon of creative relaxation.

🧸

Cute Companion

An adorable friend to cherish, handcrafted with love to bring comfort and joy for years to come.

About This Clownfish (Nemo) Amigurumi Pattern

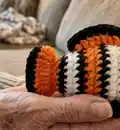
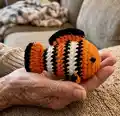
This pattern creates a small, striped clownfish (Nemo-style) amigurumi worked from the body up to the tail with no-sew construction. It features easy color changes to make the classic orange, white and black stripes and simple fins made separately. The pattern uses super bulky yarn for a quick, squishy finish.

Clownfish (Nemo) Amigurumi Pattern crochet pattern - detailed view of completed project

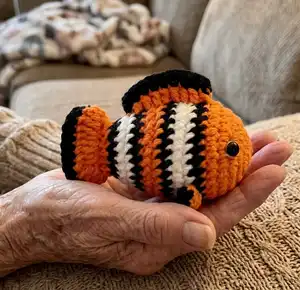
Step-by-step rounds include increases, decreases and short rows for shaping. Clear instructions and photo prompts help you assemble the fish and attach details like safety eyes.

Why You'll Love This Clownfish (Nemo) Amigurumi Pattern

I absolutely love this pattern because it turns simple stitches into a charming, striped clownfish with a lot of personality. The no-sew body construction makes assembly fast and neat, which I always appreciate when making gifts. I enjoy the bit of colorwork between orange, white and blackβ€”it creates a bold, playful look without complicated techniques. This pattern works up quickly with super bulky yarn, so you get satisfying, fast results that are great for gifting or decorating.

Clownfish (Nemo) Amigurumi Pattern step 1 - construction progress Clownfish (Nemo) Amigurumi Pattern step 2 - assembly progress Clownfish (Nemo) Amigurumi Pattern step 3 - details and accessories Clownfish (Nemo) Amigurumi Pattern step 4 - final assembly and finishing

Switch Things Up

I love customizing this pattern to create different species of fish by simply changing color combinations, such as pastel shades for a softer look.

I sometimes use thinner yarn and a smaller hook to make a mini keychain version that is perfect for gifts or bag charms.

I also like to add embroidered smiles or small felt cheeks to give the fish different facial expressions and personality.

Want a sturdier toy? I add a drop of fabric glue under safety eyes and use slightly firmer stuffing to help the shape hold up to play.

Try using variegated yarn for a fun, marbled stripe instead of distinct color changes for a unique finish.

For a reef set, I make multiple fish in complementary colors and different sizes to display together as a fun grouping.

I sometimes stitch a tiny loop at the top so the fish can be hung as an ornament or mobile decoration.

To create a weighted bottom for stable standing, add a few dried beans in a small pouch inside the base before final stuffing.

I enjoy adding wire inside the fins for poseable features β€” bendable fins let you display the fish in many playful poses.

If you want to simplify, skip the dorsal fin Part 2 and just make Part 1 for a quicker, still-cute version of the fish.

I often experiment with different eye sizes for varied looks β€” smaller eyes for a delicate look or larger eyes for extra cuteness.

Common Mistakes & How to Fix Them

βœ— Skipping stitch markers when working in continuous rounds can make it hard to identify the start of each round; place a stitch marker at the first stitch of every round so you always know where to count from. βœ— Changing colors without securing ends can cause loose tails or gaps at the stripe joins; carry the yarn neatly or weave in ends immediately and use a tight tension at color joins to reduce gaps. βœ— Forgetting to stuff before closing will make shaping difficult and lumpy; stuff gradually while you decrease and check the shape frequently to create an even, firm body. βœ— Counting mistakes during increases and decreases will alter the fish shape; recount your stitches after every increase/decrease round to ensure the correct stitch total is maintained. βœ— Pulling the finishing tail too tight when weaving in ends can distort the stitches around the join; weave in ends gently and adjust tension to keep the shape even.

Clownfish (Nemo) Amigurumi Pattern

Make an adorable Clownfish (Nemo) amigurumi using super bulky yarn and easy shaping. This pattern guides you through color changes, simple increases/decreases, and no-sew body construction so you can finish quickly. Perfect as a gift or a cute decor piece for your home or nursery. Follow the step-by-step rounds and photo prompts to create your own little ocean friend.

Intermediate 2-3 Hours

Materials Needed for Clownfish (Nemo) Amigurumi Pattern

β€” Main Fabric

  • 01
    Super Bulky yarn (Category 6) - orange color (main)
  • 02
    Super Bulky yarn (Category 6) - black color (accent)
  • 03
    Super Bulky yarn (Category 6) - white color (stripe accents)

β€” Tools Required

  • 01
    3.5mm (E) Crochet hook
  • 02
    Stitch maker (stitch marker)
  • 03
    Sewing needle
  • 04
    Scissors
  • 05
    Plastic safety eyes 8mm (2 pieces)
  • 06
    Hot gun glue
  • 07
    Fiberfill (polyester stuffing)

Progress Tracker

0% Complete

β€” Body :

Info :

Begin with Orange yarn

Round 1 :

6 SC in an MR (6)

Round 2 :

6 INC (12)

Round 3 :

(SC, INC) 6 times (18)

Round 4 :

(2 SC, INC) 6 times (24)

Round 5 :

(3 SC, INC) 6 times (30)

Round 6 :

30SC (30)

Info :

Change to Black yarn

Round 7 :

30SC (30)

Info :

Change to White yarn

Round 8-9 :

30SC (30)

Info :

Change to Black yarn

Round 10 :

30SC (30)

Info :

Change to Orange yarn

Round 11 :

30SC (30)

Round 12 :

(3SC, DEC) 6 times (24)

Info :

Change to Black yarn

Round 13 :

24SC (24)

Info :

Change to White yarn

Round 14 :

24SC (24)

Round 15 :

(2SC, DEC) 6 times (18)

Info :

Change to Black yarn

Round 16 :

18SC (18)

Info :

Change to Orange yarn

Round 17 :

(SC, DEC) 6 times (12)

Info :

*Stuffing*

Round 18 :

Crochet 2 side together with 6SC

Round 19 :

Turn, 2CH, DC-INC 6 times (12)

Info :

Change to Black yarn

Round 20 :

Turn, CH, 12SC (12)

Info :

Weave in the yarn end and cut

β€” Dorsal Fins :

Info :

Part 1: Begin with Orange yarn (Make 2)

Info :

Pick up the yarn from row 8, apart 8 stitch

Round 1 :

(Chains 1, HDC, 3DC, HDC) in one stitch (5)

Info :

Change to Black yarn

Round 2 :

Turn, CH, 5SC (5)

Info :

Weave in the yarn end and cut

Info :

Part 2: Begin with Orange yarn

Info :

Pick up the yarn from R7 to R16, in the vertical line from head to tail

Round 1 :

(Chains 1, SC, 7DC, SC) in one stitch (9)

Info :

Change to Black yarn

Round 2 :

Turn, CH, 9SC (9)

Info :

Weave in the yarn end and cut

Info :

Attach the eyes at R5-R6, apart 8 stitch

Assembly Instructions

  • Attach the eyes at R5-R6, apart 8 stitch; position the two 8mm safety eyes between rounds 5 and 6 with 8 stitches between them before securing.
  • Make Dorsal Fin Part 1 by picking up yarn from row 8 (apart 8 stitch), work the two rounds, weave in ends and attach the small fin to the top where picked up.
  • Make Dorsal Fin Part 2 by picking up yarn from R7 to R16 along the vertical line head-to-tail, work the two rounds, weave in ends and attach to the body in the vertical seam.
  • When closing the tail area (Rounds 17-20), stuff firmly and crochet the two sides together as instructed to create the tail shape, then weave in ends and cut.
  • Weave in all yarn ends neatly and trim any excess; use hot glue where needed to secure small pieces or to reinforce safety eyes if desired.

Important Notes

  • πŸ’‘Use a stitch marker to mark the beginning of each round to keep track of round starts and color changes.
  • πŸ’‘Stuff gradually and check shaping as you go; stuffing before finishing decreases helps maintain a smooth body shape.
  • πŸ’‘Weave in yarn ends after finishing each fin or color change to keep the work neat and prevent unraveling.
  • πŸ’‘Attach safety eyes before final stuffing and closing so placement is accurate and secure.

This charming Clownfish (Nemo) amigurumi is designed to work up quickly in super bulky yarn and adds a splash of ocean fun to any shelf or nursery. The bold stripes and playful fins make it a joyful handmade gift or decor piece. Enjoy the satisfaction of finishing a cute, squishy toy in just a few hours! 🧢🐠

You ask,

we answer.

FAQs

What size will the finished piece be?

The finished amigurumi measures approximately 10-12 cm long when using recommended super bulky yarn and a 3.5mm hook, though size may vary with tension and yarn choice.

Can I use different yarn weights for this pattern?

Yes, you can use different yarn weights, but the final size and stitch count appearance will change; use an appropriate hook for your yarn and expect a different finished size.

Do I need prior crochet experience for this pattern?

This pattern is rated intermediate due to color changes, increases/decreases, and shaping; familiarity with SC, HDC, DC, INC and DEC is recommended.

How long does this project typically take to complete?

Most crocheters finish this project in 2-3 hours using super bulky yarn, though time may vary depending on experience and how quickly you work the color changes.