🧢 Beautiful ✨ Detailed πŸ’ Adorable

Chunky Chain Pattern

Chunky Chain Pattern
4.4β˜… Rating
2-3 Hours Time Needed
1.9K Made This
βœ‚οΈ

Beginner Friendly Level

Perfect for those just starting their crochet journey, with clear instructions and simple techniques

⏱️

Bite-Sized Project

Finishes in 2-4 hoursβ€”perfect for an afternoon of creative relaxation.

✨

Stylish Touch

An elegant detail to elevate any look, combining traditional techniques with contemporary design sensibilities.

About This Chunky Chain Pattern

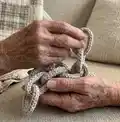
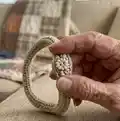
This pattern shows how to crochet a chunky chain link using cord and a small hook to create sturdy decorative links. You will learn how to form the circular base, work single crochet rounds, fold and join the link, and add a neat base trim. The finished chain can be used as a bag handle, necklace, or decorative strap and is easy to customize.

Chunky Chain Pattern crochet pattern - detailed view of completed project

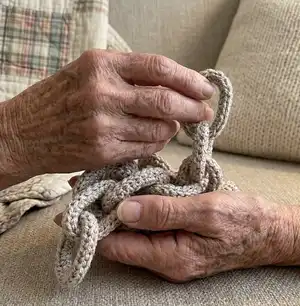
Clear step-by-step instructions and photos guide you through each stage, from making the first ring to joining multiple links. Use different cords and link counts to personalize length, thickness, and style.

Why You'll Love This Chunky Chain Pattern

I absolutely love this pattern because it transforms simple cord and basic stitches into a chic, functional accessory that looks much more complex than it is. I enjoy how quickly one link comes together and how satisfying it is to join them into a beautiful chain. The technique is forgiving and great for practicing consistent tension and finishing skills. Making multiple links is relaxing and addictive β€” you can whip up a handle or necklace in just a few hours.

Chunky Chain Pattern step 1 - construction progress Chunky Chain Pattern step 2 - assembly progress Chunky Chain Pattern step 3 - details and accessories Chunky Chain Pattern step 4 - final assembly and finishing

Switch Things Up

I love to experiment with different cords to change the look and feel of this chain; using a thicker cord creates a chunkier, statement link while thinner cord gives a delicate chain.

I often change colors for contrast β€” try alternating two cords or using a variegated cord for a playful effect.

I like doubling the cord for extra strength and a bulkier appearance; work the pattern the same way but treat the doubled cord as one strand.

Swap the 3 mm hook for a slightly larger one if you want looser stitches and more flexible links, or a smaller hook for a tighter, firmer link.

For a more polished finish, add small metal jump rings or snap hooks between links to make the chain detachable or adjustable.

I sometimes sew or glue small beads into the chain hole before closing the next link to add sparkle and weight for a jewelry-style chain.

Make a shorter chain (9 links) for a handbag handle or a longer chain (12+ links) to wear as a necklace β€” adjust the number of links to fit your needs.

Try using metallic or leather-look cord for a more sophisticated, modern accessory suitable for evening bags or statement jewelry.

I also enjoy combining this chain with a crocheted bag body: attach the finished chain to snap hook rings sewn into the bag for a coordinated handmade set.

Don't be afraid to personalize by adding tassels or small charms to select links β€” those small details make each piece unique and gift-ready.

Common Mistakes & How to Fix Them

βœ— Skipping the slip stitch to close the chain loop can cause an uneven starting point; always join the initial chain with a SlSt to form a clean circle before continuing. βœ— Not placing or moving the stitch marker can lead to lost row starts and uneven edges; place a marker in the first SC of each row and reposition it as instructed for consistent shaping. βœ— Pulling the tail too tightly when threading through loops can distort the link shape; gently pull the tail through a few loops and adjust tension before trimming and finishing. βœ— Forgetting to work the base trim into the back loops only will flatten the link; insert the hook into the back loop of the last row and the loop of the chain to get a neat raised trim.

Chunky Chain Pattern

Make a stylish chunky crochet chain perfect for bag handles, necklaces, or decorative straps. This beginner-friendly pattern uses simple single crochet and slip stitch techniques so you can create sturdy links quickly. Follow step-by-step photos and clear instructions to join links and finish a polished chain. Ideal for customizing length and color to match your projects.

Beginner Friendly 2-3 Hours

Materials Needed for Chunky Chain Pattern

β€” Main Fabric

  • 01
    Any cord, 2 mm, approximately 60 yards (50 m)
  • 02
    Example: Polyester cord Shikimiki PP Macrame Mini, latte color (used in sample)
  • 03
    Use additional cord quantities for multiple links (approximate: 9-10 links for a handle uses multiple lengths of 50 m cord)

β€” Tools Required

  • 01
    Crochet hook size 3 mm
  • 02
    Stitch marker or safety pin
  • 03
    Lighter (to melt and secure cord ends)
  • 04
    Scissors
  • 05
    Snap hook rings (optional, to attach to bag)
  • 06
    Measuring tape or ruler (to measure link size)

Progress Tracker

0% Complete

β€” Materials & Tools :

Info :

Any cord 2 mm, 60 yards (50 m). In the example used: polyester cord Shikimiki PP Macrame Mini, latte color. 3 mm hook. Marker. Lighter. Scissors. Finished chain from the specified materials: length of the chain - 22 inches (55 cm), 10 chain links; length of the chain link - 3 inches (8 cm), width of the chain link - 2 inches (5 cm. Gauge: 16 stitches and 16 row = 4*4 inches (10*10cm).

Infos :

CH - chain stitch. SlSt - slip stitch. SC - single crochet.

β€” Crochet the chain :

Step 1 :

Crochet chain with 25 CH. Connect in a circle.

Info :

SlSt in the 1st loop of the chain, CH.

Row 1 :

25 SC. Place the marker in the 1st SC of this row, last SC make in the SlSt and the 1st loop of the chain.

Info :

SlSt, CH.

Row 2 :

25 SC, SlSt, CH, rearrange the marker in the 1st loop of this and the each subsequent row.

Info :

Pull out the end through the 1st loop of the chain.

Info :

Then pull the end through a few loops of the 1st row. Cut, process with fire.

Info :

Crochet the row.

Rows 3-4 :

25 SC, SlSt, CH.

Row 5 :

25 SC, SlSt.

Info :

Fold the work in half lengthwise, right side inward.

Info :

Pull the working loop through the loop of the chain.

Base trim (P1) :

Crochet 25 SlSt. Insert the hook on the back loop only of the last row and the loop of the chain.

Info :

Cut the thread, pull out the end. Insert the hook under the 1st SlSt. Pull the end.

Info :

Pull back the end in the last SlSt. Strengthen and hide the end. Process with fire.

Info :

Crochet the next chain link through hole of the 1st link.

Info :

Crochet the required number of the links. For example, 9-10 links for a handle.

Info :

Put the crochet chain to the snap hook rings.

Info :

The chain can be used as a necklace.

Assembly Instructions

  • Join each new link by inserting the hook and crocheting through the hole of the previous link so links interlock securely, then complete the link as instructed.
  • When you finish a link, fold it in half lengthwise with the right side inward and pull the working loop through the loop of the chain to close the link tightly before trimming the tail.
  • Work the base trim by crocheting 25 SlSt into the back loop only of the last row and the loop of the chain to create a neat edge that hides the join.
  • Attach the finished chain to snap hook rings or bag hardware by slipping the last link onto the ring; the chain also works as a necklace when closed with jewelry findings.

Important Notes

  • πŸ’‘Use a stitch marker to mark the first SC of each row and move it each row to keep your stitch count accurate.
  • πŸ’‘When pulling the tail through loops to hide the end, be gentle to avoid pulling the shape out of alignment and burn the cord end carefully with a lighter.
  • πŸ’‘Work the base trim into the back loop only to get a tidy raised edge; inserting into both loops flattens the trim.

This chunky chain pattern makes a beautiful handmade handle or wearable necklace with minimal supplies and maximum style. Try contrasting cord colors for a bold statement and adjust link count to fit your bag or outfit. Whether you make a single link or a full-length chain, this project is fast, satisfying, and endlessly customizable. 🧢✨

You ask,

we answer.

FAQs

What size cord and hook do I need?

Use a 2 mm cord (approximately 50 m / 60 yards) and a 3 mm crochet hook as recommended; adjust hook size slightly if you want tighter or looser stitches.

How long will the finished chain be?

With the specified materials the finished sample chain measures about 22 inches (55 cm) with 10 links; link size is approximately 3 inches (8 cm) long and 2 inches (5 cm) wide.

Can I use different cord or yarn weights?

Yes, you can use different cord thicknesses but this will change link size and required yardage; test gauge with a small sample to decide desired link dimensions.

Is this pattern suitable for beginners?

Yes, this is a beginner-friendly pattern that uses basic stitches (CH, SC, SlSt) and clear step-by-step photos to guide you through making and joining links.