🧶 Beautiful ✨ Detailed 💝 Adorable

Crochet Puff Quilt Pattern

Crochet Puff Quilt Pattern
4.1★ Rating
12-15 Hours Time Needed
2.7K Made This
✂️

Beginner Friendly Level

Perfect for those just starting their crochet journey, with clear instructions and simple techniques

⏱️

Multi-Day Project

A rewarding 12+ hour journey—perfect for dedicated crafters who love detailed work.

🤗

Soft Hug

Gentle, plush, and full of warmth, creating a sense of comfort and coziness wherever they find a home.

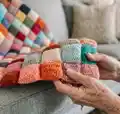
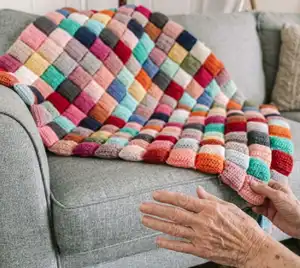
About This Crochet Puff Quilt Pattern

This pattern creates a heavy-weight, quilt-like crochet blanket made from many small puff-style squares. Each square is worked in a flat round, lightly stuffed, closed, and then seamed into rows for a padded, textured look. The design is perfect for using scrap yarns or a matched fiber for a unified finish.

Crochet Puff Quilt Pattern crochet pattern - detailed view of completed project

Written in US terms and using simple half-double crochet stitches, this blanket is approachable and forgiving. The pattern includes step-by-step seaming tutorials for whip stitch and mattress stitch joins.

Why You'll Love This Crochet Puff Quilt Pattern

I absolutely love this pattern because it transforms simple yarn scraps into a beautiful, tactile blanket that feels like a quilt. I love how each square puffs up after stuffing to create a cozy, cushioned texture that invites snuggling. The seaming tutorials make joining squares predictable and tidy, which is so satisfying to me. I enjoy the creative freedom of arranging colors as I seam and seeing the blanket come together row by row.

Crochet Puff Quilt Pattern step 1 - construction progress Crochet Puff Quilt Pattern step 2 - assembly progress Crochet Puff Quilt Pattern step 3 - details and accessories Crochet Puff Quilt Pattern step 4 - final assembly and finishing

Switch Things Up

I love experimenting with color placement for this puff quilt; try grouping shades for an ombre effect or randomly mixing scraps for a playful mosaic.

I sometimes use a single color for the top half and a contrasting color for the bottom half to create bold blocks.

You can change the puff size by altering hook size or yarn weight: a larger hook and bulky yarn will give you chunkier puffs, while a smaller hook creates mini puffs.

I like to swap the base stitch from hdc to sc or dc to slightly change the texture and height of each square.

Try using all cotton for a crisp finish, or mix cotton and acrylic for softness and durability—just be mindful of stretch differences.

I often add a crocheted border (single crochet or crab stitch) to finish the blanket and hide any irregularities along the edge.

For a reversible look, be consistent with seaming direction so both sides read nicely, or purposely stagger colors so one side is the display side.

I sometimes embroider small motifs on a few squares before seaming them for personalized details like initials or simple shapes.

If you want a lighter blanket, reduce stuffing slightly for flatter puffs; for a plush, cushioned feel, stuff a bit more but avoid overfilling.

I recommend making a small sample of several squares first to test color combinations and seaming methods before committing to a full blanket.

Common Mistakes & How to Fix Them

✗ Skipping the stitch count on Rnd 1 (20 stitches) can lead to an incorrectly sized square; count your stitches immediately after Rnd 1 and at the end of each round to ensure you have 20 stitches. ✗ Not crocheting over the starting tail on the second side of the chain can leave loose ends visible; lay the starting tail across the row and crochet over it to secure the tail without having to weave it in. ✗ Understuffing or overstuffing squares causes uneven puff sizes and lumpy joins; stuff squares lightly and consistently, following the recommended stuffing amount shown in the tutorial photos. ✗ Weaving in ends too early before seaming can make joining harder; leave the final tail until after seaming adjacent squares when instructed so you can hide tails inside stuffing or between seams. ✗ Choosing wildly different fiber types for squares can create inconsistent drape and tension; try to use yarns from the same fiber family or be prepared for slight changes in square size and texture.

Crochet Puff Quilt Pattern

Create a cozy, quilt-like crochet blanket using a single simple stitch and easy seaming techniques. This pattern guides you through making individual puff-style squares, stuffing them lightly, and seaming rows together for a heavy-weight, textured finish. Perfect for using yarn scraps or a single yarn type, you will end up with a warm, colorful blanket you can customize.

Beginner Friendly 12-15 Hours

Materials Needed for Crochet Puff Quilt Pattern

— Main Fabric

  • 01
    Worsted/Medium (4-weight) yarn - roughly 15-20 yards per square, plus extra yarn for seaming
  • 02
    100% cotton yarn recommended by the designer (scraps may be used for a colorful effect)
  • 03
    Additional yarn for mattress stitch seaming (any color of your choosing)

— Tools Required

  • 01
    Crochet hook size 5.0mm (or hook to meet gauge)
  • 02
    Yarn needle for seaming
  • 03
    Scissors
  • 04
    Polyester stuffing (for puffing each square)
  • 05
    Stitch marker (optional)
  • 06
    Flexible tape measure

Progress Tracker

0% Complete

— Pattern :

Info :

Ch 11

Round 1 :

Starting in the second ch from the hook, hdc in each ch across. Rotate your work to the other side of the ch (see figure 1) and hdc in each ch across. Slst to the starting stitch. (20 stitches)

Info :

*tip: when working along the second side of your ch, lay your starting tail down across the row and crochet over top of it to secure this tail without having to weave it in (see figure 2)

Info :

*tip: if needed, use a stitch marker at the beginning of each round to help keep track of your stitch count.

Round 2-8 :

Ch 1 and turn. Hdc in each of the next 20 stitches. Slst to the starting stitch. (20 stitches)

Info :

Fasten off, leaving a long tail (roughly 20"-24").

Info :

Begin lightly stuffing your square (see figure 3 for the recommended stuffing amount). Attach a yarn needle to the end of your tail and use the whip stitch (Tutorial #1) to begin seaming across the top. Finish filling in stuffing if needed, and whip stitch to the end, completely closing off your square. If this is your first square of a new row, you may go ahead and weave in this end.

Info :

Repeat this entire process for your next square, but don't weave in your final end yet.

Info :

As you seam all of your squares together, you will be looking at the back side of the work. Keep this in mind as you seam, if you would like your colors to be in a specific arrangement.

Info :

With your yarn needle still attached, seam this square to your previous square (Tutorial #2)

Info :

Decide how wide you would like your blanket to be, in increments of 3" (or increments of how wide each square is for you). Continue repeating this pattern until you have attached enough squares side by side to achieve your desired width. This will be one "row" of squares.

Info :

Complete a second full row of squares. Now, you will seam the two rows together using the mattress stitch (Tutorial #3). You will be using a completely separate strand of yarn for this, any color of your choosing.

Info :

Repeat this entire process for your entire project.

Info :

Once you achieve your desired width and length, weave in all ends and enjoy!

— Tutorials :

Tutorial #1 (P1) :

Whip stitch across the top: Attach your yarn needle to the end of your tail. Align the stitches from one side to the other. Insert your yarn needle through the first set of stitches and pull your yarn through. Come back around and insert your yarn needle through the next set of stitches, going the same direction as last time. Continue repeating this until you get to the end of the square, but don't fasten off the tail.

Tutorial #2 (P1) :

Whip stitch 2 squares together: You will NOT be seaming along the very sides of the squares. You want to begin picking up strands on the flat side of the square, *just off* from the very side. Insert your yarn needle into your first square (peach), picking up at least 2 strands. Pull the yarn through. Come back over to your second square (white), pick up at least 2 strands, and pick up at least 2 strands in your first square. Pull the yarn through. Continue this method all the way down. Do your last strand grab in the corners of each square. Flip your squares to work along the bottom edge. Go through the very bottom/corners one more time, ending on your second square (the color of the tail you are currently working with). Run your tail through your square and stuffing to "hide" the tail inside. Snip off the remainder of the tail.

Tutorial #3 (P1) :

Mattress stitch the rows together: Measure out a strand of yarn that is roughly 3x the length of work you need to seam. Attach one side to your yarn needle, and use the other side to tie a knot through both corners of the first set of squares. You will NOT be inserting the yarn needle from front to back, like pictured here. Similar to Tutorial #2, you will pick up stitches on the top and bottom of your squares, so that your seam lines don't show on the front of the work. Pick up a set of loops close to the top of your bottom square. Insert your yarn needle from the very bottom of your top square, up through a hole in the first row. Pull the yarn through.

Tutorial #3 Continued (P1) :

Move to the next space to seam through, but go in the opposite direction. Insert down through the top square and down through the bottom square. Continue this method across the first set of squares, switching directions with each stitch. When you get to the corners, you want to make a nice and secure connection between all 4 corners. It does not matter which square you end on. Insert through that square again (orange) up to the diagonal corner (yellow). Pull tightly. Ensure that all corner connections are nice and snug. Come back to the corner next door (tan) and down into the diagonal opposing corner (white). Pull tightly. Ensure that all corner connections are nice and snug. Continue on to the very end of your row. When you get to the end, go through the corners one more time and fasten off. Secure with a knot and weave in the end.

Assembly Instructions

  • Lightly stuff each square after finishing Rnd 2-8 and before closing the top; attach a yarn needle to the final tail and use the whip stitch to close the square securely.
  • Seam squares side-by-side using the whip stitch method (Tutorial #2), picking up at least two strands from each square along the flat edge and finishing corner stitches so seams are secure.
  • When two full rows are completed, join the rows using the mattress stitch (Tutorial #3) with a separate strand of yarn to make seams invisible on the front of the blanket.
  • As you seam, work on the back side of the work so that the front shows your chosen color arrangement, and hide tails inside stuffing where possible.
  • When finishing a seam, run the tail through the square and stuffing to hide it, then snip the remainder and weave in ends as instructed.
  • Complete the entire blanket by repeating square construction, seaming into rows, and mattress-stitching rows together until you achieve your desired width and length.

Important Notes

  • 💡Beginning ch 1 does NOT count as a stitch, so be careful when counting your stitches at the beginning of rounds.
  • 💡Each square measures approximately 3" x 3" before stuffing; measure your squares as you go to maintain the size you want.
  • 💡Meeting precise gauge is not extremely important due to flexible sizing, but consistent tension will help ensure uniform squares.
  • 💡Work with consistent stuffing and seam tension so that corner connections are snug and the blanket lies flat.
  • 💡Keep the back side facing you while seaming if you have a specific color layout in mind so the front displays your intended arrangement.

This puff quilt pattern turns yarn scraps into a warm, quilt-like blanket with charming 3" puffy squares. Customize colors, texture, and size to make a cozy heirloom for your home or a heartfelt gift. Enjoy the tactile process and the comforting result—snuggle up in handmade warmth! 🧶✨

You ask,

we answer.

FAQs

What size will the finished piece be?

The sample blanket measures 54" x 54" using 18 squares by 18 squares, with each square roughly 3" x 3" before stuffing.

Can I use different yarn weights for this pattern?

You can, but different yarn weights will change square size and the blanket's drape; the pattern is written for worsted/medium (4-weight) yarn and a 5.0mm hook.

Do I need prior crochet experience for this pattern?

This pattern is rated Beginner Friendly and uses basic stitches like half double crochet, though you should be comfortable with basic stitch counting and simple seaming techniques.

How long does this project typically take to complete?

Most crafters will spend multiple days on this project; plan for approximately 12+ hours total depending on blanket size and seaming time.

How much yarn do I need per square?

Plan for roughly 15-20 yards of worsted (4-weight) yarn per square, plus additional yarn for seaming and finishing.