🧶 Beautiful ✨ Detailed 💝 Adorable

Christmas Pudding Amigurumi Pattern

Christmas Pudding Amigurumi Pattern
4.5★ Rating
2-4 Hours Time Needed
2.3K Made This
✂️

Intermediate Level

Ideal for those with basic crochet experience, featuring slightly more advanced stitches and techniques to expand your skills.

⏱️

Bite-Sized Project

Finishes in 2-4 hours—perfect for an afternoon of creative relaxation.

🧸

Cute Companion

An adorable friend to cherish, handcrafted with love to bring comfort and joy for years to come.

About This Christmas Pudding Amigurumi Pattern

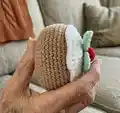
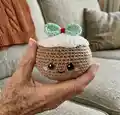
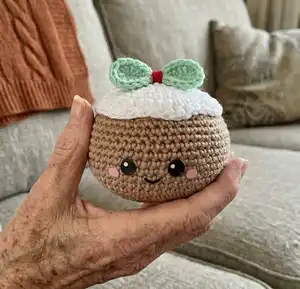
This pattern creates a charming Christmas Pudding amigurumi, measuring about 12cm across when made with the recommended yarn and hook. It includes full instructions for the pudding body, icing, leaves and berries, plus placement and assembly guidance. The design uses basic amigurumi shaping with some decorative stitches for the icing.

Christmas Pudding Amigurumi Pattern crochet pattern - detailed view of completed project

You will use Paintbox yarns and a 3.25mm hook to complete the project quickly. The pattern includes exact round-by-round instructions and finishing notes for a neat, gift-ready result.

Why You'll Love This Christmas Pudding Amigurumi Pattern

I absolutely love this pattern because it turns a classic holiday treat into a tiny handmade friend that feels joyful to make. I enjoyed designing the squashed pancake shape and the little icing details that give it character. The project is compact but satisfying—perfect for a focused afternoon of crafting. I also love how easily you can personalize it with different yarn colors or tiny accessories to make each pudding unique.

Christmas Pudding Amigurumi Pattern step 1 - construction progress Christmas Pudding Amigurumi Pattern step 2 - assembly progress Christmas Pudding Amigurumi Pattern step 3 - details and accessories Christmas Pudding Amigurumi Pattern step 4 - final assembly and finishing

Switch Things Up

I love experimenting with colors on this pattern: try a caramel or tan body for a more realistic pudding, or go whimsical with pastel shades for a baby-friendly toy.

You can make a tiny keychain version by using finer yarn and a smaller hook, or scale it up with bulkier yarn for a chunky, plush decoration.

I often add embroidered eyelashes or tiny felt accessories to change the expression and personality of the pudding.

Swap the red brads for tiny embroidered berries or small beads if you prefer not to use metal findings.

Try different icing textures by experimenting with front loop only stitches or surface crochet to create drips or ridges.

I sometimes make a set in varying sizes and group them as a holiday display—mix and match colors and sizes for charm.

If you want a posable piece, lightly insert a pipe cleaner or craft wire into the leaves before sewing them down for subtle shaping.

For a luxe look, use a metallic or sparkly yarn for the berries or a tiny ribbon bow glued to the top.

Personalize each pudding with a crocheted name tag or tiny gift tag for handcrafted holiday gifts.

When gifting, present a set of three small puddings in different colors—it's a lovely way to show creativity and thoughtfulness.

Common Mistakes & How to Fix Them

✗ Placing safety eyes too low or too high can change the expression drastically; follow the placement note (between R14-15, 3-4 stitches above the smile) and test position before securing. ✗ Forgetting to stuff gradually results in lumps or misshapen curves; stuff semi-firmly as you go and add small amounts between rounds to keep an even shape. ✗ Skipping stitch counts during increases and decreases will distort shaping; count your stitches at the end of each round to ensure you have the stated total. ✗ Not leaving long tails when finishing small pieces makes sewing difficult; leave a long tail for sewing on Leaves, Berries and Icing so you can position and secure them easily.

Christmas Pudding Amigurumi Pattern

Make a sweet, pocket-sized Christmas Pudding amigurumi with this clear, photo-referenced pattern. You will create a squishy, pancake-shaped pudding topped with icing, leaves and berries using Paintbox yarns and a 3.25mm hook. Perfect for gifting or holiday decor, the pattern walks you through body shaping, simple embellishments and neat finishing techniques.

Intermediate 2-4 Hours

Materials Needed for Christmas Pudding Amigurumi Pattern

— Main Fabric

  • 01
    Paintbox Yarns One Ball in Each Colour: Paper White (for icing)
  • 02
    Paintbox Yarns One Ball in Grass Green (for leaves)
  • 03
    Paintbox Yarns One Ball in Pillar Red (for berries)
  • 04
    Paintbox Yarns One Ball in Soft Fudge (for body - brown)
  • 05
    Amigurumi Eyes 2 count (9mm)
  • 06
    Red Brads 2 count (5mm) for cheeks

— Tools Required

  • 01
    Crochet Hook: 3.25mm
  • 02
    Amigurumi Eyes: 2 count (9mm)
  • 03
    Brads: 2 count in red (5mm)
  • 04
    Tapestry Needle
  • 05
    Glue
  • 06
    Stuffing

Progress Tracker

0% Complete

— Body :

Round 1 :

MR 6

Round 2 :

inc around [12]

Round 3 :

(sc, inc) x6 [18]

Round 4 :

(sc 2, inc) x6 [24]

Round 5 :

(sc 3, inc) x6 [30]

Round 6 :

(sc 4, inc) x6 [36]

Round 7 :

(sc 5, inc) x6 [42]

Round 8 :

(sc 6, inc) x6 [48]

Round 9 :

(sc 7, inc) x6 [52]

Round 10 :

(sc 8, inc) x6 [60]

Round 11-20 :

sc around [10 rounds]

Info :

Embroider a smile on R13, add eyes between R14-15, 3-4 stitches above smile. Add red brads between R13-14 next to eyes. Secure with glue.

Round 21 :

(sc 8, dec) x6

Round 22 :

(sc 7, dec) x6 [52]

Round 23 :

(sc 6, dec) x6 [48]

Round 24 :

(sc 5, dec) x6 [42]

Round 25 :

(sc 4, dec) x6 [36]

Info :

Stuff semi firmly as you go

Round 26 :

(sc 3, dec) x6

Round 27 :

(sc 2, dec) x6

Round 28 :

(sc, dec) x6

Round 29 :

dec around

Info :

FO. Weave in all ends.

Info :

Squish the body by pressing the top and bottom so it is more of a tall pancake shape.

— Leaves :

Leaves (P1) :

Using Green Yarn: ch 7, sl st in 2nd ch from hook through bb, (sl st through bb, ch 2, sl st in same bb), sl st in next 2 back bumps, ch 3, sl st in same bb, sl st in next bb, 3 sl st in next bb. working on other side of the ch: sl st in next 2 st, ch 3, sl st in current st, sl st in next, ch 2, sl st in same, sl st in last. FO leaving long tail for sewing.

— Berries :

Berries (P1) :

Using Red Yarn: R1: MR 4. Clean FO and leave a long tail for sewing.

— Icing :

Round 1 :

MR 6 [6]

Round 2 :

inc around [12]

Round 3 :

(sc, inc) x6 [18]

Round 4 :

(sc 2, inc) x6 [24]

Round 5 :

(sc 3, inc) x6 [30]

Round 6 :

(sc 4, inc) x6 [36]

Round 7 :

(sc 5, inc) x6 [42]

Round 8-9 :

sc, hdc in next 2 st, sc in next 3 st, hdc, sc, hdc, sc, hdc in next 2 st, sc in next 2 st, hdc in next 3 st, sc in next 4 st, hdc in next 5 st, sc in next 6 st, hdc in 8 st, sc in last 2 st. [2 rounds]

Info :

FO leaving long tail for sewing.

— Assembly :

Info :

Sew Leaves onto the top of the icing, then the berries. Place Icing onto the top of the head (around R21-29). Weave in all ends. Please use picture for reference.

Assembly Instructions

  • Sew Leaves onto the top of the icing, then sew the berries on top of the leaves as shown in the photos for accurate placement.
  • Place the Icing piece onto the top of the head around rounds R21-29 and secure by sewing through the Icing edge into the body.
  • Weave in all ends securely after attaching pieces to hide yarn tails and tidy the final piece.
  • Secure red brads next to the eyes between R13-14 with a small drop of glue to fasten them, then allow glue to dry fully.

Important Notes

  • 💡Stuff the body semi-firmly as you go to maintain consistent shaping and avoid lumps.
  • 💡Weave in all ends after assembly to keep the finished amigurumi neat and durable.
  • 💡Press the top and bottom of the body to squish it into a tall pancake shape for the correct pudding profile.

This adorable Christmas Pudding amigurumi is a festive and quick project you can finish in an afternoon. It makes a lovely handmade gift or holiday decoration that brings a smile to anyone who sees it. Happy crocheting and enjoy the cozy vibes of the season! 🎄🧶

You ask,

we answer.

FAQs

What size will the finished piece be?

The finished amigurumi measures about 12cm across when using the recommended Paintbox yarns and 3.25mm hook.

Can I use different yarn weights for this pattern?

Yes, you can change yarn weight, but this will alter the final size; adjust your hook size accordingly to achieve the desired finished dimensions.

Do I need prior crochet experience for this pattern?

This pattern is rated intermediate, so basic experience with single crochet, increases, decreases and working in the round is recommended.

How long does this project typically take to complete?

Most crocheters finish this bite-sized project in about 2-4 hours, depending on experience and how much time you spend on assembly and embellishments.