🧢 Beautiful ✨ Detailed πŸ’ Adorable

Tulip Shell Pattern

Tulip Shell Pattern
4.5β˜… Rating
2-4 Hours Time Needed
2.1K Made This
βœ‚οΈ

Intermediate Level

Ideal for those with basic crochet experience, featuring slightly more advanced stitches and techniques to expand your skills.

⏱️

Bite-Sized Project

Finishes in 2-4 hoursβ€”perfect for an afternoon of creative relaxation.

🏑

Cozy Accent

A warm touch for your space that transforms ordinary corners into inviting nooks filled with handmade charm.

About This Tulip Shell Pattern

This pattern creates a decorative Tulip Shell crocheted from cotton thread with a shaped, stiffened body and neat trim. You will work from the tip in continuous rounds, then switch to rows for shaping and finish with a fine trim and border. The instructions include shaping tips using a glue-and-water mixture so your shell keeps a firm, elegant form.

Tulip Shell Pattern crochet pattern - detailed view of completed project

Perfect for small gifts, home decor or as part of a seaside display, the shell uses tiny hooks and cotton yarn for crisp stitches. Full materials, abbreviations and step-by-step instructions are included to guide you through every round and row.

Why You'll Love This Tulip Shell Pattern

I absolutely love this pattern because it turns simple stitches into a sculptural, elegant piece that looks handmade and refined. I enjoy the process of working from the tip and watching the shell grow row by row into a recognizable form. The shaping step with glue and fill is always rewarding β€” the fabric becomes architectural and holds your intended shape. I also love that you can experiment with yarn colors and borders to give each shell its own personality. Finally, the pattern is compact and satisfying: you can finish a beautiful decorative object in an afternoon and feel proud to display it.

Tulip Shell Pattern step 1 - construction progress Tulip Shell Pattern step 2 - assembly progress Tulip Shell Pattern step 3 - details and accessories Tulip Shell Pattern step 4 - final assembly and finishing

Switch Things Up

I love how easy it is to change the personality of this shell just by swapping yarn colors; try ombre or variegated yarn for a beachy gradient.

Want a chunkier look? I sometimes use a thicker cotton and a larger hook to make a larger, softer shell for display bowls.

I often add embroidered highlights or a few hand-stitched seed beads before shaping to give the shell a pearly shimmer.

For a more natural finish I dilute acrylic paint or watercolors and brush the shell after shaping for subtle color washes.

If you prefer no stiffness, I sometimes skip the glue and simply wet-shape the shell and let it air dry for a flexible, fabric-like finish.

I also like to make a set of shells in different sizes and glue them to a driftwood base for a unique wall display.

Try adding a loop of fine cord to the back before shaping to make a hanging ornament β€” a lovely gift idea.

Make mini keychain versions by using thinner yarn and an extra small hook; attach to a keyring once finished and dried.

For a sparkly option, sprinkle a little fine glitter onto the glue mix or varnish after shaping for a subtle seaside sparkle.

I encourage you to experiment with border stitches β€” crab stitch, picot or a contrasting micro-sc edge all change the final look dramatically.

Common Mistakes & How to Fix Them

βœ— Skipping the instruction to work in back loops for the initial rounds causes the shell texture and shaping to be wrong; follow the instruction to work in back loops only until directed otherwise. βœ— Using a crochet hook that is too large creates loose stitches and a floppy shell that won’t stiffen nicely; use the recommended smaller hooks (1,5 mm for body and 1,0 mm for trim) for tight, neat stitches. βœ— Not switching to working in rows at the correct point will alter the shell profile and curvature; refer to the pattern note and turn to rows exactly where indicated. βœ— Failing to squeeze out excess glue-water mix before shaping makes drying take much longer and can deform the shell; carefully squeeze out the excess mix before molding and filling. βœ— Neglecting to fill the shell while drying results in collapsed shapes and uneven openings; use small plastic bags or filler to support the interior while it dries. βœ— Forgetting to weave in ends as you go leaves loose tails that catch on the trim; fasten off and weave in ends promptly after finishing the relevant section.

Tulip Shell Pattern

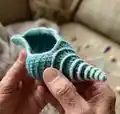
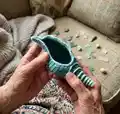
Create a delicate crocheted Tulip Shell to decorate your home or give as a handmade gift. This pattern guides you from the tip of the shell through shaping, trim and border, with clear step-by-step rounds and rows. You'll learn how to stiffen and shape the shell using a glue-and-water method for a lasting sculptural look. Ideal for makers who enjoy small detailed work and playing with texture and color.

Intermediate 2-4 Hours

Materials Needed for Tulip Shell Pattern

β€” Main Fabric

  • 01
    100% cotton yarn (body) - Madame Tricote 'Camilla' 50g = 125 m (used for shell body)
  • 02
    100% cotton yarn (trim and border) - Madame Tricote 'Maxi' 100g = 565 m (used for trim/border)
  • 03
    Variegated cotton examples mentioned: Alize 'Bahar Batik' (for color effects)
  • 04
    Thin cotton thread for trim (1,0 mm hook work)
  • 05
    Other thin yarn options mentioned: Alize 'Miss' 50 g = 280 m

β€” Tools Required

  • 01
    Crochet hook size 1.5 mm (recommended for shell body)
  • 02
    Crochet hook size 1.0 mm (for trim and border)
  • 03
    Scissors
  • 04
    Needle to weave in ends (tapestry needle)
  • 05
    Stitch marker (optional, to mark beginning of rounds/rows)
  • 06
    White glue for shaping
  • 07
    Water (to mix with glue)
  • 08
    Small plastic bags (to fill shell for shaping and drying)
  • 09
    Rubber gloves (optional, for glue work)
  • 10
    Chopstick or similar tool (to help shape and straighten the shell top)
  • 11
    Thin thread for trim

Progress Tracker

0% Complete

β€” Crocheting the shell :

Info :

Starting from the tip of the shell and working in continuous rounds and in back loops only.

Round 1 :

6 sc in a magic ring (6)

Round 2 :

* 1 sc in each of next 2 sts, 2 sc in next; rep from * 1 more time (8)

Round 3 :

* 1 hdc in each of next 3 sts, 2 hdc in next; rep from * 1 more time (10)

Round 4 :

* 1 dc in each of next 4 sts, 2 dc in next; rep from * 1 more time (12)

Round 5 :

* 1 dc in each of next 2 sts, 2 dc in next; rep from * 3 more time (16)

Round 6 :

* 1 dc in each of next 3 sts, 2 dc in next; rep from * 3 more time (20)

Round 7 :

* 1 tr in each of next 3 sts, 2 tr in next; rep from * 4 more time (25)

Round 8 :

* 1 tr in each of next 4 sts, 2 tr in next; rep from * 4 more time (30)

β€” Working in rows :

Info :

Turn and continue working in rows from now on:

Row 1 :

working through front loops only: ch 1 (=1 sc), 2 sc in next st, 1 sc in each st; turn (31)

Row 2 :

working through both loops from now on: ch 1 (=1 sc), sc2tog, * 1 sc in each of next 2 sts, 2 sc in next; rep from * 7 more times; 1 sc in each of last 4 sts; turn (38)

Row 3 :

ch 1 (=1 sc), 2 sc in next st, 1 sc in each st; turn (39)

Row 4 :

ch 1 (=1 sc), sc2tog, 1 sc in each st; turn (38)

Rows 5, 7, 9, 11 :

same as Row 3 Rows 6, 8, 10: same as Row 4

Row 12 :

ch 1 (=1 sc), * sc2tog, 1 sc in next 2 sts, rep from * 8 more times; 1 sc in last 2 sts; turn (30)

Row 13 :

ch 1 (=1 sc), 2 sc in next st, 1 sc in each st; turn (31)

Row 14 :

ch 1 (=1 sc), * sc2tog, 1 sc in next 2 sts, rep from * 6 more times, 1 sc in last 2 sts; turn (24)

Row 15 :

ch 1 (=1 sc), 2 sc in next st, 1 sc in each st; turn (25)

Row 16 :

ch 1 (=1 sc), * sc2tog, 1 sc in next 2 sts, rep from * 5 more times; turn (19)

Row 17 :

ch 1 (=1 sc), 2 sc in next st, 1 sc in each st; turn (20)

Row 18 :

ch 1 (=1 sc), * sc2tog, 1 sc in next 2 sts, rep from * 3 more times, 1 sc in last 3 sts; turn (16)

Row 19 :

ch 1 (=1 sc), sc in next st, 1 sc in each st; turn (16)

Row 20 :

ch 1 (=1 sc), * sc2tog, 1 sc in next st, rep from * 3 more times, 1 sc in last 3 sts; turn (12)

Row 21 :

ch 1 (=1 sc), 1 sc in each st; turn (12)

Row 22 :

ch 1 (=1 sc), * sc2tog, 1 sc in next st, rep from * 2 more times, 1 sc in last 2 sts; turn (9)

Row 23 :

ch 1 (=1 sc), 1 sc in each st; turn (9)

Row 24 :

ch 1 (=1 sc), * sc2tog, 1 sc in next st, rep from * 1 more time, 1 sc in last 2 sts; turn (7)

Rows 25, 26, 27, 28 :

ch 1 (=1 sc), 1 sc in each st; turn (7)

Info :

Fasten off and weave in the ends.

β€” Crocheting the border :

Trim :

Using 1,00 mm hook and thin thread. Attach yarn to the front loop of last stitch of last round. Working into those front loops: 2 sc in one stitch all the way to the center of the shell. Fasten off and weave in the ends.

Border :

Using 1,00 mm hook and thin thread. Attach yarn to the top of the shell opening. Ch 1 and then sc all the way around the shell opening inserting hook into the stitches. Now work 2. row only down of the opening of the shell by working 2 dcin one stitch and 1 dc in next. Few stitches before the tip of the shell make 2 hdc and 4-5 sc instead of dc. Fasten off and weave in the ends.

β€” Shaping the shell :

Infos :

In a cup mix 2 parts of water with 1 part of glue. Immerse the crocheted shell into the glue and water mixture (wear rubber gloves if necessary) until it’s fully wet. Carefully squeeze out excess glue-water mix. Start shaping the shell by gently pulling at the crochet fabric and giving it a desired shape. Use something (like chopstick) to help you straighten out the long ant thin shell top. Use small plastic bags to fill up the shell – it helps to hold it's shape while the shell is drying. Pinch the bottom of the shell together and shape an opening. Pull at trim. Continue until you are satisfied with the shape. Leave it to dry on a towel.

Assembly Instructions

  • Attach yarn for the trim to the front loop of the last stitch of the last round and work 2 sc in one stitch toward the center of the shell; fasten off and weave in ends.
  • Attach yarn for the border to the top of the shell opening, ch 1 and sc all the way around the shell opening, inserting the hook into the stitches as you go.
  • When shaping, fill the shell interior with small plastic bags to support the opening and top while the glue-water mix dries.
  • Pinch and shape the bottom opening after soaking and squeezing out excess glue mix, then adjust the trim and border while damp for a neat finish.

Important Notes

  • πŸ’‘Work in continuous rounds and do not join or turn unless the pattern specifically instructs you to change; this keeps the spiral shape intact.
  • πŸ’‘For neat, tight stitches use a crochet hook several sizes smaller than the yarn label recommends; smaller hooks give crisper detail for this pattern.
  • πŸ’‘Use a stitch marker at the first stitch of each round or row to mark the beginning; this helps keep your stitch counts accurate during shaping and decreases.
  • πŸ’‘When shaping with glue, wear rubber gloves if you have sensitive skin and squeeze out excess glue-water mixture before shaping to speed drying.

This Tulip Shell pattern brings a seaside touch to your home with delicate stitchwork and sculpted shaping. Use tiny hooks and cotton thread to create crisp, compact stitches and finish with a neat trim and border for a polished look. 🐚🧢 Display them in bowls or hang them as ornaments for instant coastal charm.

You ask,

we answer.

FAQs

What size will the finished piece be?

The finished shell size depends on yarn and hook but typically measures a few inches long when using the recommended yarn and 1.5 mm hook for the body and 1.0 mm for trim.

Can I use different yarn weights for this pattern?

Yes, you can use different yarn weights, but this will affect final size and stiffness; use a proportionally larger hook for heavier yarn or a smaller hook for thinner yarn to maintain tight stitches.

Do I need prior crochet experience for this pattern?

This pattern is rated intermediate because it uses small hooks, working in BLO, and shaping techniques; basic knowledge of single crochet, decreases and reading rounds/rows is recommended.

How long does this project typically take to complete?

Most crocheters finish the crochet portion in 2-4 hours, though shaping and drying time will extend the overall project time depending on glue mix and drying conditions.