🧢 Beautiful ✨ Detailed πŸ’ Adorable

Christmas Hats for Mini Penguins Amigurumi Pattern

Christmas Hats for Mini Penguins Amigurumi Pattern
4.1β˜… Rating
5-7 Hours Time Needed
3.8K Made This
βœ‚οΈ

Intermediate Level

Ideal for those with basic crochet experience, featuring slightly more advanced stitches and techniques to expand your skills.

⏱️

Weekend Treat

Takes 5-7 hours, making it an enjoyable project to finish over a couple of days.

πŸŽ„

Holiday Cheer

Festive fun for the season, bringing handmade magic to celebrations and creating new family traditions.

About This Christmas Hats for Mini Penguins Amigurumi Pattern

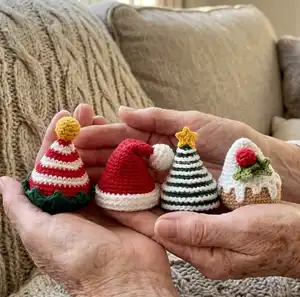
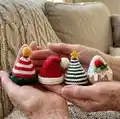
This pattern provides four unique Christmas mini-hats sized to fit toys with a head coverage of about 14.5 cm. Youll find step-by-step rounds, color change notes and finishing techniques for pompons, curls, brims and decorative details. Clear photo references are included for tricky steps like crocheting curls in front loops and sewing on decorations.

Christmas Hats for Mini Penguins Amigurumi Pattern crochet pattern - detailed view of completed project

Designed for basic-intermediate crocheters, the hats use simple increases, decreases and BLO rounds. Each hat is worked in a continuous spiral and finished with sewing instructions and illustrated tips.

Why You'll Love This Christmas Hats for Mini Penguins Amigurumi Pattern

I absolutely love this pattern because it captures the playful spirit of the holidays in tiny, collectible accessories. I enjoy how quick each hat works up while still allowing fun detailing like pompon curls, brims and tiny stars. I like that the instructions are written in a clear spiral format and include photos to guide tricky steps. Making these hats becomes a lovely relaxing project that also makes perfect decorations or little gifts.

Christmas Hats for Mini Penguins Amigurumi Pattern step 1 - construction progress Christmas Hats for Mini Penguins Amigurumi Pattern step 2 - assembly progress Christmas Hats for Mini Penguins Amigurumi Pattern step 3 - details and accessories Christmas Hats for Mini Penguins Amigurumi Pattern step 4 - final assembly and finishing

Switch Things Up

I love to customize these hats by swapping colors; I often change the white trim to cream for a vintage look.

I sometimes use a thicker yarn and a larger hook to make chunky, oversized versions for bigger dolls or decorative displays.

I like adding embroidery or beads for a sparkle effect β€” a few French knots or tiny seed beads make a charming accent.

For a soft pastel set, I use pale pinks and sage greens instead of traditional reds and dark greens for a modern holiday palette.

I also experiment with different pompon sizes and textures; a fluffy faux fur pompon gives the Santa hat a playful, luxe finish.

If you want a wearable adult ornament, increase the rounds or use sport/bulky yarn to scale up the pattern while keeping the stitch pattern identical.

I sometimes make matching scarves by changing the length of the foundation chain to fit different toy necks or to create a set for display.

Try adding a metallic thread worked through single crochet rounds for subtle shimmer that still stitches easily and hides well.

I often replace the star on the tree hat with a tiny bell or button for a different sound and look β€” sew it tightly so it stays in place.

Don`t be afraid to mix techniques: you can crochet the leaves in a contrasting color or use felt cutouts instead of crocheted beads for quicker assembly.

Common Mistakes & How to Fix Them

βœ— Skipping the stitch marker and losing the start of the round leads to mismatched stripes; place a marker at the first stitch and move it each round. βœ— Changing colors without securing tails can cause loose ends and gaps at color joins; weave in ends or use a small knot and hide tails as you go. βœ— Forgetting to work in a continuous spiral when instructed creates visible seams; avoid joining rounds and use a marker to track the start. βœ— Overstuffing pompons or small details makes shaping difficult and bulky; stuff gradually and only enough to hold the shape without stretching the stitches. βœ— Failing to crochet curls into the front loops as directed results in flat decorations; insert the hook into the front loop and work the spiral curls exactly into those loops.

Christmas Hats for Mini Penguins Amigurumi Pattern

Make a set of festive mini hats designed for tiny amigurumi penguins and other small toys. This pattern includes four seasonal hat designs plus decorations and step-by-step photos to guide you. Youll enjoy quick, detailed rounds and clear finishing instructions to create charming holiday accessories.

Intermediate 5-7 Hours

Materials Needed for Christmas Hats for Mini Penguins Amigurumi Pattern

β€” Main Fabric

  • 01
    Yarn Art Jeans (50g/160 m, 55% cotton/45% acrylic, Sport / Fine): color No 01 (white)
  • 02
    Yarn Art Jeans (50g/160 m): color No 07 (beige)
  • 03
    Yarn Art Jeans (50g/160 m): color No 35 (yellow)
  • 04
    Yarn Art Jeans (50g/160 m): color No 51 (dark red)
  • 05
    Yarn Art Jeans (50g/160 m): color No 69 (green)
  • 06
    Yarn Art Jeans (50g/160 m): color No 90 (red)
  • 07
    Yarn Art Jeans (50g/160 m): color No 92 (dark green)
  • 08
    Suitable alternatives: Alize Cotton Gold (55% cotton/45% acrylic, 100g/330m) and Schachenmayr Catania Originals (100% cotton, 50g/125m)

β€” Tools Required

  • 01
    Crochet hook size 2.25 mm (metal US B/1, GB 13)
  • 02
    Polyester stuffing / hollowfibre
  • 03
    Yarn needle for sewing details
  • 04
    Scissors
  • 05
    Stitch marker
  • 06
    Pins for positioning pieces (optional)

Progress Tracker

0% Complete

β€” Elf hat :

Round 1 :

6sc in MR (6)

Round 2 :

6 inc (12)

Round 3-5 :

12sc (3 rounds) Stuff detail with stuffing material, continue crocheting.

Round 6 :

6 dec (6)

Round 7 :

(change to red yarn) 6sc (6) (Image 1)

Round 8 :

(1sc, inc)*3 times (9)

Round 9 :

(change to white yarn) (2sc, inc)*3 times (12)

Round 10 :

(3sc, inc)*3 times (15)

Round 11 :

(change to red yarn) (4sc, inc)*3 times (18)

Round 12 :

(5sc, inc)*3 times (21)

Round 13 :

(change to white yarn) (6sc, inc)*3 times (24)

Round 14 :

(7sc, inc)*3 times (27)

Round 15 :

(change to red yarn) (8sc, inc)*3 times (30)

Round 16 :

(9sc, inc)*3 times (33)

Round 17 :

(change to white yarn) (10sc, inc)*3 times (36)

Round 18 :

36sc

Round 19 :

(change to red yarn) 36sc

Round 20 :

36sc

Round 21 :

36sc

Round 22 :

(change to dark green yarn) 36sc

Round 23 :

BLO 36sc

Round 24 :

36sc

Info :

Thread secure, hide the end of the thread (Image 2-6).

β€” Brim :

Info :

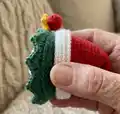
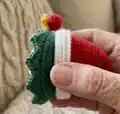
Join dark green yarn with a slip knot in the last front loop remaining of rnd 23 at the bottom of the elf`s hat (Image 7) and work along the remaining front loops: (skip 1, crochet in one stitch: 2hdc + ch2 + slst in 1st ch (Image 8) + 2hdc)*9 times, slst into the stitch where you started crocheting the brim. Cut the yarn and hide the end of the thread (Image 9).

β€” Santa hat :

Round 1 :

6sc in MR (6)

Round 2 :

BLO 6 inc (12)

Round 3-5 :

BLO 12sc (3 rounds) Stuff detail with stuffing material, continue crocheting.

Round 6 :

BLO 6 dec (6)

Round 7 :

BLO (change to dark red yarn) 6sc (6) (Image 10)

Round 8 :

(1sc, inc)*3 times (9)

Round 9 :

9sc

Round 10 :

(2sc, inc)*3 times (12)

Round 11 :

12sc

Round 12 :

(3sc, inc)*3 times (15)

Round 13 :

15sc

Round 14 :

(4sc, inc)*3 times (18)

Round 15 :

18sc

Round 16 :

(5sc, inc)*3 times (21)

Round 17 :

21sc

Round 18 :

(6sc, inc)*3 times (24)

Round 19 :

24sc

Round 20 :

(7sc, inc)*3 times (27)

Round 21 :

27sc

Round 22 :

(8sc, inc)*3 times (30)

Round 23 :

30sc

Round 24 :

(9sc, inc)*3 times (33)

Round 25 :

(10sc, inc)*3 times (36)

Round 26 :

36sc

Round 27 :

36sc

Round 28 :

(change to white yarn) 36sc

Round 29 :

BLO 36sc

Round 30 :

BLO 36sc

Round 31 :

BLO 36sc, slst. (Image 11)

Info :

Cut the yarn and hide the end of the yarn (Image 12-15).

Curls on the pompon :

Hold the hat with pompon facing upward, find the last remaining front loop of the 7th round, and insert the hook as show on Image 16. Join white yarn and crochet: (ch1, 1slst in the next front loop)* repeat crochet curls in spiral into all front loops of the pompon, until you crochet the last front loop on the top. Crochet ch1 more and pull the end of yarn through the last stitch completely. Weave in the end of yarn of that ch1 into the pompon, using a needle. Don`t forget to weave in the end of the yarn sticking out from where you started crocheting the curls (Image 17-19).

Curls on the Santa hat :

Hold the hat with pompon facing upward, find the last remaining front loop of the 31st round, and insert the hook as show on Image 20. Join white yarn and crochet: (ch1, 1slst in the next front loop)* repeat crochet curls in spiral into all front loops of the 29th-31st rounds. Weave in the end of yarn from the beginning and the end of crocheting the curls on the wrong side of the hat (Image 21-22).

Info :

Bend the hat a little and sew it in place with a few stitches if you wish (Image 23-25).

β€” Christmas tree hat :

Round 1 :

6sc in MR (6)

Round 2 :

(1sc, inc)*3 times (9)

Round 3 :

BLO 9sc

Round 4 :

(2sc, inc)*3 times (12)

Round 5 :

BLO 12sc

Round 6 :

(1sc, inc)*6 times (18)

Round 7 :

BLO 18sc

Round 8 :

(2sc, inc)*6 times (24)

Round 9 :

BLO 24sc

Round 10 :

(3sc, inc)*6 times (30)

Round 11 :

BLO 30sc

Round 12 :

(4sc, inc)*6 times (36)

Round 13 :

BLO 36sc

Round 14 :

36sc

Round 15 :

BLO 36sc

Round 16 :

36sc

Round 17 :

BLO 36sc, slst. (Image 26)

Info :

Cut the yarn and hide the end of the yarn (Image 27-31).

Curls on the Christmas tree hat :

Hold the hat with the top facing down, find the first front loop of the 3rd round and insert the hook as shown on Image 32. Join white yarn and crochet: (ch1, 1slst in the next front loop)* repeat crochet curls in spiral into all front loops of the 3rd-17th rounds (Image 33-35). Weave in the end of yarn from the beginning and the end of crocheting the curls on the wrong side of the hat (Image 36-38).

β€” Star :

Info :

Use the yellow yarn. Crochet in MR: (1sc, picot stitch*, 1sc)* 5 times (Image 39-43).

Info :

picot stitch*: 1. Crochet 2 chains; 2. Insert your hook in the second chain from the hook; 3. Yarn over and draw the yarn through the stitch and through the loop on the hook.

Info :

Tighten the MR, bring the end of the yarn to the back of the star, fasten and cut off (Image 44-46). Leave the other end of the yarn for sewing on the hat. Sew the star to the top of the hat (Image 47-49).

β€” Cookie hat :

Round 1 :

6sc in MR (6)

Round 2 :

(1sc, inc)*3 times (9)

Round 3 :

(2sc, inc)*3 times (12)

Round 4 :

(3sc, inc)*3 times (15)

Round 5 :

(4sc, inc)*3 times (18)

Round 6 :

(5sc, inc)*3 times (21)

Round 7 :

(6sc, inc)*3 times (24)

Round 8 :

(7sc, inc)*3 times (27)

Round 9 :

(8sc, inc)*3 times (30)

Round 10 :

(9sc, inc)*3 times (33)

Round 11 :

(10sc, inc)*3 times (36)

Round 12 :

BLO (change to beige yarn) 36sc (Image 50-52)

Round 13-17 :

36sc (5 rounds), slst. Cut the yarn and hide the end of the yarn.

β€” Glaze :

Info :

Hold the hat with the top facing down, find the first front loop of the 12th round, join white yarn and crochet: (ch4, stat in second chain from the hook: 3sc, 1slst in the next front loop, 2sc, ch2, stat in second chain from the hook: 1sc, 1slst in the next front loop, 2sc)* repeat 5 times, ch4, stat in second chain from the hook: 3sc, 1slst in the next front loop, 2sc, ch2, stat in second chain from the hook: 1sc, 1slst in the next front loop, 1sc (Image 53-58). Fasten off and leave a long yarn tail for sewing.

Info :

Sew the glaze to the hat (Image 59-61).

β€” Bead (decoration) :

Round 1 :

6sc in the MR

Round 2 :

(1sc, inc)*3 times (9)

Round 3-4 :

9sc (2 rounds)

Round 5 :

(1sc, dec)*3 times (6), stuff detail with stuffing material.

Info :

Cut the yarn and guide it into each front loop of the last round using a needle inserted from the outer part of the detail (Image 62). Cut the yarn, fasten off the hole and leave a long yarn tail for sewing. (Image 63-64)

β€” Leaves (decoration) (make 2) :

Info :

Use the green yarn. Stitches are worked around both sides of the foundation chain. Ch4, in second chain from the hook: R1: sc, picot stitch*, sc in next 2 stitches, picot stitch; another side of the chain: sc, picot stitch, sc in next 2 stitches, picot stitch, slst into the same sc (Image 65-67).

Info :

Sew the decoration to the hat (Image 68-69).

β€” Scarf (make 4) :

Info :

Use the green, dark red, dark green yarn. Crochet ch41: R1: 40 sc, ch1, turn the detail. R2: 40 sc, ch1, turn the detail. R3: 40sc. Thread secure, hide the end of the thread (Image 70).

Assembly Instructions

  • Sew the pompon securely to the tip of each hat by threading the yarn tail through the tip and stitching several times from the inside to hide the knot.
  • Attach the star to the top of the Christmas tree hat using the yarn tail left from the MR and stitch through the top center until secure (Image 47-49).
  • Sew the glaze piece to the cookie hat by matching the drip points to the hat rounds and stitching the long yarn tail around the inside to hide the ends (Image 59-61).
  • Sew the red bead to the cookie hat top and place the two leaves beside it, stitching through the outer front loops to secure decoration placement (Image 62-69).
  • If desired, bend the Santa hat tip and tack it in place with a few stitches on the wrong side for a jaunty look (Image 23-25).

Important Notes

  • πŸ’‘Work in a continuous spiral and do not join rounds unless the pattern specifically tells you to do so.
  • πŸ’‘Use a stitch marker or a piece of yarn to mark the beginning of the round to keep stripes and rounds aligned.
  • πŸ’‘Fasten off using a needle join for a neat finish and hide yarn tails inside the hat whenever possible.
  • πŸ’‘Stuff small details like pompons and beads gradually; overstuffing will distort the shape of the hat.
  • πŸ’‘When crocheting curls in front loops, insert the hook precisely into front loops to achieve consistent spiral curls.

These mini Christmas hats bring instant holiday charm to your amigurumi collection. πŸŽ„ Perfect for gifting or dressing up tiny handmade friends, each hat is quick to crochet and full of character. 🎁 Make a set in coordinating colors for an adorable seasonal display and enjoy the cozy creativity of handmade details. 🧢

You ask,

we answer.

FAQs

What size will the finished hats fit?

The hats are designed for toys with a head coverage of approximately 14.5 cm (5.7 inches) when using the recommended yarn and hook.

Can I use a different yarn weight for these hats?

Yes, you can use a different yarn weight but it will change the finished sizeβ€”choose an appropriate hook for your yarn and check the hat diameter as you work.

Are the patterns worked in joined rounds or spiral?

Work in a continuous spiral and do not join rounds unless the instructions explicitly state otherwise; use a stitch marker to track the start of each round.

How long will it take to make each hat?

Most crafters finish a single mini hat in a couple of hours; completing the full set typically takes 5-7 hours depending on experience and embellishments.