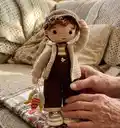
🧢 Beautiful ✨ Detailed πŸ’ Adorable

Tommy The Fisher Amigurumi Pattern

Tommy The Fisher Amigurumi Pattern
4.0β˜… Rating
12-15 Hours Time Needed
1.5K Made This
βœ‚οΈ

Intermediate Level

Ideal for those with basic crochet experience, featuring slightly more advanced stitches and techniques to expand your skills.

⏱️

Multi-Day Project

A rewarding 12+ hour journeyβ€”perfect for dedicated crafters who love detailed work.

🧸

Cute Companion

An adorable friend to cherish, handcrafted with love to bring comfort and joy for years to come.

About This Tommy The Fisher Amigurumi Pattern

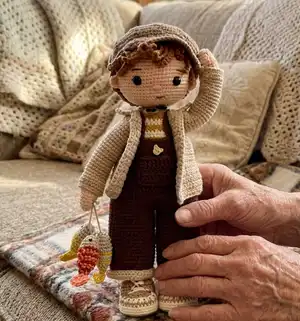
This pattern creates a detailed Tommy the Fisher amigurumi with hat, hair, coat, trousers and tiny accessories. You will work in rounds with clear color changes to craft the legs, body, arms, head and clothes. The design includes instructions for insoles, shoes, a wire option for sturdiness and tiny embroidered details. Materials use Yarn Art Jeans and Etrofil yarns to achieve the pictured look.

Tommy The Fisher Amigurumi Pattern crochet pattern - detailed view of completed project

The pattern includes full round-by-round stitch counts, abbreviations and photo guidance for assembly. Suitable as a decorative piece or a careful baby toy when soft materials are used.

Why You'll Love This Tommy The Fisher Amigurumi Pattern

I absolutely love this pattern because it brings character to every small detail β€” the tiny fish, cap and striped sweater make Tommy feel wonderfully handmade. I enjoy the combination of simple amigurumi construction with finishing touches like the shoes and hat that elevate the final look. The step-by-step rounds make shaping predictable yet fun, and I like how the color changes create a charming striped sweater. Working this pattern was a relaxing way to practice consistent tension and color joins while producing a very giftable finished toy.

Tommy The Fisher Amigurumi Pattern step 1 - construction progress Tommy The Fisher Amigurumi Pattern step 2 - assembly progress Tommy The Fisher Amigurumi Pattern step 3 - details and accessories Tommy The Fisher Amigurumi Pattern step 4 - final assembly and finishing

Switch Things Up

I love personalizing this pattern by changing the color palette; try navy and red for a nautical look or soft pastels for a baby-friendly version.

I often swap the yarn weight and hook to make a mini keychain version β€” use a finer yarn and smaller hook for a tiny Tommy perfect for gifts.

For a cuddly version, choose a bulkier yarn and a larger hook; this will give you a softer, chunkier toy with the same shaping instructions.

I sometimes add embroidered freckles or a small felt patch to the trousers to give Tommy extra personality and charm.

If you want a poseable toy, I add thin wire into the legs and body as pictured so he can stand or hold tiny props.

Try different hairstyles β€” replace the crocheted hair with wool locks for a fluffier look, or make a short cap to change Tommy's style.

I like to make matching tiny fish accessories in alternate colors to practice colorwork while keeping the main figure neutral.

Experiment with button placements and shoe colors to create different expressions and moods for Tommy β€” it's an easy way to make many unique friends.

For gifting, attach a small loop on the hat or back so the doll can be hung as a decorative ornament or packed flat for mailing.

Lastly, I recommend embroidering small details like eyebrows or a mouth with contrasting thread rather than sewing pieces on; it gives a neater finished face.

Common Mistakes & How to Fix Them

βœ— Skipping stitch markers while joining the legs to form the body will cause mismatched round positions; place markers at join points and count stitches carefully before joining. βœ— Forgetting to check the number of stitches after color changes can create an uneven striped pattern; always count and move your marker after finishing each round to maintain symmetry. βœ— Not stuffing gradually causes lumps or irregular shaping in the head and limbs; add fiberfill a little at a time and shape as you go for smooth results. βœ— Pulling your yarn too tight during increases will distort the piece and reduce flexibility; use even, relaxed tension and practice increases before starting the main piece. βœ— Attaching hands or ears without pinning first can result in asymmetrical placement; pin and align parts on the body, check in a mirror or photograph before sewing.

Tommy The Fisher Amigurumi Pattern

Make a charming Tommy the Fisher amigurumi with this complete crochet pattern. You will find full round-by-round instructions, color changes, and clear assembly notes so you can recreate this adorable fisherman toy. The pattern uses yarn art Jeans and Etrofil yarns for a soft, durable finish. Perfect for gifting or decorating a nursery.

Intermediate 12-15 Hours

Materials Needed for Tommy The Fisher Amigurumi Pattern

β€” Main Fabric

  • 01
    Skin color No.73 Yarn Art Jeans (main skin tone)
  • 02
    Beige color No.87 Yarn Art Jeans (hat trim, shoe cuffs, trouser hem)
  • 03
    Yellow color No.84 Yarn Art Jeans (sweater stripes)
  • 04
    Brown color No.70 Yarn Art Jeans (dark brown details)
  • 05
    Brown color No.71 Yarn Art Jeans (hat, shoe body)
  • 06
    Brown color No.59 Etrofil Jeans (hair)
  • 07
    White color No.62 Yarn Art Jeans (shoe sole, stripes)
  • 08
    Grey color No.46 Yarn Art Jeans (body top / coat)

β€” Tools Required

  • 01
    Crochet hook size 2.3mm
  • 02
    Black safety eyes size 10mm (2 pieces)
  • 03
    Polyester fiberfill for stuffing: 300 gram
  • 04
    2 small buttons for trouser straps
  • 05
    Sewing needle
  • 06
    Scissors
  • 07
    Fabric glue or glue gun
  • 08
    Plastic or fiberboard for shoe insole (cut to size)
  • 09
    Stitch markers

Progress Tracker

0% Complete

β€” Head :

Round 1 :

6 sc in MR (6)

Round 2 :

6 inc (12)

Round 3 :

(sc, inc)*6 (18)

Round 4 :

(sc, inc, sc)*6 (24)

Round 5 :

(3 sc, inc)*6 (30)

Round 6 :

(2 sc, inc, 2 sc)*6 (36)

Round 7 :

(5 sc, inc)*6 (42)

Round 8 :

(3 sc, inc, 3 sc)*6 (48)

Round 9 :

(7 sc, inc)*6 (54)

Round 10 :

(4 sc, inc, 4 sc)*6 (60)

Round 11 :

(9 sc, inc)*6 (66)

Round 12-20 :

66 sc (66)

Info :

Eyes in row 17-18, each eye is 10 stitches apart. Nose in row 19-20.

Round 21 :

(9 sc, dec)*6 (60)

Round 22 :

(4 sc, dec, 4 sc)*6 (54)

Round 23 :

(7 sc, dec)*6 (48)

Round 24 :

(3 sc, dec, 3 sc)*6 (42)

Round 25 :

(5 sc, dec)*6 (36)

Round 26 :

(2 sc, dec, 2 sc)*6 (30)

Round 27 :

(3 sc, dec)*6 (24)

Round 28 :

(sc, dec, sc)*6 (18)

Info :

Fiberfill, fasten off and leaving a tail to sew into the body

β€” Ears :

Item Name (Left ear) :

(1 ch, 2 sc, 3 dc) in MR (5)

Info :

Draw yarn and fasten off. Leaving a tail to sew into the head

Item Name (Right ear) :

(2 ch, 2 dc, 3 sc) in MR (5)

Info :

Draw yarn and fasten off. Leaving a tail to sew into the head

Info :

Sewing the ears into the head in row 17-20

β€” Right Leg :

Round 1 :

Make a chain of 9 ch, start in second ch from the hook: sc, 6 sc, 3 sc into the last stitch, 6 sc, inc (18)

Round 2 :

inc, 6 sc, 3 inc, 6 sc, 2 inc (24)

Round 3 :

sc, inc, 7 sc, hdc, 5 inc*dc, 2 dc, 2 hdc, 2 sc, inc, sc, inc (32)

Round 4 :

BLO: 32 sc (32)

Round 5-6 :

32 sc (32)

Round 7 :

10 sc, 6 dec, 10 sc (26)

Round 8 :

26 sc (26)

Round 9 :

7 sc, 6 dec, 7 sc (20)

Round 10 :

6 sc, 4 dec, 6 sc (16)

Round 11 :

15 sc, inc (17)

Round 12 :

2 sc, dec, 9 sc, inc, 3 sc (17)

Round 13 :

inc, sc, dec, 10 sc, inc, 2 sc (18)

Round 14 :

18 sc (18)

Round 15 :

14 sc, inc, 2 sc, inc (20)

Round 16 :

20 sc (20)

Round 17 :

2 sc, dec, 12 sc, inc, 3 sc (20)

Round 18-22 :

20 sc (20)

Round 23 :

dec, 14 sc, dec, 2 sc (18)

Round 24 :

inc, 7 sc, inc, 9 sc (20)

Round 25 :

20 sc (20)

Round 26 :

8 sc, dec, 6 sc, inc, 3 sc (20)

Round 27 :

inc, 7 sc, dec, 10 sc (20)

Round 28 :

3 sc, inc, 11 sc, inc, 4 sc (22)

Round 29-30 :

22 sc (22)

Round 31 :

3 sc, inc, 18 sc (23)

Round 32 :

19 sc, inc, 3 sc (24)

Info :

Change to Grey color

Round 33-35 :

24 sc (24)

Info :

Fiberfill, cut the yarn

β€” Left Leg :

Round 1 :

Make a chain of 9 ch, start in second ch from the hook: sc, 6 sc, 3 sc into the last stitch, 6 sc, inc (18)

Round 2 :

inc, 6 sc, 3 inc, 6 sc, 2 inc (24)

Round 3 :

sc, inc, 2 sc, 2 hdc, 2 dc, 5 inc*dc, hdc, 7 sc, inc, sc, inc (32)

Round 4 :

BLO: 32 sc (32)

Round 5-6 :

32 sc (32)

Round 7 :

10 sc, 6 dec, 10 sc (26)

Round 8 :

26 sc (26)

Round 9 :

8 sc, 6 dec, 6 sc (20)

Round 10 :

7 sc, 4 dec, 5 sc (16)

Round 11 :

15 sc, inc (17)

Round 12 :

2 sc, inc, 9 sc, dec, 3 sc (17)

Round 13 :

inc, sc, inc, 10 sc, dec, 2 sc (18)

Round 14 :

18 sc (18)

Round 15 :

inc, 2 sc, inc, 14 sc (20)

Round 16 :

20 sc (20)

Round 17 :

2 sc, inc, 12 sc, dec, 3 sc (20)

Round 18-22 :

20 sc (20)

Round 23 :

dec, sc, dec, 15 sc (18)

Round 24 :

inc, 9 sc, inc, 7 sc (20)

Round 25 :

20 sc (20)

Round 26 :

3 sc, inc, 9 sc, dec, 5 sc (20)

Round 27 :

inc, 9 sc, dec, 8 sc (20)

Round 28 :

4 sc, inc, 11 sc, inc, 3 sc (22)

Round 29-30 :

22 sc (22)

Round 31 :

17 sc, inc, 4 sc (23)

Round 32 :

4 sc, inc, 18 sc (24)

Info :

Change to Grey color

Round 33-35 :

24 sc (24)

Info :

Fiberfill. Don't cut the yarn

β€” Body :

Round 1 :

From left leg, chain 3 to and slip stitch to right leg (at a position 5 stitches from the yarn end of the right leg): 24 sc, 3 sc (into 3 chain), 24 sc, 3 sc (into 3 chain) (54)

Round 2-4 :

54 sc (54)

Round 5 :

13 sc, (move the marking position here) change to yellow color: 54 sc (54)

Round 6 :

54 sc (54)

Round 7 :

Change to white color: 54 sc

Round 8 :

54 sc

Round 9 :

Change to yellow color: 54 sc

Round 10 :

54 sc

Round 11 :

Change to white color: (7 sc, dec)*6 (48)

Round 12 :

(3 sc, dec, 3 sc)*6 (42)

Info :

If you want to make a wire diagram to make the doll sturdy, follow the instructions in the pictures, or you can not make the diagram if you want the doll to be soft.

Info :

Change to 2 rows of yellow color and 2 rows of white color alternately from round 13 to round 22

Round 13-22 :

42 sc (10 rounds)

Round 23 :

Change to white color: (5 sc, dec)*6 (36)

Round 24 :

(2 sc, dec, 2 sc)*6 (30)

Round 25 :

Change to yellow color: (3 sc, dec)*6 (24)

Round 26 :

24 sc (24)

Info :

Fiberfill, fasten off and cut the yarn

Info :

Connect hands to the body, mark the 4 positions. Sew the 6 stitches of the hand to the body.

β€” Hands :

Round 1 :

6 sc in MR (6)

Round 2 :

6 inc (12)

Round 3-4 :

12 sc (12)

Round 5 :

(2 sc, inc)*4 (16)

Round 6-7 :

16 sc (16)

Round 8 :

2 sc, sc3tog, 11 sc (14)

Round 9 :

sc, sc3tog, 10 sc (12)

Round 10 :

Change to yellow color: BLO: 12 sc; FLO: 12 sc (12)

Round 11 :

12 sc (12)

Round 12 :

Change to white color: 12 sc (12)

Round 13 :

12 sc (12)

Round 14-32 :

Hook 2 yellow color rows and then 2 white color rows until the hands ends: 12 sc

Info :

Fiberfill, fasten off and leaving a tail to sew into the body

Item Name (Left hand) :

Repeat rounds same as Right hand (6 sc in MR, increase and color changes as above)

β€” Trousers :

Round 1 :

Start with Beige color: Make a chain of 36 ch and close circle: 1 ch, 35 sc, slst (35)

Round 2-4 :

35 sc (35)

Round 5-26 :

Change to dark brown color: 35 sc (35)

Info :

Hook similar to the other pant leg and join them together

Round 27 :

32 sc, skip 3 chains of the 1st pant leg, skip 3 chains of the 2nd pant leg (and join them together), 32 sc (64)

Round 28 :

64 sc (64)

Round 29 :

(14 dc, dec*dc)*4 (60)

Round 30 :

(4 dc, dec*dc, 4 dc)*6 (54)

Round 31 :

(7 dc, dec*dc)*6 (48)

Round 32 :

16 slst, 2 ch, 16 dc, turn

Round 33 :

2 ch, skip 1 ch, 14 dc, turn

Round 34 :

2 ch, skip 1 ch, 13 dc, turn

Round 35 :

2 ch, skip 1 ch, 12 dc, turn

Round 36 :

2 ch, skip 1 ch, 11 dc, turn

Strap :

make 2

Round 37 :

Continue to make a chain of 35 ch, start in 8th ch from the hook: 28 sc, turn

Round 38 :

10 slst, make a chain of 35 ch, start in 8th ch from the hook: 28 sc

Info :

Fasten off. Cut the yarn

Pocket :

make 1

Round 1 :

Make a chain of 11 ch, start in 3rd ch from the hook: 9 dc, turn

Round 2 :

2 ch, 9 dc, turn

Round 3 :

2 ch, 9 dc

Info :

Fasten off and leaving a tail to sew into the trousers

β€” Hair :

Round 1 :

(1 ch, 8 hdc, slst) in MR (8)

Round 2 :

1 ch, BLO: 8 inc*hdc, slst (16)

Round 3 :

1 ch, BLO: (hdc, inc*hdc)*8, slst (24)

Round 4 :

1 ch, BLO: (hdc, inc*hdc, hdc)*8, slst (32)

Wings Rnd 1-8 :

Make a chain of 20 ch, start in second ch from the hook: 3 sc, 4 hdc, 9 dc, 3 hdc, skipt 1 chain, slst (19)

Round 9-10 :

Make a chain of 18 ch, start in second ch from the hook: 4 sc, 11 hdc, 2 sc, slst (17)

Round 11-12 :

Make a chain of 16 ch, start in second ch from the hook: 4 sc, 9 hdc, 2 sc, slst (15)

Round 13-14 :

Make a chain of 15 ch, start in second ch from the hook: 14 sc, slst (14)

Round 15-16 :

Make a chain of 14 ch, start in second ch from the hook: 13 sc, slst (13)

Round 17-20 :

Make a chain of 15 ch, start in second ch from the hook: 14 sc, slst (14)

Round 21-22 :

Make a chain of 16 ch, start in second ch from the hook: 4 sc, 9 hdc, 2 sc, slst (15)

Round 23-24 :

Make a chain of 18 ch, start in second ch from the hook: 4 sc, 11 hdc, 2 sc, slst (17)

Info :

Fasten off. Cut the yarn. You can use glue guns or fabric glue to attach hair into the head

β€” Hat :

Round 1 :

6 sc in MR (6)

Round 2 :

6 inc (12)

Round 3 :

(sc, inc)*6 (18)

Round 4 :

(sc, inc, sc)*6 (24)

Round 5 :

(3 sc, inc)*6 (30)

Round 6 :

(2 sc, inc, 2 sc)*6 (36)

Round 7 :

(5 sc, inc)*6 (42)

Round 8 :

(3 sc, inc, 3 sc)*6 (48)

Round 9 :

(7 sc, inc)*6 (54)

Round 10 :

(4 sc, inc, 4 sc)*6 (60)

Round 11 :

(9 sc, inc)*6 (66)

Round 12 :

66 sc (66)

Round 13 :

(5 sc, inc, 5 sc)*6 (72)

Round 14 :

(11 sc, inc)*6 (78)

Round 15 :

(6 sc, inc, 6 sc)*6 (84)

Round 16 :

(13 sc, inc)*6 (90)

Round 17 :

(7 sc, inc, 7 sc)*6 (96)

Round 18 :

(3 sc, dec, 3 sc)*12 (84)

Round 19 :

(5 sc, dec)*12 (72)

Round 20 :

72 sc (72)

Round 21 :

(2 sc, dec, 2 sc)*12 (60)

Round 22 :

60 sc (60)

Round 23 :

FLO: 24 sc, turn (24)

Round 24 :

1 ch, 8 sc, (inc, sc)*4, 8 sc, turn (28)

Round 25 :

1 ch, dec, 4 sc, (inc, 3 sc)*4, 4 sc, dec, turn (30)

Round 26 :

1 ch, 2 dec, 22 sc, 2 dec, turn (26)

Round 27 :

1 ch, 2 dec, 18 sc, 2 dec (22)

Info :

Fasten off. Cut the yarn.

β€” Shoes :

Right shoe Round 1 :

Make a chain of 9 ch, start in second ch from the hook: sc, 6 sc, 3 sc into the last stitch, 6 sc, inc, slst (18)

Round 2 :

1 ch, inc, 6 sc, 3 inc, 6 sc, 2 inc, slst (24)

Round 3 :

1 ch, sc, inc, 6 sc, hdc, 5 inc*dc, 2 dc, 2 hdc, 3 sc, inc, sc, inc, slst (32)

Round 4 :

1 ch, 12 sc, inc, sc, inc, 2 sc, inc, sc, inc, 12 sc, slst (36)

Round 5 :

1 ch, BLO: 36 sc, slst (36)

Round 6 :

Turn the sole (wrong side facing): 1 ch, 36 sc, slst (36)

Info :

Change to brown color (No.71 Yarn art Jeans)

Round 7 :

Turn the sole (wrong side facing): 1 ch, 36 sc, slst (36)

Info :

Change to white color (No.03 Yarn art Jeans)

Round 8 :

1 ch, 12 sc, 6 hdc*dec, 12 sc, slst (30)

Info :

Fasten off. Cut the yarn

Info :

Make the body of the shoe: Count 12 sc from the slip stitch to the left side and 12 sc from the slip stitch to the right side and marker.

Make the tongue of the shoe :

with the brown color

Round 1 :

BLO (in the 8th round of the sole): 1 ch, 6 sc, turn (6)

Round 2-7 :

1 ch, 6 sc, turn (6)

Info :

Fasten off. Cut the yarn. With the white color to make the shoelaces to finish

Item Name (Left shoe) :

Make the left shoe following the same rounds as the Right shoe

Assembly Instructions

  • Sew the ears into the head in row 17-20, using the tail left from the ears; position symmetrically and stitch securely.
  • Attach head to the body by sewing the tail from the head into the top opening of the body, matching the back seam and stuffing level.
  • Connect hands to the body: mark four positions on the body and sew the 6 stitches of each hand to the corresponding opening, securing firmly.
  • Sew the trouser pant legs together at the crotch as instructed (skip 3 chains each leg when joining), then attach straps and buttons as shown.
  • Insert cut insoles (plastic or fiberboard) into each foot before closing, then sew shoe body pieces around the sole and attach tongue and laces.
  • Pin and sew the hair/hairpiece or glue hair piece into the head with fabric glue if using glued hair method.

Important Notes

  • πŸ’‘Cut an insole from plastic or fiberboard and put one in each foot before finishing the shoe for stability.
  • πŸ’‘Use stitch markers to keep track of start positions after joins and color changes to prevent misalignment in rounds.
  • πŸ’‘If you want a sturdier toy, follow the wire diagram pictured to insert wire form into the body; omit wire for a soft toy.
  • πŸ’‘Stuff the pieces gradually and evenly; overstuffing can distort shaping while under-stuffing will leave gaps.

Tommy the Fisher is a sweet handmade companion with a striped sweater, little hat and tiny shoes that brighten any shelf or nursery. This detailed pattern includes every round and assembly tip so you can make a lasting keepsake. Perfect for gift-making or practicing amigurumi skills β€” happy stitching! 🧢🧸

You ask,

we answer.

FAQs

What size will the finished piece be?

The finished amigurumi measures approximately 30 cm tall when using the recommended yarn Art Jeans and hook size 2.3mm.

Can I use different yarn weights for this pattern?

Yes, you can use different yarn weights, but be aware this will change the finished size; choose an appropriate hook and check gauge to adjust measurements.

Do I need prior crochet experience for this pattern?

This pattern is rated intermediate and uses increases, decreases, BLO/FLO and joins, so basic amigurumi experience is recommended.

How long does this project typically take to complete?

Most crocheters complete this project in 12-15 hours depending on experience and assembly complexity; expect a multi-day project.

How do I attach the hair securely?

You can sew the hairpiece into the head using the tails or use fabric glue or a glue gun to attach the hair strips as shown in the photos.