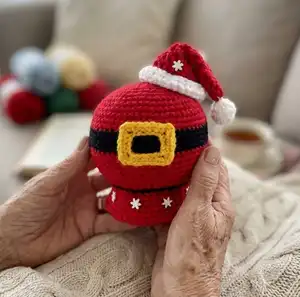
Create a festive Santa Belly Snow Globe with this detailed crochet pattern. You will crochet a spherical snow globe, a decorative base, a belt buckle and an optional tiny Santa hat. The pattern uses simple amigurumi techniques worked in joined rounds and includes full assembly notes and finishing ideas. Perfect for holiday gifts or seasonal decor.
Progress Tracker
0% Complete
— Notes :
Info :
Make a large loop by putting the yarn tail behind the working yarn leaving a 4-6 inch tail. Draw the working yarn through the loop to have one loop on the hook. The snow globe is worked in joined rounds. Stitches are distributed in such way that creates a straight seam.
Special Stitch :
INV DEC (invisible decrease) - put hook through the front loop only of two consecutive stitches. You have three loops on hook. Yarn over and pull through two loops. You have two loops on hook. Yarn over and pull through those two loops.
— Snow globe :
Info :
Ch 1 at the beginning of rounds doesn’t count as a St. With crochet hook E/4 (3.5 mm) and Color A, make magic ring.
Round 1 :
Ch 1, 6 SC in magic ring, Sl St to first SC to join. Total – 6 SC.
Round 2 :
Ch 1, 2 SC in first St and in each St around, Sl St to first SC to join. Total – 12 SC.
Round 3 :
Ch 1, SC in first St, 2 SC in next St, [SC in next St, 2 SC in next St] 5 times, Sl St to first SC to join. Total – 18 SC.
Round 4 :
Ch 1, SC in first St, [2 SC in next St, SC in each of next 2 Sts] 5 times, 2 SC in next St, SC in next St, Sl St to first SC to join. Total - 24 SC.
Round 5 :
Ch 1, SC in first St and in next 2 Sts, 2 SC in next St, [SC in each of next 3 Sts, 2 SC in next St] 5 times, Sl St in first SC to join. Total – 30 SC.
Round 6 :
Ch 1, SC in first St and in next St, [2 SC in next St, SC in each of next 4 Sts] 5 times, 2 SC in next St, SC in each of next 2 Sts, Sl St in first SC to join. Total – 36 SC.
Round 7 :
Ch 1, SC in first St and in next 4 Sts, 2 SC in next St, [SC in each of next 5 Sts, 2 SC in next St] 5 times, Sl St in first SC to join. Total – 42 SC.
Round 8 :
Ch 1, SC in first St and in each of next 2 Sts, [2 SC in next St, SC in each of next 6 Sts] 5 times, 2 SC in next St, SC in each of next 3 Sts, Sl St in first SC to join. Total – 48 SC.
Round 9 :
Ch 1, SC in first St and in next 6 Sts, 2 SC in next St, [SC in each of next 7 Sts, 2 SC in next St] 5 times, Sl St in first SC to join. Total – 54 SC.
Round 10 :
Ch 1, SC in first St and in each of next 3 Sts, [2 SC in next St, SC in each of next 8 Sts] 5 times, 2 SC in next St, SC in each of next 4 Sts, Sl St in first SC to join. Total – 60 SC.
Round 11, 12 :
Ch 1, SC in first St and in each St around, Sl St in first SC to join.
Round 13 :
Ch 1, skip first St, SC in each St around to last St, 2 SC in last St, Sl St in first SC to join. Fasten off Color A.
Info :
Join Color B to first St.
Round 14, 15 :
Ch 1, SC in first St and in each St around, Sl St in first SC to join.
Round 16 :
Ch 1, skip first St, SC in each St around to last St, 2 SC in last St, Sl St in first SC to join.
Round 17 :
Ch 1, SC in first St and in each St around, Sl St in first SC to join. Fasten off Color B.
Info :
Join Color A to first St.
Round 18 :
Ch 1, SC in first St and in each St around, Sl St in first SC to join.
Round 19 :
Ch 1, skip first St, SC in each St around to last St, 2 SC in last St, Sl St in first SC to join.
Round 20, 21 :
Ch 1, SC in first St and in each St around, Sl St in first SC to join.
Round 22 :
Ch 1, skip very first St, SC in each of next 9 Sts, [INV DEC, SC in each of next 8 Sts] 5 times, Sl St to first SC to join. Total – 54 SC.
Round 23 :
Ch 1, SC in first and in each of next 2 Sts, INV DEC, [SC in each of next 7 Sts, INV DEC] 5 times, SC in each of next 4 Sts, Sl St to first SC to join. Total – 48 SC.
Round 24 :
Ch 1, skip very first St, SC in each of next 7 Sts, [INV DEC, SC in each of next 6 Sts] 5 times, Sl St to first SC to join. Total – 42 SC.
Round 25 :
Ch 1, SC in first and in next St, INV DEC, [SC in each of next 5 Sts, INV DEC] 5 times, SC in each of next 3 Sts, Sl St to first SC to join. Total – 36 SC. Fasten off Color A.
Info :
Join Color B to first St.
Round 26 :
Ch 1, Sl St in first St and in each St around, Sl St to first Sl St to join. Total – 36 Sl Sts. Fasten off Color B.
— Base (work after snow globe) :
Info :
Continue working on base. Join Color A to BL of first St of previous round.
Round 1 :
Ch 1, BLO: SC in first St and in each of next 7 Sts, 2 SC in next St, [SC in each of next 8 Sts, 2 SC in next] 3 times, Sl St to first SC to join. Total – 40 SC.
Round 2 :
Ch 1, SC in first St and in each St around, Sl St to first SC to join. Total – 40 SC.
Round 3 :
Ch 1, SC in first St and in each of next 8 Sts, 2 SC in next St, [SC in each of next 9 Sts, 2 SC in next St] 3 times, Sl St to first SC to join. Total – 44 SC.
Round 4 :
Ch 1, SC in first St and each St around, Sl St to first SC to join. Total – 44 SC.
Round 5 :
Ch 1, SC in first St and in each of next 9 Sts, 2 SC in next St, [SC in each of next 10 Sts, 2 SC in next St] 3 times, Sl St to first SC to join. Total – 48 SC. Fasten off.
— Bottom :
Info :
The bottom is worked in continuous rounds. Use stitch marker to mark first stitch of each round. With Color A, make magic ring.
Round 1 :
Ch 1, 6 SC in magic ring.
Round 2 :
2 SC in each St around. Total – 12 SC.
Round 3 :
[2 SC in first St, SC in next St] 6 times. Total – 18 SC.
Round 4 :
SC in first St, [2 SC in next St, SC in each of next 2 Sts] 5 times, 2 SC in next St, SC in next St. Total – 24 Sts.
Round 5 :
[2 SC in first St, SC in each of next 3 Sts] 6 times. Total – 30 Sts.
Round 6 :
SC in first St and in next St, [2 SC in next St, SC in each of next 4 Sts] 5 times, 2 SC in next St, SC in each of next 2 Sts. Total – 36 Sts.
Round 7 :
[2 SC in first St, SC in each of next 5 Sts] 6 times. Total – 42 Sts.
Round 8 :
SC in first St and in each of next 2 Sts, [2 SC in next St, SC in each of next 6 Sts] 5 times, 2 SC in next St, SC in each of next 3 Sts. Total – 48 Sts. Leave long tail for sewing bottom to the base.
Info :
Stuff your snow globe and the base, leave some space at the bottom. Stuff the snow globe very well to make a nice spherical shape. Cut out a circular piece of cardboard slightly smaller than the bottom diameter and insert it inside before sewing. Using a sewing needle and saved long tail, start sewing the bottom to the base, sew about 3/4 of the diameter, add more stuffing as necessary, add weighted material for stability, and finish sewing the bottom.
— Belt Buckle :
Info :
With crochet hook E/4 (3.5 mm) and Color C, Ch 18, join with Sl St to first Ch to form a ring. Do not twist the chain.
Round 1 :
Ch 1, SC in first and in next 2 Chs, *(SC, Ch 2, SC) in next*, SC in next 4, repeat from * to *, SC in next 3, repeat from * to *, SC in next 4, repeat from * to *, Sl St to first SC to join. Fasten off.
— Mini Hat :
Info :
Ch 2 (Ch 3) at the beginning of rounds counts as HDC (DC). With crochet hook E/4 (3.5 mm) and Color A, make magic ring.
Round 1 :
Ch 3, 6 DC in ring, join with Sl St to top of Ch 3. Total – 7 DC.
Round 2 :
Ch 3, DC in next St and in each of next St around, join with Sl St to top of Ch 3. Total – 7 DC.
Round 3 :
Ch 3, DC in same St, [DC in next, 2 DC in next] 3 times, join with Sl St to top of Ch 3. Total – 11 DC.
Round 4 :
Ch 3, DC in next St and in each of next St around, join with Sl St to top of Ch 3. Total – 11 DC.
Round 5 :
Ch 3, DC in same St and in each of next 2 Sts, [2 DC in next, DC in each of next 2] 2 times, 2 DC in next, DC in next, join with Sl St to top of Ch 3. Total – 15 DC.
Round 6 :
Ch 3, DC in next St and in each of next St around, join with Sl St to top of Ch 3. Total – 15 DC.
Round 7 :
Ch 3, DC in same St and in each of next 3 Sts, [2 DC in next, DC in each of next 3] 2 times, 2 DC in next, DC in each of next 2, join with Sl St to top of Ch 3. Total – 19 DC.
Round 8 :
Ch 3, DC in next St and in each of next St around, join with Sl St to top of Ch 3. Total – 19 DC.
Round 9 :
Ch 3, DC in same St and in each of next 4 Sts, [2 DC in next, DC in each of next 4] 2 times, 2 DC in next, DC in each of next 3, join with Sl St to top of Ch 3. Total – 23 DC. Fasten off Color A.
Info :
Join Color D to first St.
Round 10 :
Ch 2, HDC in next St and in each of next St around, join with Sl St to top of Ch 2. Total – 23 HDC.
Round 11 :
Ch 2, HDC in same St and in each of next 5 Sts, [2 HDC in next, HDC in each of next 5] 2 times, 2 HDC in next, HDC in each of next 4, join with Sl St to top of Ch 2. Total – 27 HDC.
Round 12 :
Ch 2, HDC in same St and in each of next 6 Sts, [2 HDC in next, HDC in each of next 6] 2 times, 2 HDC in next, HDC in each of next 5, join with Sl St to top of Ch 2. Total – 31 HDC. Fasten off. Roll the white trim of the hat up.
Info :
Make a small yarn ball for the pom-pom: using white yarn make a tiny ball about 1 inch in diameter. Thread the end into a large sewing needle and make a couple of stitches through the ball to secure; leave 5-7 inch tail for sewing ball to hat.
Info :
Finishing the hat: Sew the small yarn ball to the tip of the Santa hat. Fold the hat and secure with a couple of stitches using matching thread. Embellish the hat with tiny snowflake buttons using a hot glue gun.
Info :
Finishing the snow globe: Position the belt buckle on the front of the snow globe (make sure the seam is on the back) and sew the belt buckle on. Embellish the base with snowflake buttons using a hot glue gun. Sew the Santa hat onto the snow globe if desired.
This Santa Belly Snow Globe is a delightful holiday project that adds handmade charm to your seasonal decor. Perfect as a tabletop accent or a thoughtful handmade gift, the pattern includes instructions for the globe, base, belt buckle and an optional mini Santa hat. Have fun customizing the colors and embellishments to match your holiday style. 🎄🧶✨