🧶 Beautiful ✨ Detailed 💝 Adorable

Checker It Out Crochet Bag Pattern

Checker It Out Crochet Bag Pattern
4.5★ Rating
5-7 Hours Time Needed
4.1K Made This
✂️

Beginner Friendly Level

Perfect for those just starting their crochet journey, with clear instructions and simple techniques

⏱️

Weekend Treat

Takes 5-7 hours, making it an enjoyable project to finish over a couple of days.

Stylish Touch

An elegant detail to elevate any look, combining traditional techniques with contemporary design sensibilities.

About This Checker It Out Crochet Bag Pattern

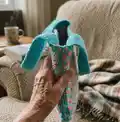
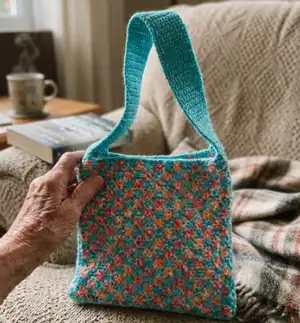
This pattern creates a roomy, textured crochet bag worked from a simple 6-row chart using two contrast colors. The bag measures approximately 12" x 12" x 3" (excluding the strap) and features a long integrated strap and finished side panels. It uses Caron Coconut Cakes for a colorful variegated effect and a second solid contrast for checker detail.

Checker It Out Crochet Bag Pattern crochet pattern - detailed view of completed project

Youll work the Chart Pattern across the Bag Base, Front and Back Panels, and Strap & Sides, then join pieces together with single crochet seams. The instructions include full chart notes, finishing steps, and tips for carrying color to maintain even gauge.

Why You'll Love This Checker It Out Crochet Bag Pattern

I absolutely love this pattern because its an effortless way to make a stylish, functional bag using just two yarn colors. The charted checker pattern gives a designer look with minimal complexity, so I can create something that looks sophisticated without complicated stitches. I enjoy how the Caron Coconut Cakes colorways blend into soft gradients, making each bag unique. Sewing the panels together is satisfying and fast, and the finished tote is sturdy enough for everyday use. This pattern always makes great gifts because its quick to make yet looks professionally finished.

Checker It Out Crochet Bag Pattern step 1 - construction progress Checker It Out Crochet Bag Pattern step 2 - assembly progress Checker It Out Crochet Bag Pattern step 3 - details and accessories Checker It Out Crochet Bag Pattern step 4 - final assembly and finishing

Switch Things Up

I love customizing this bag by swapping the Caron Coconut Cakes for a solid bulky yarn to create a chunkier, cozier tote.

I sometimes lengthen or shorten the strap by continuing the charted repeats until the strap reaches my preferred length—just watch the chart row count and keep markers on each end.

I often add a fabric lining for extra strength and to protect small items from slipping through the stitches; you can sew a simple cotton lining and hand-stitch it in place.

Try changing Contrast A or Contrast B to create high-contrast checkerboards, subtle tonal stripes, or seasonal palettes like autumn hues or pastels for spring.

I like to add a zipper or magnetic snap closure at the top for security; attach it after joining panels so the edges meet evenly.

For a decorative finish, add tassels or pom-poms at each strap join, or crochet a small external pocket and sew it to the inside or outside of the front panel.

If you want a smaller keychain version, use lighter weight yarn and a smaller hook, decreasing the chain counts proportionally to maintain the chart repeat.

Consider swapping the single crochet join for an exposed seam using slip stitch or mattress stitch for a different look—just be consistent on both sides.

I sometimes experiment with adding a row of surface crochet along the top edge before joining to give the bag a contrasting trim that pops.

For added durability, use a strand of matching sewing thread with your joining yarn when working through both thicknesses during finishing; this strengthens seams without changing appearance.

Common Mistakes & How to Fix Them

✗ Skipping the chart note about carrying color can cause uneven edges; always carry the unused color across the top of the previous row and work sts around it to maintain even gauge. ✗ Not placing stitch markers on the Strap ends may cause incorrect alignment later; place markers on each end of the last row when instructed to help match corners during assembly. ✗ Using a different hook without checking gauge will alter the bag size significantly; make a gauge swatch of 16 sc and 16 rows = 4" in Chart Pat before starting and adjust hook size as needed. ✗ Joining pieces without aligning corners can result in twisted or lumpy seams; pin pieces together, align corners carefully, and join with single crochet through both thicknesses for an even finish.

Checker It Out Crochet Bag Pattern

Make a bright, colorblocked tote with this easy crochet bag pattern that uses Caron Coconut Cakes for a soft ombre look. Youll work a simple chart pattern to create a sturdy bag base, panels and a long strap—perfect for everyday use or gifting. The pattern includes a full chart, finishing instructions, and tips to help you carry the colors neatly up the side.

Beginner Friendly 5-7 Hours

Materials Needed for Checker It Out Crochet Bag Pattern

— Main Fabric

  • 01
    Caron Coconut Cakes (8 oz/227 g; 481 yds/440 m) - main gradient cake
  • 02
    Contrast A: Tutti-Frutti (84002) - 1 ball or 335 yds/307 m
  • 03
    Contrast B: Sugar Teal (84005) - 1 ball or 350 yds/320 m

— Tools Required

  • 01
    Crochet hook size U.S. 7 (4.5 mm) Susan Bates Silvalume or size needed to obtain gauge
  • 02
    Susan Bates yarn needle
  • 03
    Susan Bates stitch markers
  • 04
    Scissors
  • 05
    Pins for assembly (optional)

Progress Tracker

0% Complete

— Measurements :

Info :

Approx 12" x 12" x 3" [30.5 x 30.5 x 7.5 cm], excluding Strap.

— Gauge :

Info :

16 sc and 16 rows = 4" [10 cm] in Chart Pat.

— Instructions :

Info :

Note: When working from chart and joining new color, work to last 2 loops on hook of last st. Draw new color through 2 loops, then proceed in new color.

— Bag Base :

Info :

With A, ch 13. Work Chart, noting each square of chart is equal to 1 sc and reading RS rows from right to left and WS rows from left to right. Carry color not in use across top of entire previous row and work sts around it. This will ensure even gauge as all sts will be worked around an extra strand of yarn held across top of previous row. Carry both colors up side of work. See Chart on page 2.

Round 1 :

(1st row of Chart - RS). 1 sc in 2nd ch from hook. 1 sc in each ch to end of chain. Turn. 12 sc.

Round 2 :

(2nd row of Chart - WS). Ch 1. 1 sc in each sc to end of row. Turn.

Round 3-6 :

Rep last row until 6th row of chart is complete.

Round 7 :

Rep last 6 rows of Chart Pat until Bag Base measures approx 12" [30.5 cm], ending with either 3rd row or 6th row of chart. Fasten off.

— Strap & Sides :

Info :

With A, ch 13. Work Chart as noted for Bag Base.

Round 1 :

(1st row of Chart - RS). 1 sc in 2nd ch from hook. 1 sc in each ch to end of chain. Turn. 48 sc.

Round 2 :

(2nd row of Chart - WS). Ch 1. 1 sc in each sc to end of row. Turn.

Round 3-6 :

Rep last row until 6th row of chart is complete.

Round 7 :

Rep last 6 rows of Chart Pat until work from beg measures approx 12" [30.5 cm], ending with either 3rd row or 6th row of chart.

Round 8 :

PM on each end of last row. Cont in Chart Pat, until Strap measures approx 36" [91.5 cm], ending with either 3rd row or 6th row of chart. PM on each end of last row.

Round 9 :

Cont in Chart Pat until Strap measures approx 48" [122 cm], ending with 3rd row or 6th row of chart. Fasten off.

Round 10 :

Next row: With B only, 1 sc in each sc to end of row. Fasten off.

— Front & Back Panels :

Info :

With A, ch 49. Work Chart as noted for Bag Base.

— Finishing :

Info :

Join Bag Base to Front & Back Panels: With RS of Base facing, place lower edge of Front Panel behind long edge of Base with WS of work tog, aligning corner of Base with corner of Front Panel.

Round 1 :

Join B with sl st. Ch 1. Working through both thicknesses, work sc evenly across edge. Fasten off.

Round 2 :

Rep to join Base to Back Panel.

Info :

Join Strap & Sides to Bag Base: With RS of Base facing, place beg edge of Strap & Sides behind short edge of Base with WS of work tog, aligning corner of Bottom with corner of Strap.

Round 3 :

Join B with sl st. Ch 1. Working through both thicknesses, work sc evenly across edge. Fasten off.

Round 4 :

Rep to join opposite end of Strap & Sides to Base.

Info :

Join Strap & Sides to Front & Back Panels: Align top corners of Front and Back Panels to rows marked with st markers on Strap & Sides. Pin pieces tog if desired.

Round 5 :

Beg at bottom right corner of Front Panel, join B with sl st. Ch 1. Working through both thicknesses, work sc evenly up edge of Front Panel, across single edge of Strap, and down opposite edge of Front Panel. Fasten off.

Round 6 :

Rep for other side.

— Chart Legend :

Info :

Chart shows 6 st rep. Dark square = Contrast A. White square = Contrast B. Start at indicated corner and follow RS rows from right to left and WS rows from left to right.

Assembly Instructions

  • Join Bag Base to Front Panel: With RS of Base facing, place lower edge of Front Panel behind long edge of Base with WS of work together, aligning corner of Base with corner of Front Panel, then join with B using slip stitch, chain 1 and work single crochet evenly across edge.
  • Join Bag Base to Back Panel: Repeat the same joining method used for the Front Panel, working slip stitch join with B, ch 1 and single crochet evenly across edge; fasten off when complete.
  • Attach Strap & Sides to Base: With RS of Base facing, place the beginning edge of Strap & Sides behind the short edge of Base with WS of work together, align corners and join with B using slip stitch, ch 1 and single crochet through both thicknesses across the edge; fasten off.
  • Attach the opposite end of Strap & Sides to the Base: Repeat the joining sequence for the other short edge of the Base so the strap forms around the bag.
  • Join Strap & Sides to Front & Back Panels: Align top corners of Front and Back Panels with the rows marked by stitch markers on Strap & Sides, pin if desired, then join by beginning at bottom right corner of Front Panel, join B with slip stitch, ch 1 and single crochet through both thicknesses up the edge, across the strap edge and down the opposite edge; fasten off and repeat for the other side.

Important Notes

  • 💡Carry the unused color across the top of the previous row and work sts around it to ensure even gauge and consistent edges.
  • 💡Place stitch markers on each end of the Strap when indicated so you can align corners accurately during assembly.
  • 💡Work the chart reading RS rows from right to left and WS rows from left to right for correct color placement.
  • 💡Pin pieces together before joining to confirm alignment and prevent twisted seams.

Create a colorful, durable tote thats perfect for everyday errands or a beach day—made with soft Caron Coconut Cakes for vibrant gradient color. The easy charted pattern gives a designer checker look while staying beginner-friendly. Make one in an afternoon or gift a handmade bag that looks store-bought. 🧶✨🌈

You ask,

we answer.

FAQs

What size will the finished piece be?

The finished bag measures approximately 12" x 12" x 3" [30.5 x 30.5 x 7.5 cm] excluding the strap when using the recommended yarn and hook size.

Can I use different yarn weights for this pattern?

Yes, you can use different yarn weights, but changing weight will affect the final size; make a gauge swatch and adjust hook size to achieve 16 sc and 16 rows = 4" in the Chart Pattern.

Do I need to follow the chart exactly?

Follow the chart for the checker color placement for the intended look, and read RS rows right to left and WS rows left to right; you may substitute colors but keep the chart pattern for correct patterning.

How long does this project typically take to complete?

Most crocheters complete this project in 5-7 hours, though time may vary depending on experience, speed, and whether you add lining or extra finishes.