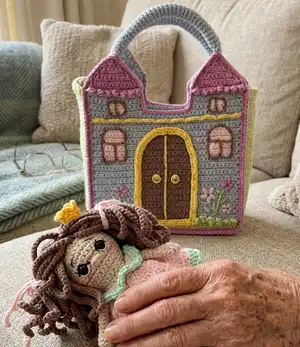
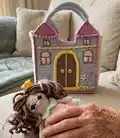
Make a charming princess doll and a matching castle bag with this detailed crochet pattern. Youll work with sport-weight yarn to create a small doll with hair, outfit, shoes and a cute castle purse. The pattern includes step-by-step rounds, color changes and assembly notes so you can follow along easily. Perfect as a handmade gift or a special keepsake for a little adventurer.
Progress Tracker
0% Complete
— Head :
Info :
With Cream yarn. Work in rows.
Round 1 :
ch5, start from the second chain on the hook: inc, 2sc, inc, turn (6)
Round 2 :
ch1, inc, 4sc, inc, turn (8)
Round 3 :
ch1, inc, 6sc, inc, turn (10)
Round 4 :
ch1, inc, 8sc, inc, turn (12)
Round 5 :
ch1, inc, 10sc, inc, turn (14)
Round 6 :
ch1, 14sc, turn (14)
Round 7 :
ch1, inc, 12sc, inc, turn (16)
Round 8-11 :
ch1, 16sc, turn (4 rows) (16)
Round 12 :
ch1, dec, 12sc, dec, turn (14)
Round 13 :
ch1, dec, 10sc, dec, turn (12)
Round 14 :
ch1, dec, 8sc, dec, turn (10)
— Neck :
Round 15-16 :
ch1, 10sc, turn (2 rows) (10)
— Body :
Info :
Change color as indicated in rounds.
Round 17 :
Change color to White. ch1, inc, 8sc, inc, turn (12)
Round 18 :
ch1, 12sc, turn (12)
Round 19 :
ch1, inc, 10sc, inc, turn (14)
Round 20 :
ch1, 14sc, turn (14)
Round 21 :
Change color to Cream. ch1, 14sc, turn (14)
Round 22 :
ch1, 14sc, turn (14)
Round 23 :
ch1, inc, 12sc, inc, turn (16)
Round 24 :
ch1, 16sc, turn (16)
Round 25 :
Change color to White. ch1, 16sc, turn (16)
Round 26-27 :
ch1, 16sc, turn (2 rows) (16)
Round 28 :
ch1, dec, 12sc, dec, turn (14)
Round 29 :
ch1, 14sc, turn
— Legs :
Info :
First leg. Change color to Cream. Make 2 legs as instructed; skip stitches as noted for second leg.
Round 30-37 :
ch1, 6sc, turn (8 rows) (6)
Round 38 :
ch1, dec, 2sc, dec, turn (4)
Info :
Cut the yarn, weave in the ends. Skip 2 stitches for the second leg. Attach the Cream yarn and crochet the second leg repeating rounds 30-39. Cut the yarn.
— Connect the halves :
Infos :
Connect the halves. The halves are connected with a constant color change to white (the color change to white is highlighted in red). Stuff with fiberfill as you go. Start from the first cream row:
Instruction :
22sc on the head and neck; 4sc, 4sc, 6sc on the body; 24sc on the leg; 4sc; 24sc on the leg; 6sc, 4sc, 4sc on the body; 18sc on the neck and head.
— Arms :
Info :
Arms (make 2). With Cream yarn. Work in a spiral.
Round 2 :
(1sc, inc) *3 (9)
Round 4 :
(1sc, dec) *3 (6)
Info :
Stuff with fiberfill in the process.
Round 5-12 :
6sc (8 rounds) (6)
Info :
Leave a long tail for sewing.
Info :
Sew the arms on the sides to the body (approximately in Rnds 16 -17).
— Hair Wig :
Info :
With Brown yarn. Work in a spiral.
Round 2 :
Place row marker here. BLO 6inc (12)
Round 3 :
(1sc, inc) *6 (18)
Round 4 :
BLO (2sc, inc) *6 (24)
Round 5 :
(3sc, inc) *6 (30)
Round 7 :
(4sc, inc) *6 (36)
Round 11 :
Crochet the strands. (sl st, ch26, from the second chain on the hook 25sl st) *18
Info :
Leave a long tail for sewing.
Instruction :
Return to round 2 of the hair wig and work with brown yarn through front loops: (sl st, ch26, from the second chain on the hook 25sl st) *3, sl st into the first stitch of round 4;
Instruction :
Along round 4: FLO (sl st, ch26, from the second chain on the hook 25sl st) *9, sl st into the first stitch of round 6;
Instruction :
Along round 6: FLO (sl st, ch26, from the second chain on the hook 25sl st) *15, sl st into the first stitch of round 8;
Instruction :
Along round 8: FLO (sl st, ch26, from the second chain on the hook 25sl st) *18, sl st into the first stitch of round 10;
Instruction :
Along round 10: FLO (sl st, ch26, from the second chain on the hook 25sl st) *18, sl st.
— Shoes :
Info :
Shoes (make 2). With Mint green yarn. Work in a spiral.
Round 3 :
(1sc, inc) *6 (18)
Round 4-5 :
18sc (2 rounds) (18)
Round 7 :
ch2 18dc-inc, sl st, turn (36)
Round 8 :
(sl st, hdc) *18 (36)
Info :
Fasten off, cut the yarn, weave in the ends.
Instruction :
Return to round 6 of the shoes and work with Pink yarn in front loops: Sl st, ch1, 18sc, sl st, cut the yarn
— Dress :
Info :
With Pink yarn. Work in rows.
Round 1 :
Chain 31. From the second chain on the hook: 30sc, turn (30)
Round 2 :
FLO ch1, 5sc, ch6 (skip 6sc, start from the next stitch), 8sc, ch6 ( skip 6sc, start from the next stitch), 5sc , turn (30)
Round 3 :
ch2, 30dc-inc, turn (60)
Round 4-8 :
ch2, 60dc, turn (5 rows)(60)
Round 9 :
Change color to Mint green. (1dc, dc-inc) *30 (90)
Round 10 :
ch1, (hdc, sl st) *45.
Info :
Cut the yarn and fasten off. Sew buttons on one side, make a buttons loops on the other.
Instruction :
Return to round 2 of the dress and work with Mint green yarn through back loops: 1. ch1, 30inc, turn (60)
Instruction :
2. ch1, (hdc, sl st) *30, Cut the yarn and fasten off.
— Crown :
Round 1 :
ch 12, join in the round, crochet 12sc, Place row marker here. (12)
Round 3 :
(3sc, inc) *3 (15)
Round 4 :
(sl st, ch1, dc, ch1, sl st) *5 (15)
Info :
Fasten off, cut the yarn, weave in the ends.
— Hair ties :
Info :
Hair ties (make 2). With Pink yarn.
Round 1 :
Ch51. From the second chain on the hook: 50sc (50)
Info :
Fasten off, cut the yarn, weave in the ends.
— Assembly - Doll :
Info :
Sew the hair-wig to the head. Embroider the nose in Rows 9-10 with a cream thread.
Instruction :
Make a parting in the center of the hair. Divide the hair into 2 parts, tie the hair ties. Embroider eyebrows with a brown thread.
Instruction :
Glue the eyes approximately in Rows 7-8 at a distance of 6sc. Embroider the eyelids with a black thread, embroider the whites of the eyes with a white thread. Use pink pastel to draw cheeks and above the nose.
— BAG - CASTLE - Front Wall Inner side :
Info :
With Gray yarn. Work in rows.
Round 1 :
Chain 41, From the second chain on the hook: 40sc, turn (40)
Round 2-36 :
ch1, 40sc, turn (35 rows) (40)
Round 37 :
Crochet a first tower: ch1, 14sc, turn (14)
Round 38-41 :
ch1, 14sc, turn (4 rows) (14)
Round 42 :
ch1, inc, 12sc, inc, turn (16)
Round 43 :
ch1, 16sc, turn (16)
Round 44 :
ch1, dec, 12sc, dec, turn (14)
Round 45 :
ch1, dec, 10sc, dec, turn (12)
Round 46 :
ch1, dec, 8sc, dec, turn (10)
Round 47 :
ch1, dec, 6sc, dec, turn (8)
Round 48 :
ch1, dec, 4sc, dec, turn (6)
Round 49 :
ch1, dec, 2sc, dec, turn (4)
Round 50 :
ch1,2 dec, turn (2)
Round 51 :
ch1, dec, turn (1)
Info :
Cut the yarn, weave in the ends. Skip 12 stitches for the second tower and repeat rounds 37-51 to crochet the second tower attached to the main piece.
— BAG - CASTLE - Front side :
Info :
With Green yarn. Work in rows. Change colors and use jacquard technique as instructed.
Round 1 :
Chain 41, From the second chain on the hook: 40sc, turn (40)
Round 2 :
ch1, 40sc, turn (40)
Round 3 :
Change color to Blue. Crochet the next rows in jacquard technique. Add Brown yarn (these stitches are highlighted in yellow). Add Pink yarn (these stitches are highlighted in purple). BLO ch1, 13sc, 14sc, 13sc, turn (40)
Round 4-22 :
ch1, 13sc, 14sc, 13sc, turn (19 rows) (40)
Round 23-24 :
ch1, 3sc, 6sc, 4sc, 14sc, 4sc, 6sc, 3sc, turn (2 rows) (40)
Round 25-26 :
ch1, 3sc, 6sc, 5sc, 12sc, 5sc, 6sc, 3sc, turn (2 rows) (40)
Round 27-30 :
ch1, 3sc, 6sc, 6sc, 10sc, 6sc, 6sc, 3sc, turn (4 rows) (40)
Info :
Cut the Brown yarn.
Round 31 :
ch1, 3sc, 6sc, 22sc, 6sc, 3sc, turn (40)
Round 32 :
ch1, 4sc, 4sc, 24sc, 4sc, 4sc, turn (40)
Round 33-34 :
ch1, 40sc, turn (2 rows) (40)
Round 35 :
BLO ch1, 40sc, turn (40)
Round 36 :
ch1, 40sc, turn (40)
Round 37 :
Crochet a first tower: ch1, 5sc, 4sc, 5sc, turn (14)
Round 38-40 :
ch1, 5sc, 4sc, 5sc, turn (3 rows) (14)
Round 41 :
ch1, 14sc, turn (14)
Round 42 :
ch1, inc, 12sc, inc, turn (16)
Round 43 :
Change color to Dark Pink. BLO ch1, 16sc, turn (16)
Round 44 :
ch1, dec, 12sc, dec, turn (14)
Round 45 :
ch1, dec, 10sc, dec, turn (12)
Round 46 :
ch1, dec, 8sc, dec, turn (10)
Round 47 :
ch1, dec, 6sc, dec, turn (8)
Round 48 :
ch1, dec, 4sc, dec, turn (6)
Round 49 :
ch1, dec, 2sc, dec, turn (4)
Round 50 :
ch1,2 dec, turn (2)
Round 51 :
ch1, dec, turn (1)
Info :
Cut the yarn, weave in the ends. Repeat tower sequence for the second tower skipping 12 stitches where indicated and attach as you work.
— Connect Inner side and Front side together :
Instruction :
Cut a piece from plastic and put it between two pieces. Crochet with Dark Pink yarn through both pieces: 39sc, inc in the corner, 40sc, inc in the corner, 9sc, 3sc in the top of the tower, 9sc, inc in the corner, 26sc, inc in the corner, 9sc, 3sc in the top of the tower, 9sc, inc in the corner, 40sc, inc in the corner, sl st.
Info :
Cut the yarn, weave in the ends.
— Final castle decoration :
Instruction :
Crochet the piece with Yellow yarn: ch67, from the second chain on the hook: 66sc, leave a long tail for sewing. Fix the arch with pins around the brown door and sew it on.
Instruction :
Divide the door into 2 parts, embroider the partition with a yellow thread, and also embroider the handles on the doors. Embroider the window frames with a brown thread.
Info :
Return to round 3 of the front side and work with Green yarn in front loops: Sl st, (ch1, dc-inc, ch1, sl st) *20. Fasten off, cut the yarn, weave in the ends.
Instruction :
Return to round 35 of the front side and work with Yellow yarn in front loops: Sl st, (ch1, 2sc, ch1, 2sl st) *10. Fasten off, cut the yarn, weave in the ends.
This lovely set includes a tiny princess amigurumi and a matching castle bag — a delightful gift-ready project for crafters and kids alike. The pattern combines basic amigurumi with fun colorwork to make a charming play set you can be proud of. Happy crocheting and enjoy creating a little storybook friend! 🧶🧵