🧶 Beautiful ✨ Detailed 💝 Adorable

Ostin The Octopus Amigurumi Pattern

Ostin The Octopus Amigurumi Pattern
3.9★ Rating
5-7 Hours Time Needed
2.1K Made This
✂️

Intermediate Level

Ideal for those with basic crochet experience, featuring slightly more advanced stitches and techniques to expand your skills.

⏱️

Weekend Treat

Takes 5-7 hours, making it an enjoyable project to finish over a couple of days.

🧸

Cute Companion

An adorable friend to cherish, handcrafted with love to bring comfort and joy for years to come.

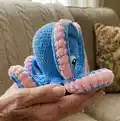
About This Ostin The Octopus Amigurumi Pattern

This pattern guides you through crocheting Ostin, a plush octopus with curling tentacles and a sweet face. It uses plush and semi-cotton yarns to create soft textures and clear contrast for eyes and blushes. You will build tentacles in two layers, attach them while crocheting, and finish with embroidered features. The instructions include exact stitch counts, assembly notes, and helpful tips for shaping.

Ostin The Octopus Amigurumi Pattern crochet pattern - detailed view of completed project

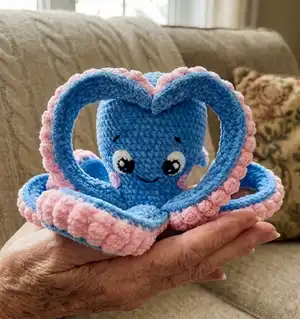
Designed for intermediate crocheters, the pattern uses basic amigurumi stitches and simple puff stitch details for the tentacles. Photos and step-by-step notes help you attach pieces neatly and shape the toy.

Why You'll Love This Ostin The Octopus Amigurumi Pattern

I absolutely love this pattern because it turns soft plush yarn into a playful, squishy octopus with personality. I enjoy how the two-layer tentacles curl and give the toy dynamic movement that kids adore. The step-by-step attachment method lets you sew as you go, reducing finishing work and helping the tentacles sit naturally. Sewing the eyes and embroidering the smile feels like adding the final magic touches that bring Ostin to life. I also love that the pattern allows customization in colors and sizes while keeping the core construction straightforward.

Ostin The Octopus Amigurumi Pattern step 1 - construction progress Ostin The Octopus Amigurumi Pattern step 2 - assembly progress Ostin The Octopus Amigurumi Pattern step 3 - details and accessories Ostin The Octopus Amigurumi Pattern step 4 - final assembly and finishing

Switch Things Up

I love how easy it is to customize Ostin by simply changing colors; try mint and cream for a vintage look or bright neons for a playful version.

If you want a smaller keychain-sized octopus, use a thinner plush yarn and a smaller hook, or use normal worsted yarn with a smaller gauge for a compact amigurumi.

Make a giant cuddly version by using bulky chunky yarn and a larger hook — the tentacles become extra squishy and dramatic.

I often add accessories like tiny crocheted hats, bows, or a little starfish appliqué to personalize each octopus for gifting.

Try embroidered eyelashes, different eye placements, or a sleepy mouth to change the toy's expression — subtle adjustments make big personality changes.

For a marine-themed set, crochet several octopuses in gradient blues and attach small felt bubbles or seaweed accents to the base.

I sometimes mix yarn textures for contrast: plush for the body and smooth cotton for the suckers or blushes to create visual interest.

To make tentacles stiffer or more poseable, you can insert a thin wire inside the tentacle core before final closing, but be careful if the toy is for a child.

Try different puff stitch sizes for the inner tentacle layer to vary the look of the suckers — more pronounced puff stitches give a chunkier feel.

If you want to speed up finishing, sew the eyes on as you go and embroider features with a running stitch for a quick but secure result.

Common Mistakes & How to Fix Them

✗ Not keeping consistent tension while crocheting plush yarn causes uneven tentacle width; maintain steady tension and practice a swatch with your chosen hook before starting the tentacles. ✗ Skipping side loops when attaching tentacles can create visible gaps between tentacle and body; work SC into both the tentacle side loops and body stitches as instructed to secure edges. ✗ Overstuffing the body early makes it hard to attach tentacles and shape the head; stuff gradually during assembly and avoid packing stuffing too tightly until final shaping. ✗ Forgetting to change thread color exactly when specified can misplace the blush or eye contrast; follow the color-change steps carefully and secure ends between loops to hide them.

Ostin The Octopus Amigurumi Pattern

Make a sweet plush octopus named Ostin with plush yarn and easy-to-follow instructions. This pattern includes full tentacle construction, head-body shaping, eyes, blushes, and final assembly tips. You will enjoy the soft textures and the playful curly tentacles that make this toy extra cuddly. Perfect as a handmade gift or a charming nursery friend.

Intermediate 5-7 Hours

Materials Needed for Ostin The Octopus Amigurumi Pattern

— Main Fabric

  • 01
    Plush yarn (120 m/100 gr) e.g., Himalaya Dolphin Baby or YarnArt Dolce — consumption 1.5-2 balls main blue color
  • 02
    Pink plush yarn (for tentacles and blushes) — consumption 1.5-2 balls
  • 03
    Semi-cotton yarn (~330 m/100 gr) (e.g., Gazzal Jeans, YarnArt Jeans, Alize Cotton Gold) for eyes, smile, eyebrows — black (small amount)
  • 04
    Semi-cotton yarn white for eye details — small amount

— Tools Required

  • 01
    Crochet hook 3.5 mm (for plush yarn body and tentacle base)
  • 02
    Crochet hook 4.0 mm (optional for looser gauge on body)
  • 03
    Crochet hook 2.0-2.5 mm (for semi-cotton yarn eyes and small details)
  • 04
    Needles for sewing eyes and blushes (tapestry/embroidery needles)
  • 05
    Stitch markers
  • 06
    Scissors
  • 07
    Fiber filling (polyester stuffing)
  • 08
    Pins for assembly
  • 09
    Thin pink cotton thread for sewing blushes
  • 10
    Love (recommended!)

Progress Tracker

0% Complete

— Tentacles :

Inner Part (8 details) :

*pink plush yarn, 3.5 mm hook *make a turn and work a turning CH at the end of each row

Round 0 :

Chain 9

Round 1 :

start in the 2nd chain from the hook: 8 SC

Round 2 :

2 SC, 4 PS, 2 SC (8)

Round 3 :

FLO: skip the St, 7 SC (7)

Round 4 :

skip the St, SC, 4 PS, SC (6)

Round 5 :

FLO: skip the St, 5 SC (5)

Round 6 :

SC, 3 PS, SC (5)

Round 7 :

FLO: 5 SC (5)

Round 8 :

SC, 3 PS, SC (5)

Info :

then repeat the combination of Rows 7 and 8 12 more times up to Row 32

Round 33 :

FLO: skip the St, 4 SC (4)

Round 34 :

skip the St, SC, PS, SC (3)

Round 35 :

FLO: skip the St, 2 SC (2)

Info :

fix and cut the thread. fix thread ends between the loops on the wrong side.

Outer Part (8 details) :

*blue plush yarn, 3.5 mm hook *make a turn and work a turning CH at the end of each row

Round 0 :

Chain 9

Round 1 :

start in the 2nd chain from the hook: 8 SC

Round 2 :

8 SC

Round 3 :

skip the St, 7 SC (7)

Round 4 :

skip the St, 6 SC (6)

Round 5 :

skip the St, 5 SC (5)

Rounds 6-32 :

27 rounds 5 SC

Round 33 :

skip the St, 4 SC (4)

Round 34 :

skip the St, 3 SC (3)

Round 35 :

skip the St, 2 SC (2)

Info :

fix and cut the thread. fix thread ends between the loops on the wrong side.

Assembly :

attach two details and crochet them around together with SC, at the end of the tentacle work 2 SC in each 2 stitches on the top

Info :

stuff in process of assembling not tight, so that the tentacles bend and twist

Info :

don't work in the upper edge stitches of the tentacle

Info :

tie the ends of the threads together and hide inside, so that they do not comes out

— Head-Body :

Info :

*blue plush yarn, 3.5 mm hook *stuff in process, not tight

Round 1 :

8 SC in MR

Round 2 :

8 INC (16)

Round 3 :

(SC, INC)*8 (24)

Round 4 :

(2 SC, INC)*8 (32)

Round 5 :

(3 SC, INC)*8 (40)

Round 6 :

(4 SC, INC)*8 (48)

Round 7 :

(5 SC, INC)*8 (56)

Round 8 :

(6 SC, INC)*8 (64)

Rounds 9-20 :

12 rounds 64 SC

Round 21 :

(14 SC, DEC)*4 (60)

Round 22 :

(13 SC, DEC)*4 (56)

Round 23 :

(12 SC, DEC)*4 (52)

Round 24 :

(11 SC, DEC)*4 (48)

Round 25 :

(10 SC, DEC)*4 (44)

Round 26 :

(9 SC, DEC)*4 (40)

Round 27 :

(8 SC, DEC)*4 (36)

Round 28 :

(7 SC, DEC)*4 (32)

Round 29 :

(3 SC, INC)*8 (40)

Round 30 :

(4 SC, INC)*8 (48)

Round 31 :

(5 SC, INC)*8 (56)

Round 32 :

(6 SC, INC)*8 (64)

Info :

in Round 33 we are going to attach the tentacles; work SC inserting the hook simultaneously into the both sides of the tentacle and the body; also, work into side loops of the tentacle; if there are missed loops on the sides and gaps, then work the side loops of the first and second tentacles with the body together

Round 33 :

(8 SC together with tentacle)*8 (64)

Info :

*change thread color to pink

Round 34 :

(6 SC, DEC)*8 (56)

Round 35 :

(5 SC, DEC)*8 (48)

Round 36 :

(4 SC, DEC)*8 (40)

Round 37 :

(3 SC, DEC)*8 (32)

Round 38 :

(2 SC, DEC)*8 (24)

Round 39 :

(SC, DEC)*8 (16)

Round 40 :

8 DEC (8)

Info :

tighten the hole, fix the thread and hide the end inside

— Blushes :

Blush (2 details) :

*pink plush yarn, 3.5 mm hook

Round 1 :

6 SC in MR

Info :

fix the thread and leave a long end for sewing

— Eyes :

Info :

*start with black semi-cotton yarn, 2 mm hook. if you crochet the octopus of semi-cotton yarn, you may use the same thread of black color divided in half and use a smaller hook; look for more information on the yarn thickness and hook size on page 6.

Round 1 :

6 SC in MR

Round 2 :

6 INC

Round 3 :

(SC, INC)*3, change thread color to white, BLO: (SC, INC)*3 (18)

Round 4 :

BLO: SC, INC, SS, turn (4)

Round 5 :

skip SS of the previous round, 2 SC, 7 INC HDC, 2 SC (18)

Info :

fix the thread, leave long ends of black and white threads for sewing, and embroidering the glare; embroider the glare with white thread end

— Final Assembly :

Info :

fix the eyes on the head between Rounds 20 and 25 at the distance of 5 SC in the middle of the eyes

Info :

sew them along the contour (you may glue them with non-toxic glue)

Info :

embroider eyebrows (you may also embroider eyelashes)

Info :

embroider the smile, stretching the thread under the pins and fixing the curve (2 bottom points) with thread

Info :

sew blushes with thin pink cotton thread

Assembly Instructions

  • Attach each tentacle by working Round 33: insert the hook through the side loop of the tentacle and the corresponding body stitch and work SC, joining tentacle and body as you crochet (work (8 SC together with tentacle)*8 to attach all eight tentacles).
  • When assembling two-layer tentacles, crochet inner and outer parts together with SC along the top edge, and at the end of the tentacle work 2 SC in every 2 stitches to close the top.
  • Stuff the tentacles and body during the assembly process but not too tightly so the tentacles can bend and twist naturally; stuff gradually as you join pieces.
  • Place the eyes between Rounds 20 and 25, spacing the centers 5 SC apart; sew the eye pieces along their contour and embroider the glare with white thread before final sewing.
  • Sew blushes with thin pink cotton thread and hide all thread ends between the plush loops or inside the body to prevent them from showing.
  • Tie the ends of assembly threads together and hide them inside the toy; do not work in the upper edge stitches of the tentacle to preserve the curl shape.
  • After finishing Round 40, tighten the hole, fix the thread and hide the end inside for a neat finish.

Important Notes

  • 💡Choose yarn and hook sizes carefully: the yarn thickness ratio should be about 2:1 and the hook for the eyes should be about 1.5 mm smaller than the hook for the body.
  • 💡Work into side loops of tentacles when joining to avoid visible gaps; if you miss loops, work side loops of adjacent tentacles together with the body.
  • 💡Use stitch markers to mark the beginning of rounds and to keep track of attachment points while joining tentacles.
  • 💡Stuff gradually during assembly and avoid overstuffing the head early, so you can shape and attach tentacles easily.

You've finished Ostin the Octopus — a cuddly, curl-tailed companion perfect for gifts and nursery decor! 🧶 This plush amigurumi combines soft plush yarn with playful tentacles and a cheerful embroidered face. 🐙 Enjoy making one for yourself or as a handmade present — every stitch brings personality and warmth. ✨

You ask,

we answer.

FAQs

What size will the finished piece be?

The finished toy measures approximately 18 cm (7") without tentacles and about 42 cm (15.5") with tentacles when using the recommended plush yarn and hooks.

Can I use different yarn weights for this pattern?

Yes, but changing yarn weight will affect the final size; keep the yarn thickness ratio near 2:1 (body plush yarn about twice as thick as yarn used for eyes) and adjust hook sizes accordingly.

Do I need prior crochet experience for this pattern?

This pattern is rated intermediate as it requires working into side loops, attaching tentacles while crocheting, and changing colors; basic amigurumi experience is recommended.

How long does this project typically take to complete?

Most crocheters complete this project in 5-7 hours, though time may vary depending on experience and how much detailed embroidery and finishing you do.

How do I attach the tentacles to avoid gaps?

Attach tentacles by working SC into both the side loops of the tentacle and the body stitch simultaneously (see Round 33), and if gaps appear work the side loops of adjacent tentacles together with the body.