🧢 Beautiful ✨ Detailed πŸ’ Adorable

Lucky Cat Amigurumi Pattern

Lucky Cat Amigurumi Pattern
4.1β˜… Rating
5-7 Hours Time Needed
1.9K Made This
βœ‚οΈ

Intermediate Level

Ideal for those with basic crochet experience, featuring slightly more advanced stitches and techniques to expand your skills.

⏱️

Weekend Treat

Takes 5-7 hours, making it an enjoyable project to finish over a couple of days.

🧸

Cute Companion

An adorable friend to cherish, handcrafted with love to bring comfort and joy for years to come.

About This Lucky Cat Amigurumi Pattern

This pattern guides you to crochet a Lucky Cat (Maneki-neko) amigurumi using YarnArt Jeans yarn and a 2.3mm hook. It includes step-by-step round instructions for head, body, arms, legs, ears, tail, spots, collar and a small pillow with tassels. Photos accompany key steps so you can follow shaping and finishing with confidence.

Lucky Cat Amigurumi Pattern crochet pattern - detailed view of completed project

Finished doll measures approximately 4 inches tall with the recommended materials. The pattern uses continuous spiral rounds and shows where to place eyes, sew features and assemble the parts.

Why You'll Love This Lucky Cat Amigurumi Pattern

I absolutely love this pattern because it captures the sweet, classic look of a Maneki-neko in a compact, giftable size. I enjoy the combination of simple amigurumi shaping and small decorative details like the collar, bell and pillow that make each cat unique. The pattern includes clear photos and step-by-step rounds that help me stay confident while crocheting. I also love that you can easily customize colors and spots to create dozens of different personalities from the same instructions.

Lucky Cat Amigurumi Pattern step 1 - construction progress Lucky Cat Amigurumi Pattern step 2 - assembly progress Lucky Cat Amigurumi Pattern step 3 - details and accessories Lucky Cat Amigurumi Pattern step 4 - final assembly and finishing

Switch Things Up

I love changing colors to give each Lucky Cat a different personality; try pastel shades for a soft nursery friend or bold tones for a festive look.

You can make the doll larger or smaller by switching yarn weight and hook size β€” bulky yarn will give you a plush chunkier cat while thinner yarn creates a dainty mini version.

I often substitute safety eyes with embroidered eyes for a fully baby-safe toy ideal for small children.

Try different collar decorations: tiny beads, buttons or embroidered motifs add a personal touch to each collar.

Make the pillow pattern longer or shorter to match the cat size and add different tassel colors to make matching sets.

I sometimes embroider extra markings or a contrasting belly patch to create more character and visual interest.

For a seasonal series, change the collar and bell color: red and gold for Lunar New Year, pastels for spring, or orange and brown for autumn vibes.

To make the cat posable, I add thin wire into the arms before stuffing to allow slight arm movement and better posing.

I recommend experimenting with placement of spots and whiskers until you find a face you love β€” small shifts can change the expression dramatically.

If you want to gift a set, make three cats in coordinating colors and make small matching pillows to create a charming trio display.

Common Mistakes & How to Fix Them

βœ— Skipping stitch counts when increasing or decreasing can distort shaping; always count stitches at the end of each round to ensure the correct total. βœ— Overstuffing pieces makes seams difficult to close and can distort the silhouette; stuff gradually and stop when the shape is smooth but not bulging. βœ— Not separating yarn strands for embroidered details results in thick, clumsy lines; split the yarn into thinner strands for neater nose and whisker stitching. βœ— Placing safety eyes without checking placement can give the face the wrong expression; insert eyes between the recommended rounds and leave 7 stitches between them as instructed. βœ— Ignoring the advice to use invisible decrease can leave visible gaps; practice invisible decreases for a cleaner finish on curved shaping.

Lucky Cat Amigurumi Pattern

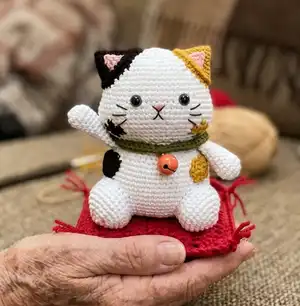
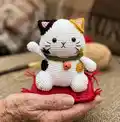
Make a charming Lucky Cat (Maneki-neko) amigurumi with this friendly, photo-supported crochet pattern. You will create a cuddly cat complete with ears, tail, collar and a tiny pillow β€” perfect as a handmade gift or decor. Clear step-by-step rounds and sewing instructions guide you through the whole project so you can finish a delightful amigurumi to cherish.

Intermediate 5-7 Hours

Materials Needed for Lucky Cat Amigurumi Pattern

β€” Main Fabric

  • 01
    YarnArt Jeans yarn (160m/50g) - White (01)
  • 02
    YarnArt Jeans yarn (160m/50g) - Black (53)
  • 03
    YarnArt Jeans yarn (160m/50g) - Red (51)
  • 04
    YarnArt Jeans yarn (160m/50g) - Pink (36)
  • 05
    YarnArt Jeans yarn (160m/50g) - Green (82)
  • 06
    YarnArt Jeans yarn (160m/50g) - Honey (84)

β€” Tools Required

  • 01
    Crochet hook size 2.3mm
  • 02
    One bell 12mm
  • 03
    One pair of safety ocean blue eyes 7mm
  • 04
    One wooden button 10mm
  • 05
    Fiberfill for stuffing
  • 06
    Yarn needle

Progress Tracker

0% Complete

β€” Head :

Info :

HEAD - (white, honey and black yarn) - use the white yarn to make MAGIC RING - work in a continuous spiral (photo 1, 2). Black word: black yarn. Honey word: honey yarn. Blue word: white yarn.

Round 1 :

8sc into magic ring (8)

Round 2 :

8inc (16)

Round 3 :

sc, inc, sc, inc, sc, inc, (sc, inc)*2, sc, inc, sc, inc, sc, inc (24)

Round 4 :

2sc, inc, 2sc, inc, 2sc, inc, 2sc, inc, sc, sc, inc, 2sc, inc (32)

Round 5 :

3sc, inc, 3sc, inc, 3sc, inc, 3sc, inc, sc, 2sc, inc, 3sc, inc (40)

Round 6 :

4sc, inc, 4sc, inc, 3sc, inc, 3sc, inc, 4sc, inc, sc, 3sc, inc, 4sc, inc (48)

Round 7 :

5sc, inc, 5sc, inc, 3sc, 2sc, inc, 5sc, inc, sc, 4sc, inc, 5sc, inc (56)

Round 8 :

7sc, 10sc, 12sc, 15sc, 12sc (56)

Round 9 :

6sc, inc, 6sc, inc, 3sc, 3sc, inc, 6sc, inc, sc, 5sc, inc, 6sc, inc, 2sc, 4sc, inc, 6sc, inc (64)

Round 10 :

8sc, 10sc, 16sc, 16sc, 14sc (64)

Round 11 :

9sc, 8sc, 18sc, 14sc, 15sc (64)

Round 12 :

10sc, 6sc, 20sc, 11sc, 17sc (64)

Round 13 :

10sc, 5sc, 23sc, 7sc, 19sc (64)

Round 14-16 :

64sc (64)

Round 17 :

3sc, (sc, inc)*8, 14sc, (sc, inc)*8, 15sc (80)

Round 18-20 :

80sc (80)

Round 21 :

22sc, 2sc, 21sc, 2sc, 33sc (80)

Round 22 :

20sc, 6sc, 17sc, 6sc, 31sc (80)

Round 23 :

(8sc, dec)*2, 6sc, 2sc, dec, 8sc, dec, 3sc, 5sc, dec, (8sc, dec)*3 (72)

Round 24 :

(7sc, dec)*2, 2sc, 2sc, 3sc, dec, 7sc, dec, 5sc, 2sc, dec, (7sc, dec)*3 (64)

Round 25 :

(6sc, dec)*8 (56)

Round 26 :

BLO (2sc, dec)*14 (42)

Info :

Fasten off, leave a long tail for sewing. Insert safety eyes between round 16-17 with 7 sts apart. Stuff the head.

Info :

Tip: separate the yarn into small yarns to have better result. Use black yarn to sew mouth between round 18-20 and sew whiskers between round 18-21. Use pink yarn to sew nose.

β€” Body :

Info :

BODY - use the white yarn, work in a continuous spiral (photo 3, 4, 5). Make a chain of 11ch. Start in the second chain from hook.

Round 1 :

9sc, 3sc into the last stitch, work on a long the other side: 8sc, inc (22)

Round 2 :

inc, 8sc, 3inc, 8sc, 2inc (28)

Round 3 :

sc, inc, 8sc, (inc, sc)*3, 8sc, (inc, sc)*2 (34)

Round 4 :

inc, 10sc, (2sc, inc)*3, 8sc, (2sc, inc)*2 (40)

Round 5 :

(4sc, inc)*8 (48)

Round 6 :

48sc (48)

Round 7 :

(5sc, inc)*8 (56)

Round 8 :

56sc (56)

Round 9 :

(13sc, inc)*4 (60)

Round 10-18 :

60sc (60)

Round 19 :

(13sc, dec)*4 (56)

Round 20 :

56sc (56)

Round 21 :

(12sc, dec)*4 (52)

Round 22 :

(11sc, dec)*4 (48)

Round 23 :

(6sc, dec)*6 (42)

Info :

Fasten off, leaving a long tail for sewing. Stuff the body.

β€” Arms :

Info :

ARMS (2) - use the white yarn to make MAGIC RING, work in a continuous spiral (photo 6)

Round 1 :

8sc into magic ring (8)

Round 2 :

8inc (16)

Round 3-4 :

16sc (16)

Round 5 :

(6sc, dec)*2 (14)

Round 6-7 :

14sc (14)

Round 8 :

(5sc, dec)*2 (12)

Round 9-12 :

12sc (12)

Info :

Stuff the arms. Flatten and fold the top of the arm, join and sc together the 2 opposing stitches (6sc). Leave a long tail for sewing.

β€” Ears :

Info :

EARS (2) - (honey, light pink and black yarn) - use the honey (black) yarn to make MAGIC RING, work in a continuous spiral (photo 7). Black word: honey (black) yarn. Pink word: pink yarn.

Round 1 :

4sc into magic ring (4)

Round 2 :

4inc (8)

Round 3 :

(sc, inc)*4 (12)

Round 4 :

2sc, inc, 2sc, inc, (2sc, inc)*2 (16)

Round 5 :

3sc, inc, 2sc, sc, inc, (3sc, inc)*2 (20)

Round 6 :

4sc, inc, 2sc, 2sc, inc, (4sc, inc)*2 (24)

Round 7 :

5sc, inc, 2sc, 3sc, inc, (5sc, inc)*2 (28)

Round 8 :

28sc (28)

Info :

Stuff the ears. Fasten off, leave a long tail for sewing.

β€” Legs :

Info :

LEGS (2) - use the white yarn to make MAGIC RING, work in a continuous spiral (photo 8)

Round 1 :

6sc into magic ring (6)

Round 2 :

6inc (12)

Round 3 :

(sc, inc)*6 (18)

Round 4 :

(2sc, inc)*6 (24)

Round 5 :

(3sc, inc)*6 (30)

Round 6-8 :

30sc (30)

Round 9 :

(3sc, dec)*6 (24)

Info :

Stuff the legs. Leave a long tail for sewing.

β€” Spots :

Info :

SPOTS - (honey and black yarn) - use the honey (black) yarn to make MAGIC RING, work in round (photo 9)

Round 1 :

Ch5, start in the 2nd chain from hook: 3sc, 3sc-inc, 2sc, inc, slst (10)

Round 2 :

Ch, Inc, 2sc, 3inc, 2sc, 2inc, slst (16)

Info :

Fasten off, leave a long tail for sewing.

β€” Collar :

Info :

COLLAR - use the green yarn (photo 10, 11)

Round 1 :

Make a chain of 62ch. Start in the 7th chain from hook 55sc. (photo 10) (55)

Info :

Fasten off, weave in the yarn end. Sew the button and the bell through the collar. Wear collar for the cat.
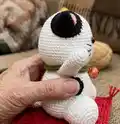
β€” Tail :

Info :

TAIL - use the white yarn to make MAGIC RING, work in a continuous spiral (photo 12, 13)

Round 1 :

6sc into magic ring (6)

Round 2 :

6inc (12)

Round 3-9 :

12sc (12)

Info :

Don't stuff the tail. Flatten and fold the top of the tail, join and sc together the 2 opposing stitches (6sc). Leave a long tail for sewing. Sew tail to body on round 6.

β€” Pillow :

Info :

PILLOW - use the red yarn (photo 14, 15, 16, 17, 18, 19, 20, 21, 22, 23)

Round 1 :

Make a chain of 40ch. Start in the 3rd chain from hook 38dc, turn (38)

Round 2-13 :

Ch2, 38dc, turn (38)

Round 14 :

Ch2, 38dc (38)

Info :

Fasten off, leave a long tail about 40cm for sewing. Stuff some fiberfill in the pillow.

Item Name (Tassels P1) :

Tassels (4): Cut 20 equal yarns about 10cm. Take 5 yarns and thread needle. Thread the needle through one corner of the pillow. Knot. Separate the yarns into small yarns. Repeat the same steps for the remaining 3 corners.

β€” Sewing :

Info :

Sew head to body. Sew ears to head between round 4-11. Sew spot to the body. Sew legs to body between round 6-13, 2 legs apart 10sts. Sew arms to body. Use pink yarn to sew lines in legs.

Assembly Instructions

  • Sew head to body by aligning the base of the head opening over the top of the body and whipstitch securely with the long tail left after fastening off.
  • Position and sew ears to head between rounds 4-11 so they are symmetrical; use pins to check spacing before stitching.
  • Sew each spot to the body in the desired positions using the long tail left when fastening off and secure with a few passing stitches.
  • Attach legs to the bottom of the body between rounds 6-13, spacing the two legs 10 stitches apart; sew firmly so the doll sits stably.
  • Sew arms to body on either side at the chosen round heights, matching photos for natural placement and angle.
  • Weave the collar around the neck, sew the button and bell through the collar, and secure the collar on the cat's neck.

Important Notes

  • πŸ’‘Insert safety eyes between rounds 16-17 and leave 7 stitches between them for correct facial proportion.
  • πŸ’‘Make Invisible Decrease stitches (as noted) for a neater finish on decreases and shaping.
  • πŸ’‘Separate yarn into thinner strands for embroidered nose and whiskers to achieve delicate lines.
  • πŸ’‘Stuff parts firmly but not overpacked so seams close neatly and shape remains smooth.

This cute Lucky Cat amigurumi is a sweet, compact project perfect for gifting or decorating your home. Customize the spots, collar and pillow colors to create many lucky variations for friends and family. Small enough to finish in a weekend and meaningful enough to treasure. πŸ§ΆπŸ±πŸ€

You ask,

we answer.

FAQs

What size will the finished piece be?

The finished doll size is approximately 4 inches tall when using the recommended YarnArt Jeans yarn and 2.3mm hook.

Can I use different yarn weights for this pattern?

Yes, you can use different yarn weights but this will change the final size; choose an appropriate hook to match the yarn and expect size differences.

Do I need prior crochet experience for this pattern?

This pattern is rated intermediate, so basic knowledge of single crochet, increases and decreases is recommended for best results.

How long does this project typically take to complete?

Most crocheters complete this project in 5-7 hours depending on experience and how detailed you are with finishing and embroidery.

Where should I place the safety eyes?

Insert the safety eyes between rounds 16 and 17 of the head, leaving 7 stitches between them for the correct placement shown in the photos.