🧢 Beautiful ✨ Detailed πŸ’ Adorable

Capybara Amigurumi Pattern

Capybara Amigurumi Pattern
4.4β˜… Rating
1.5-2 Hours Time Needed
1.8K Made This
βœ‚οΈ

Beginner Friendly Level

Perfect for those just starting their crochet journey, with clear instructions and simple techniques

⏱️

Quick Make

Complete in under 2 hoursβ€”lightning fast fun for instant gratification and quick gifts.

🧸

Cute Companion

An adorable friend to cherish, handcrafted with love to bring comfort and joy for years to come.

About This Capybara Amigurumi Pattern

This pattern creates a soft, plush capybara amigurumi with a tiny tangerine accessory. The body is crocheted first and the legs are made separately and sewn on for a neat finish. Clear round-by-round instructions and photos guide you through shaping and assembly.

Capybara Amigurumi Pattern crochet pattern - detailed view of completed project

Perfect for using super-bulky plush yarn to get a squishy, cuddly texture. Ideal as a beginner-friendly, quick project or a handmade gift.

Why You'll Love This Capybara Amigurumi Pattern

I absolutely love this pattern because it turns simple stitches into a charming, tactile capybara that feels delightful to hold. I enjoy how quickly the plush yarn creates a soft, pillowy texture with very little effort. The assembly method of crocheting the body first and sewing the legs on afterwards makes positioning easy and yields a clean finish. I also love the playful detail of a tiny tangerine topper β€” it adds personality and is a fun finishing touch I always enjoy making.

Capybara Amigurumi Pattern step 1 - construction progress Capybara Amigurumi Pattern step 2 - assembly progress Capybara Amigurumi Pattern step 3 - details and accessories Capybara Amigurumi Pattern step 4 - final assembly and finishing

Switch Things Up

I love how easily this pattern adapts to different yarns and sizes: use thinner yarn and a smaller hook to make a tiny keychain version.

I also make a giant version by using bulky yarn with a larger hook for a huggable plush toy that doubles as a pillow.

I often change the capybara color to greys, browns, or pastels for different moods and seasonsβ€”each color gives a new personality.

I sometimes swap the embroidered eyes for safety eyes if the toy is not for small children; always consider safety for the recipient.

I enjoy adding accessories like a tiny scarf, hat, or a crocheted fruit other than a tangerine for variety.

I sometimes stuff the legs more firmly or less firmly to alter the sitting posture and balance of the toy.

I experiment with facial expressions by moving the eye and nose placement slightly; a small shift changes the character completely.

I like to embroider a small mouth or make a tiny heart patch on the side to personalize each capybara for gifts.

I recommend trying different hook sizes to test texture: plush yarn with a slightly larger hook gives a fluffier look while a tighter hook gives a firmer toy.

I sometimes add a wire inside the neck for a slight posability feature, but only if the toy is decorative and not for small children.

I also love creating a whole family of capybaras in different sizes and colors to display together as a set.

Common Mistakes & How to Fix Them

βœ— Skipping stitch markers when marking ear positions can cause asymmetry; place markers and double-check distances from the center before sewing. βœ— Not stuffing gradually causes uneven shaping and lumps; stuff in small amounts and shape as you work to maintain smooth curves. βœ— Failing to count stitches after increases or decreases will lead to incorrect stitch counts; count each round and correct mistakes immediately. βœ— Pulling your yarn too tight on plush yarn can flatten the texture and make stitching difficult; keep a gentle, consistent tension while crocheting.

Capybara Amigurumi Pattern

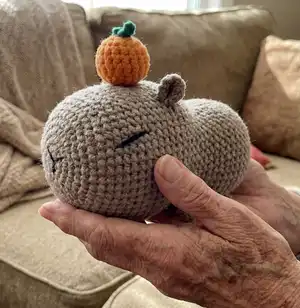
Make a cuddly capybara amigurumi using super-bulky plush yarn and a simple round-by-round pattern. You will crochet the body first, then sew the legs and add a tiny tangerine topper for charm. This easy, photo-guided pattern is perfect for quick handmade gifts and cozy decor.

Beginner Friendly 1.5-2 Hours

Materials Needed for Capybara Amigurumi Pattern

β€” Main Fabric

  • 01
    Super bulky plush yarn (Himalaya Dolphin Baby 120m/100g or equivalent) approximately 1 skein beige (main color)
  • 02
    Small amount of orange plush yarn for the tangerine (approx 10-20g)
  • 03
    Small amount of green plush yarn for the tangerine leaves (approx 5-10g)
  • 04
    Black fine yarn for eyes and nose (Yarnart Begonia black color 0999 or similar) small amount
  • 05
    Polyester stuffing for head/body and tangerine

β€” Tools Required

  • 01
    Crochet hook size 4.5 mm (H-7 US)
  • 02
    Polyester stuffing
  • 03
    Crochet stitch markers
  • 04
    Big and small yarn needles
  • 05
    Scissors
  • 06
    Thin black embroidery thread or fine yarn for eyes and nose
  • 07
    Optional: pins to position parts before sewing

Progress Tracker

0% Complete

β€” Leg (x 4) :

Round 1 :

crochet a MR with 6 Sc (6)

Round 2 :

Inc around (12)

Round 3 :

Sc around, Sl St (12)

Info :

Fasten off. Leave a sewing tail.

β€” Ear (x 2) :

Round 1 :

crochet a MR with 6 Sc (6)

Info :

Don`t close the ring, turn, Ch

Round 2 :

(Inc, Sc) x 3 (9)

Info :

Fasten off.

Info :

Sew the corners together. Leave sewing tail.

β€” Head-body :

Round 1 :

crochet a MR with 8 Sc (8)

Round 2 :

Inc around (16)

Round 3 :

(Sc 1, inc) x 8 (24)

Round 4 :

(Sc 2, inc) x 8 (32)

Round 5 :

(Sc 3, inc) x 8 (40)

Round 6 :

(Sc 4, inc) x 8 (48)

Round 7 :

Sc around (48)

Round 8 :

Sc 19, Inc, Sc 8, Inc, Sc 19 (50)

Round 9 :

Sc around (50)

Round 10 :

Sc 21, Inc, Sc 6, Inc, Sc 21 (52)

Round 11-13 :

Sc around (52) 3 Rnds

Round 14 :

Sc 23, Inc, Sc 4, Inc, Sc 23 (54)

Round 15-17 :

Sc around (54) 3 Rnds

Info :

In the next round we will mark the approximate position of the ears.

Round 18 :

Sc 6, Dec, Sc 4, Dec, Sc 9, Sc 1 (mark this St), Sc 9, Sc 1 (mark this St), Sc 10, Dec, Sc 4, Dec, Sc 2 (50)

Round 19 :

Sc 4, Dec, Sc 2, Dec, Sc 34, Dec, Sc 2, Dec (46)

Round 20-22 :

Sc around (46) 3 Rnds

Round 23 :

Sc 20, Dec, Sc 4, Dec, Sc 18 (44)

Round 24 :

Sc 20, Dec, Sc 2, Dec, Sc 18 (42)

Round 25 :

Sc 10, Inc, Sc 8, Dec, Sc 4, Dec, Sc 8, Inc, Sc 6 (42)

Round 26 :

Sc around (42)

Round 27 :

(Sc 6, Inc) x 6 (48)

Round 28-34 :

Sc around (48) 7 Rnds

Info :

Stuff with filler.

Round 35 :

(Sc 4, Dec) x 8 (40)

Round 36 :

(Sc 3, Dec) x 8 (32)

Round 37 :

(Sc 2, Dec) x 8 (24)

Round 38 :

(Sc, Dec) x 8 (16)

Info :

Stuff firmly.

Round 39 :

Dec 8 (8)

Info :

Tighten the hole, hide the thread inside.

β€” Assembly / Legs & Ears Position :

Info :

Determine the position of the legs. Sew the legs.

Info :

Since everyone has a different crocheting style and yarn thickness, a slight shift of stitches is possible. See if the markers are positioned equally from the center. Adjust the position if necessary.

Info :

Sew the ears in place of the markers at a distance of approximately 9-10 stitches.

β€” Eyes Embroidery :

Info :

Now it is necessary to determine where to embroider the EYES.

Left eye :

From the left ear down 3 rounds, then to the left 5 stitches - here is the 1st dot of the eye.

Left eye :

From this dot down 5 stitches and to the left 1 stitch - here is the 2nd dot of the eye.

Info :

Embroider the eye with a thin black thread connecting these two dots. I used one long thread to embroider the eyes and nose. You can fix the thread as shown in the photo. Make 2 stitches to make the eye more expressive.

Right eye :

From the right ear down 3 rounds, then to the right 5 stitches - here is the 1st dot of the eye.

Right eye :

From this dot down 5 stitches and to the right 1 stitch - here is the 2nd dot of the eye.

Info :

Embroider the second eye in the same way as the first.

β€” Embroider the NOSE :

Info :

Use the same thin black thread to embroider the nose in a Y shape connecting the center dots shown in the photos.

Info :

Tie a knot.

Info :

Hide the threads inside. Use a yarn needle to pull ends inside and trim.
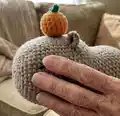
β€” Tangerine :

Round 1 :

crochet a MR with 6 Sc (6)

Round 2 :

Inc around (12)

Round 3 :

(Sc 1, Inc) x 6 (18)

Round 4-6 :

Sc around (18) 3 Rnds

Round 7 :

(Sc 1, Dec) x 6 (12)

Info :

Stuff

Round 8 :

Dec around (6)

Info :

Fasten off, tighten the hole, leave the thread for sewing.

β€” Leaves :

Info :

Ch 4, Sl St in 1st Ch, Ch 4, Sl St in 1st Ch. Fasten off, wrap the center with thread and tie a knot.

Info :

Sew the leaves to the tangerine, hide the threads inside.

Info :

Sew a tangerine to the head. Hide the threads inside.

β€” Final :

Info :

Our capybara is ready!

Assembly Instructions

  • Position and sew the four legs evenly on the underside of the body where indicated by markers; use the sewing tails to secure each leg firmly.
  • Sew the ears to the head where you placed the markers in R18, spacing them approximately 9-10 stitches apart and adjusting for symmetry.
  • Embroider the eyes using the dot positions described: left and right eyes each use two dots connected by thin black thread; secure thread ends and hide inside the body.
  • Sew the tangerine to the top of the head using the long sewing tail from the tangerine; attach the leaves to the tangerine and hide all threads inside.
  • Hide all remaining thread ends inside the body and tighten any holes; adjust stuffing if necessary to smooth shape before final closing.

Important Notes

  • πŸ’‘Use stitch markers to mark the ear positions in R18 so you can compare symmetry before sewing.
  • πŸ’‘Stuff gradually and evenlyβ€”overstuffing can distort the plush shape and under-stuffing will leave gaps.
  • πŸ’‘Check stitch counts after every increase or decrease round to ensure correct shaping and final dimensions.
  • πŸ’‘Hide and secure threads inside the body to prevent unraveling and to keep the exterior neat.

This adorable capybara amigurumi is soft, squishy, and charming β€” a perfect quick make for handmade gifts. Attach the tiny tangerine for an extra touch of personality and style. Share your finished buddy with loved ones and enjoy the smiles it brings! 🧢🍊

You ask,

we answer.

FAQs

What size will the finished piece be?

The finished amigurumi measures approximately 8.7 x 4.7 x 4.7 inches (22 x 12 x 12 cm) when using the recommended yarn and hook size.

Can I use different yarn weights for this pattern?

Yes, you can use different yarn weights, but this will change the final size and texture; adjust your hook size accordingly and expect a different look when using non-plush yarns.

Do I need prior crochet experience for this pattern?

This pattern is rated beginner friendly (Easy) and uses basic stitches like single crochet, increases, and decreases, so basic crochet knowledge is recommended for the best results.

How long does this project typically take to complete?

Most crocheters complete this project in about 1.5-2 hours using super-bulky plush yarn, though time may vary depending on experience and assembly precision.

How should I secure and hide thread ends after embroidery?

Tie a small knot, pull the remaining thread into the body with a yarn needle, trim the excess, and make sure the knot is hidden inside to keep the exterior neat and safe.