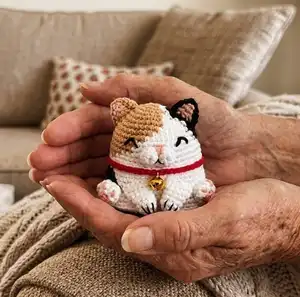
🧢 Beautiful ✨ Detailed πŸ’ Adorable

Calico Cat Amigurumi Pattern

Calico Cat Amigurumi Pattern
4.2β˜… Rating
5-7 Hours Time Needed
1.4K Made This
βœ‚οΈ

Intermediate Level

Ideal for those with basic crochet experience, featuring slightly more advanced stitches and techniques to expand your skills.

⏱️

Weekend Treat

Takes 5-7 hours, making it an enjoyable project to finish over a couple of days.

🧸

Cute Companion

An adorable friend to cherish, handcrafted with love to bring comfort and joy for years to come.

About This Calico Cat Amigurumi Pattern

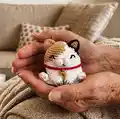
This pattern creates a small, round Calico Cat amigurumi worked in continuous rounds with color changes for the calico patches. The model includes separate pieces for ears, muzzle, front legs, paws, a curly tail and a small fish accessory. The instructions include special stitch notes (invisible finish, bobble and surface slip stitches) and assembly guidance for a polished finish. Ideal for making single or reversible toy versions by joining two cats together.

Calico Cat Amigurumi Pattern crochet pattern - detailed view of completed project

The pattern uses 4-ply cotton blend yarn and a 2.0 mm hook for a firm, neat fabric. Step-by-step rounds and photographed tips guide you through shaping and finishing. A small cardboard base is suggested if you make a single toy so it will stand evenly.

Why You'll Love This Calico Cat Amigurumi Pattern

I absolutely love this pattern because it packs a lot of character into a tiny, lovable form that you can finish in a weekend. I enjoy the compact shaping and the color-change details that make each cat unique and full of personality. I also love how the bobble paws and tiny fish accessory add cute focal points that are quick to make. The instructions are written with practical tips I used myself to get tidy joins and a flat base so the toy looks professional.

Calico Cat Amigurumi Pattern step 1 - construction progress Calico Cat Amigurumi Pattern step 2 - assembly progress Calico Cat Amigurumi Pattern step 3 - details and accessories Calico Cat Amigurumi Pattern step 4 - final assembly and finishing

Switch Things Up

I love how easy it is to customize this pattern with different color palettes β€” try pastel shades for a soft nursery friend, or bold, high-contrast colors for a playful look.

If you want a bigger version, switch to a bulkier yarn and a larger hook; the pattern grows proportionally so your finished cat becomes a cuddly plush.

Make a reversible toy by crocheting two cats in different colorways and joining them together as described β€” each side becomes a surprise reveal when flipped.

I often add tiny accessories like a crocheted scarf, tiny hat, or miniature yarn fish to personalize each cat and make gift-ready creations.

Try embroidering different facial expressions β€” raising or lowering the eyes and mouth placement changes the personality a lot.

For a more poseable version, you can thread thin wire into the legs before final sewing to create a slight bend in the limbs.

Use different yarn textures β€” an acrylic blend gives more sheen while cotton gives firmer shapes; mix textures for distinct patches of fur.

Consider adding safety eyes for a slightly larger toy, but for small versions I prefer embroidered eyes for safety and cleaner scale.

Experiment with the bobble stitch size for chunkier or smaller paw pads β€” change the number of wraps or yarn weight to alter the bobble look.

I sometimes mount the bottom on a small disc of felt glued to cardboard inside for extra stability when the toy is displayed on shelves.

Common Mistakes & How to Fix Them

βœ— Working too loosely on single crochet rounds causes gaps and loose stuffing; maintain a firm, consistent tension and consider a slightly smaller hook if your work is open. βœ— Skipping stitch markers leads to miscounted rounds and misplaced color patches; place a marker at the start of each round and move it every round to stay on track. βœ— Overstuffing the body makes the shape distort and seams hard to close; stuff gradually, shaping as you go and add fiberfill in small amounts for a smooth round. βœ— Tight tapestry color changes can pucker the fabric around the patch; cut the yarn and start a new yarn for each color change as recommended to keep the fabric even. βœ— Not finishing the base for a single toy will cause the toy to tip over easily; prepare a circular piece of cardboard or rigid plastic and sew it to the BL of the last round to stabilize the base.

Calico Cat Amigurumi Pattern

Create an adorable pocket-sized Calico Cat amigurumi with this clear, photo-guided crochet pattern. You will work in continuous rounds using single crochet, bobble stitches, and simple color changes to produce a charming cat with ears, paws, muzzle and a curled tail. The pattern is ideal for crafters who enjoy small detailed projects and makes a delightful handmade gift. Follow the step-by-step rounds and assembly notes for neat results.

Intermediate 5-7 Hours

Materials Needed for Calico Cat Amigurumi Pattern

β€” Main Fabric

  • 01
    4 ply cotton blend yarn (approx. 10-50g white/main body color depending on variant)
  • 02
    Tan (calico) - small amount for patches (approx. 10-20g)
  • 03
    Black - small amount for patches/details (approx. 5-15g)
  • 04
    Peach/Pink - small amount for paw pads and muzzle details (approx. 5-10g)
  • 05
    Red/Orange - small amount for collar surface slip stitches (approx. 5-10g)
  • 06
    Grey variant: Grey - 20-50g, White - 10-30g, Pink/Peach - small amounts
  • 07
    Siamese variant: Light beige, brown, dark brown, orange, peach - small amounts each
  • 08
    Note: yarn amounts vary by color and by whether you make a single or reversible toy; this pattern uses small leftovers of 4-ply yarn.

β€” Tools Required

  • 01
    Crochet hook size 2.0 mm (or size suitable for 4-ply cotton to get a firm fabric)
  • 02
    Tapestry needle (for sewing and invisible finish)
  • 03
    Embroidery needle (for facial details, 1-ply yarn)
  • 04
    Scissors
  • 05
    Stitch markers
  • 06
    Polyester stuffing (fiberfill)
  • 07
    Small golden bell, diameter 7 mm (optional)
  • 08
    Small circular piece of cardboard or rigid plastic for base (optional, for single toy)

Progress Tracker

0% Complete

β€” Head and Body :

Round 1 :

6 sc in MR (6)

Round 2 :

6 inc (12)

Round 3 :

[sc, inc] x 6 (18)

Round 4 :

[sc, inc, sc] x 6 (24)

Round 5 :

[3 sc, inc] x 6 (30)

Round 6 :

[2 sc, inc, 2 sc] x 6 (36)

Round 7 :

[5 sc, inc] x 6 (42)

Round 8 :

42 sc (42)

Round 9 :

[3 sc, inc, 3 sc] x 6 (48)

Round 10-13 :

48 sc (48)

Round 14 :

[7 sc, inc] x 6 (54)

Round 15 :

BLO 54 sc (54)

Round 16-19 :

54 sc (54)

Round 20 :

[4 sc, inc, 4 sc] x 6 (60)

Round 21-22 :

60 sc (60)

Info :

Fasten off, cut the yarn and do invisible finish.

Info :

Hold the body upside down. With red (or bright) yarn, make a loop between R14-15, right above the FL left of R14, then make surface slip stitches all the way around for the collar.

β€” EARS (make 2) :

Info :

We will crochet ears using alternating colors for inner and outer. Start with the outer color.

Round 1 :

6 sc in MR (6)

Round 2 :

sc, inc, sc, inc, sc, inc (9)

Round 3 :

2 sc, inc, sc, sc, inc, 2 sc, inc (12)

Round 4 :

3 sc, inc, sc, 2 sc, inc, 3 sc (13), leave the last st unworked

Info :

Fasten off. Leave a long tail for sewing. Do invisible finish. Make the second ear with alternate yarn colors as instructed for your variant.

β€” Muzzle :

Info :

Start with white (or light color for muzzle). Make first small circle then join a second circle and join them together as described.

Round 1 :

Make 6 sc in MR, tighten the MR and join with a sl st to the first st. Fasten off and cut the yarn.

Round 2 :

With a new piece of white yarn, make another 6 sc in MR, tighten the MR and join with a sl st to the first st. Do not fasten off.

Round 3 :

Continue your work by joining it to the first circle with a sc. Work 5 more sc at the first circle. And continue with 6 sc at the second circle. Fasten off. Leave a long tail for sewing. Do the invisible finish.

β€” FRONT LEGS (make 2) :

Round 1 :

8 sc in MR (8)

Round 2 :

8 sc (8)

Round 3 :

8 sc (8)

Round 4 :

3 sc, inc, 4 sc (9)

Round 5 :

4 sc, inc, 4 sc (10)

Info :

No need to stuff. Last round: flatten and work through both stitches 5 sc (5). Fasten off, leaving a long tail for sewing.

β€” PAWS (make 2) :

Round 1 :

Start with peach yarn. 6 sc in MR (6), join to the first sc with a sl st. Change to white. Cut the peach yarn leaving about 20 cm long tail.

Round 2 :

BLO, loosely 6 sl st (6), join to the first st with a sl st. Make 1 ch.

Round 3 :

3 inc, loosely 3 sl st (9), join to the first sc with a sl st.

Round 4 :

[bobble st, sl st] x 3 (6), leave remaining stitches unworked.

Info :

Fasten off, leave a long tail for sewing, do invisible finish. Using the peach tail, embroider paws on every bobble st.

β€” TAIL :

Info :

Start with black (or chosen striping color). Work every sl st below a little bit loosely to create a flexible curly tail.

Round 1 :

5 sc in MR (5)

Round 2-3 :

5 sc (5)

Round 4 :

2 sl st, 3 sc (5)

Round 5 :

5 sc (5)

Round 6 :

Change color: 2 sl st, 3 sc (5)

Round 7 :

5 sc (5)

Round 8 :

2 sl st, 3 sc (5)

Round 9-10 :

5 sc (5)

Round 11-12 :

5 sc (5)

Round 13 :

sl st, 3 sc, sl st (5)

Round 14 :

5 sc (5)

Round 15 :

sl st, 3 sc, sl st (5)

Info :

Fasten off, leave a long tail for sewing. Do invisible finish. Change colors as desired to create stripes.

β€” FISH :

Info :

Start with peach yarn for the little fish accessory. Work the body and a small tail and embroider an eye with black yarn.

Step :

Make 5 ch. Start from the second loop from the hook: sc (this st will be called as the "first st*"), hdc, dc, inc3 at the last ch. Continue at the other side of the ch: dc, hdc, sc, then sl st at the first st*.

Step :

Then, continue to work the tail: [3 ch, start from the second loop from the hook: sc, sl st] x 2, then sl st to the first st*. Fasten off. Leave a long tail for sewing. Using black yarn (1 ply only) embroider the eye.

β€” Assembly :

Info :

Attach parts as instructed in assembly list below. Embroider facial features and sew the bell to the collar center.

Assembly Instructions

  • Attach the muzzle on the head between R11-13, 5 stitches wide; no need to stuff the muzzleβ€”sew securely using invisible finish.
  • Attach the ears on the head between R4-8, spacing them evenly and sewing through the back loops for a neat placement.
  • Attach the front legs on the body between R16-22 with a slightly tilted position and sew firmly so they support the toy when sitting.
  • Attach the paws on the body between R18-22, right beside the front legs; embroider paw pads on the bobble stitches using peach yarn.
  • Attach the fish to the bottom of the muzzle and also to one of the front legs to fix its position and prevent it from hanging loosely.
  • Attach the tail at the back of the body at R21 and secure it well with the tail left for sewing.
  • If making a single toy, prepare a circular cardboard or rigid plastic base, place it inside the bottom, and sew the round base to the BL of the last round of the body for stability.

Important Notes

  • πŸ’‘Use stitch markers to keep track of your rounds and color-change positions to avoid misalignment.
  • πŸ’‘Work each part with the same stitch tension for uniform shaping; inconsistent tension will change final proportions.
  • πŸ’‘Stuff gradually and evenly while shaping the body and head to avoid lumps and to get a smooth silhouette.
  • πŸ’‘When doing color changes for reversible amigurumi, avoid tapestry techniques that tighten rounds; cut and join new yarn for each color change for best stretchability.

This Calico Cat amigurumi is a delightful little project that turns leftover yarn into a lovable friend. Each tiny detailβ€”from the bobble paws to the curled tailβ€”adds personality and charm to your finished piece. Whether you make one for yourself or gift a pair, these pocket cats bring smiles and cozy handmade joy. 🧢🐱✨

You ask,

we answer.

FAQs

What size will the finished piece be?

The finished amigurumi measures approximately 6 cm (2.3") tall when using the recommended 4-ply cotton blend yarn and a 2.0 mm hook.

Can I use different yarn weights for this pattern?

Yes, you can use different yarn weights, but this will affect the final size and fabric density; choose an appropriate hook size and test gauge to achieve the desired firmness.

Do I need prior crochet experience for this pattern?

This pattern is rated intermediate; familiarity with magic ring, single crochet, increases, decreases, bobble stitch and working in continuous spiral rounds is recommended.

How long does this project typically take to complete?

Most crocheters complete this project in 5-7 hours, though time may vary based on experience level and how many accessories or color changes you include.