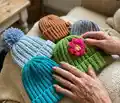
About This Freestyle Beanie Pattern
This pattern creates a versatile ribbed beanie that can be made in any yarn weight and customized with pompoms, buttons, studs, or embroidered details. The method uses a simple rectangle worked in back loop HDC rows, then seamed and shaped across the top with SC decreases. It is designed to be adaptable — use it to make fitted slouchy, child-sized, or oversized hats by adjusting chains and rows.

Includes tips for measuring, stitch placement, and finishing to make a professional-looking hat. Optional instructions and ideas are provided for flowers, embroidery, studs, and pom-pom toppers.
Why You'll Love This Freestyle Beanie Pattern
I absolutely love this pattern because it takes a very simple set of stitches and turns them into a timeless, wearable beanie. I enjoy how customizable it is — you can swap yarn weights, change colors, and add your own embellishments to make each hat unique. The construction is honest and straightforward, which makes it satisfying to complete quickly and confidently. I also love that small adjustments (just a few chains or rows) let you size the hat for anyone, from baby to adult.
Switch Things Up
I love how easy it is to customize this beanie by switching yarn weights and hook sizes; using bulky yarn and a larger hook will create a quick, chunky hat while fine yarn and a smaller hook gives you a neat, fitted beanie.
I often make a mini version for keychains by using sport or fingering yarn and a very small hook — it becomes a cute pocket-sized gift.
Try alternating two strands of different colors held together for a marled effect that still uses the same stitch pattern for texture and warmth.
Want a slouchy hat? Make the rectangle longer in height before seaming so you have more fabric to drape at the crown when worn.
Prefer a low-profile fitted beanie? Decrease the number of rows and make the long side of the rectangle closer to the head circumference (still slightly smaller so it stretches to fit snugly).
I like to add a faux fur pom-pom or an oversize pom for children — attach with a thread and knot through both layers so it sits securely even after washing (if using washable pom-poms).
Add embroidered accents like the cactus spines by using two strands of fingering yarn and whip-stitches along the ribs; you can also embroider small motifs or initials for personalization.
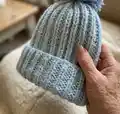
Swap the folded brim for a single-layer brim by making the foundation chains slightly shorter and not folding up the edge, or add button tabs to secure a decorative fold as shown in the samples.
For a dressier look, sew faux leather buttons or studs onto a hidden fabric square inside the brim as a reinforcement so they don't pull through the stitches.
I sometimes line my beanies with a soft knit fabric rectangle sewn into the brim for extra warmth and a clean interior finish — this also helps stabilize studs and pins.
Experiment with color stripes by carrying a second color along the WS for a neater color change, or change color every few rows to create bold bands.
If you'd like more texture, try working the rectangle in SC BLO rib instead of HDC BLO to create a tighter, denser fabric that still behaves like a classic rib.
Common Mistakes & How to Fix Them
✗ Using the wrong hook for your chosen yarn weight can make the fabric too loose or too stiff; always swatch and adjust your hook to achieve a fairly firm gauge so there are no large holes between stitches.
✗ Not measuring the rectangle as you go can lead to a hat that is too small or too large; periodically measure across the long side and try the rectangle on or pin the ends together to check the circumference.
✗ Forgetting to work in the back loop only after the foundation row will change the rib texture; be consistent and double-check that each HDC row is worked into the back loop of each stitch.
✗ Skipping checks for an even number of rows can lead to the working loop ending on the wrong side; make sure you work an even number of rows so the working loop aligns opposite the beginning yarn tail.
✗ Rushing the top decreases causes uneven shaping; insert your hook into the ridges as shown and pull consistent loops when making SC2tog decreases to keep the top edge neat and even.
✗ Sewing the seam without blending edges will show a bulky seam; to make the seam blend well insert your needle under the top loop of the last row and under both loops of the foundation edge before whipping the seam.