About This FOX HAND PUPPET Amigurumi Pattern
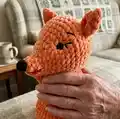
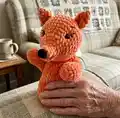
This pattern teaches you how to crochet a fox hand puppet using plush yarn and clear rounds written in US terms. You will work the head, nose, ears, arms and body, then assemble and embroider facial features. The finished puppet is soft, expressive, and perfect for play or display.
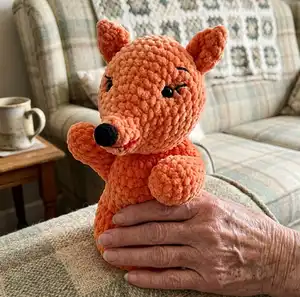
Detailed step-by-step rounds and helpful photos guide you through shaping and assembly. Recommended yarns, hook sizes, and sewing instructions are included for smooth finishing.
Why You'll Love This FOX HAND PUPPET Amigurumi Pattern
I absolutely love this pattern because it brings a playful fox character to life with simple shapes and soft plush yarn. I enjoyed designing the expressive face and compact body so the puppet is easy to make yet full of personality. The pattern allows for small customizations like eye placement and embroidery that make each puppet unique. I also love how the finished puppet is both a toy and a cozy hand puppet for storytelling and imaginative play.
Switch Things Up
I love how easy it is to customize this fox by changing yarn colors; try pastel shades for a softer look or deep orange and browns for a more realistic fox.
I often change the eye size and spacing to give the puppet different expressions — moving the eyes one or two stitches can create a cuter or more mischievous face.
If you want a smaller puppet, use lighter weight yarn and a smaller hook to create a mini keychain-sized fox.
For a chunkier, cuddlier puppet, use bulky or super-bulky yarn with a larger hook to increase the finished size and plushness.
I sometimes embroider freckles, whiskers, or different eyebrow shapes to add personality and uniqueness to each puppet.
Try different mouth colors and stitching techniques to make smiling, surprised, or even sleepy expressions — the red yarn tongue is optional for a playful look.
To make the puppet posable, add wire inside the arms or between body layers for gentle positioning of limbs and head.
I like to add tiny accessories like a crocheted scarf or felt ears lining for extra detail and charm.
Switch up the eyes using safety eyes, embroidered eyes, or felt cutouts depending on the intended use and recipient — safety eyes for display, embroidered for child-safe toys.
If you plan to sell or gift, consider packaging options like a small handmade tag or matching crocheted pouch to make the puppet feel extra special.
Common Mistakes & How to Fix Them
✗ Skipping placement of eyes between rounds 10 and 11 will make them misaligned; mark the stitch positions and check spacing (11 sc apart) before securing the safety eyes.
✗ Forgetting to leave long tails for sewing noses and ears can make attachment difficult; always leave the recommended 20 cm tail and cut only after sewing is complete.
✗ Overstuffing the head will distort the face and make indenting eyes harder; stuff gradually, shape carefully, and add small amounts of filler until the desired firmness is reached.
✗ Not counting stitches during increases and decreases leads to uneven shaping; count after each round and verify stitch totals match the pattern to keep correct shaping throughout the piece.