๐Ÿงถ Beautiful โœจ Detailed ๐Ÿ’ Adorable

Bunny in carrot Amigurumi Pattern

Bunny in carrot Amigurumi Pattern
4.0โ˜… Rating
2-4 Hours Time Needed
3.9K Made This
โœ‚๏ธ

Beginner Friendly Level

Perfect for those just starting their crochet journey, with clear instructions and simple techniques

โฑ๏ธ

Bite-Sized Project

Finishes in 2-4 hoursโ€”perfect for an afternoon of creative relaxation.

๐Ÿงธ

Cute Companion

An adorable friend to cherish, handcrafted with love to bring comfort and joy for years to come.

About This Bunny in carrot Amigurumi Pattern

This pattern teaches you to crochet a tiny yellow bunny and a soft plush carrot case to tuck it into. It uses cotton yarn for the bunny and plush chunky yarn for the carrot to create contrasting textures. The instructions are written in continuous spiral rounds and include clear shaping for the head, body, limbs, ears, muzzle, belly and tail.

Bunny in carrot Amigurumi Pattern crochet pattern - detailed view of completed project

You will find exact round-by-round instructions and assembly steps with placement tips for eyes, ears and facial embroidery. Suitable for crocheters comfortable with basic single crochet, increases and decreases.

Why You'll Love This Bunny in carrot Amigurumi Pattern

I absolutely love this pattern because it combines a cute character with a playful prop โ€” the carrot โ€” that becomes part of the toy. I enjoy the contrast between smooth cotton yarn for the bunny and plush yarn for the carrot, which gives a delightful tactile finish. The pattern is quick to make, which makes it perfect for a gift or a last-minute handmade surprise. I also love that the toy is small but full of personality, and it is easy to adapt colors and sizes to make a whole family of bunnies.

Bunny in carrot Amigurumi Pattern step 1 - construction progress Bunny in carrot Amigurumi Pattern step 2 - assembly progress Bunny in carrot Amigurumi Pattern step 3 - details and accessories Bunny in carrot Amigurumi Pattern step 4 - final assembly and finishing

Switch Things Up

I love how simple it is to customize this pattern โ€” you can change the bunny color to gray, pink, or mint for a whole new look.

If you want a tiny keychain version, use a thinner yarn and a smaller hook and add a keyring loop at the top of the head or carrot.

I often switch the plush carrot for regular worsted yarn to create a sleeker case rather than a fuzzy one, and it still looks charming.

Try embroidering different facial expressions; moving the eyes or mouth a stitch or two gives the bunny a completely different personality.

You can make the carrot larger by adding extra rounds before the buttonhole and increasing the length of the chain for round 16 to fit bigger bunnies.

For a baby-safe version, skip the safety eyes and embroider eyes with black yarn instead, and sew the button securely or replace it with a felt circle sewn around its edge.

I like to add little accessories like a tiny crocheted bow or scarf โ€” use leftover yarn scraps to knit up tiny extras.

To make a standing bunny, stuff the legs more firmly and position them slightly apart when sewing to the body so it can balance on a shelf.

Use contrast yarn for the muzzle and belly for a cuter, cartoon-like finish, and try different shades for the carrot top to match seasonal decor.

I sometimes create a family of bunnies by changing hook sizes and yarn weights โ€” they make lovely layered displays or gifts.

Common Mistakes & How to Fix Them

โœ— Not inserting safety eyes at the recommended stage can shift facial placement; insert safety eyes between rounds 8 and 9 with 5 stitches in between to get correct spacing before stuffing. โœ— Overstuffing head or body makes sewing and shaping difficult; stuff gradually and firmly but not overly tight, and make sure to leave enough yarn tail for secure sewing. โœ— Skipping stitch counts during increases/decreases causes uneven shaping; count your stitches at the end of each round and mark the start with a stitch marker. โœ— Not leaving long tails for sewing makes assembly fiddly; leave the specified long tail for sewing (about 15 cm) when fastening off pieces to make attachment easier.

Bunny in carrot Amigurumi Pattern

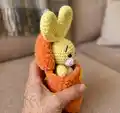
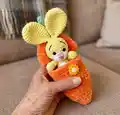
Make an adorable bunny tucked inside a plush carrot with this step-by-step crochet pattern. You will create a small, huggable amigurumi with clear rounds for head, body, limbs, and a cozy carrot case. The pattern includes assembly instructions, materials, and helpful tips so you can finish a charming handmade gift. Perfect for gifting or keeping as a cute seasonal decoration.

Beginner Friendly 2-4 Hours

Materials Needed for Bunny in carrot Amigurumi Pattern

โ€” Main Fabric

  • 01
    Cotton yarn - Premier Yarns Cotton Fair 290m (317 yds)/100g Yellow color 27-11 Lemon Drops - 20g
  • 02
    Cotton yarn - Premier Yarns Cotton Fair White color 27-01 White - 5g (for muzzle, belly, tail)
  • 03
    Plush yarn - Premier Yarns Parfait Chunky 120m (131 yds)/100g Orange color 1150-15 Tangerine - 20g (carrot body)
  • 04
    Plush yarn - Premier Yarns Parfait Chunky Green color 1150-49 Key Lime or 1150-06 Mint - 5g (carrot leaves)
  • 05
    Substitute cotton yarn - Yarnart Jeans 159m (174 yds)/50g Yellow color 67 - 20g, White 01 - 5g
  • 06
    Substitute plush yarn - Himalaya Dolphin Baby 120m (131 yds)/100g Orange color 80316 - 15g, Green color 80347 or 80350 - 5g

โ€” Tools Required

  • 01
    Crochet hook US size B/2 (2.5 mm) for bunny (head, body, limbs, details)
  • 02
    Crochet hook US size G/6 (4 mm) for carrot and plush parts
  • 03
    Black safety eyes 7-8 mm (or substitute with buttons or embroidered eyes)
  • 04
    Button for carrot 15-20 mm
  • 05
    Fiber fill stuffing
  • 06
    Tapestry needle for sewing pieces together
  • 07
    Scissors
  • 08
    Pink and brown cotton yarn for embroidery (nose and eyebrows)
  • 09
    Stitch markers (recommended)

Progress Tracker

0% Complete

โ€” Beginning :

Info :

All pieces are worked in a spiral continuously. This means that you do not end the rnd with a slip stitch and do not start a rnd with a chain.

Info :

I start working every piece from a magic ring but you can ch2 and work the necessary number of sc in the second st from the hook.

Info :

You should crochet tight enough to prevent stuffing from sticking out.

โ€” Head :

Round 1 :

6 sc in magic ring =6 sts

Round 2 (INC) :

(2 sc in next st)*6 times =12 sts

Round 3 (INC) :

(sc in next 1 st, 2 sc in next st)*6 times =18 sts

Round 4 (INC) :

(sc in next 2 sts, 2 sc in next st)*6 times =24 sts

Round 5 (INC) :

(sc in next 3 sts, 2 sc in next st)*6 times =30 sts

Round 6-10 :

sc in each st around =30 sts

Round 11 (DEC) :

(sc in next 3 sts, sc dec)*6 times =24 sts

Info :

If you use safety eyes insert them between rounds 8 and 9 with 5 sts in between.

Info :

Also stuff the head before making dec.

Round 12 (DEC) :

(sc in next 2 sts, sc dec)*6 times =18 sts

Round 13 (DEC) :

(sc in next st, sc dec)*6 times =12 sts

Round 14 :

Fasten off. Leave the long tail for sewing (about 15cm)

โ€” Muzzle :

Round 1 :

6 sc in magic ring =6 sts

Round 2 (INC) :

sc 2 in each st around =12 sts

Round 3 (INC) :

(sc in next st, 2 sc in next st)*6 times =18 sts

Round 4 :

sc in each st around =18 sts

Info :

Join with sl st and fasten off. Leave the long tail of the yarn for sewing.

โ€” Ear (Make 2) :

Round 1 :

6 sc in magic ring =6 sts

Round 2 (INC) :

2 sc in each st around =12 sts

Round 3 (INC) :

(2 sc in next 2 sts, sc in next 4 sts)*2 times =16 sts

Round 4 (INC) :

sc in next st, 2 sc in next 2 sts, sc in next 6 sts, 2 sc in next 2 sts, sc in next 5 sts =20 sts

Round 5-9 :

sc in each sts around =20 sts

Round 10 (DEC) :

(sc dec, sc in next 8 sts)*2 times =18 sts

Round 11 (DEC) :

(sc dec, sc in next 7 sts)*2 times =16 sts

Round 12 (DEC) :

(sc dec, sc in next 6 sts)*2 times =14 sts

Round 13 (DEC) :

(sc dec, sc in next 5 sts)*2 times =12 sts

Round 14 (DEC) :

(sc dec, sc in next 4 sts)*2 times =10 sts

Round 15 (DEC) :

(sc dec, sc in next 3 sts)*2 times =8 sts

Info :

Join with sl st and fasten off. Leave the long tail of the yarn for sewing.

Info :

Rep rnds 1-15 for the second ear.

โ€” Body :

Round 1 :

6 sc in magic ring =6 sts

Round 2 (INC) :

2 sc in each st around =12 sts

Round 3 (INC) :

(sc in next st, 2 sc in next st)*6 times =18 sts

Round 4 :

sc in each st around =18 sts

Round 5 (INC) :

(sc in next 2 sts, 2 sc in next st)*6 times =24 sts

Round 6-8 :

sc in each st around =24 sts

Round 9 (DEC) :

(sc in next 2 sts, sc dec)*6 times =18 sts

Info :

Stuff the body firmly.

Round 10 :

sc in each st around =18 sts

Round 11 (DEC) :

(sc in next st, sc dec)*6 times =12 sts

Info :

Join with sl st and fasten off.

โ€” Arm (Make 2) :

Round 1 :

6 sc in magic ring =6 sts

Round 2 (INC) :

(2 sc in next st, sc in next 2 st)*2 times =8 sts

Round 3 :

sc in each st around =8 sts

Round 4 (DEC) :

(sc dec in next st, sc in next 2 st)*2 times =6 sts

Round 5-8 :

sc in each st around =6 sts

Info :

Stuff the arm, do not stuff it too tight.

Info :

Fold arm in half and sc two sides together with sc 3.

Info :

Fasten off, cut yarn and weave in ends. One arm is done.

Info :

Complete these steps with the second arm. Leave long tail of the yarn for sewing.

โ€” Leg (Make 2) :

Round 1 :

6 sc in magic ring =6 sts

Round 2 (INC) :

2 sc in each st around =12 sts

Round 3 (INC) :

(2 sc in next st, sc in next 3 st)*3 times =15 sts

Round 4 (DEC) :

sc in next 2 st, (sc dec)*4 times, sc in next 5 st =11 sts

Round 5 (DEC) :

sc in next 2 st, (sc dec)*2 times, sc in next 5 sts =9 sts

Round 6-8 :

sc in each st around =9 sts

Info :

Stuff the leg. Do not stuff it very firmly.

Round 9 (DEC) :

(sc in next st, sc dec)*3 times =6 sts

Info :

Fold the leg in half and sc two sides together with sc 3.

Info :

Fasten off, cut yarn and weave in ends. One leg is done.

Info :

Complete these steps with the second leg. Leave long tail of the yarn for sewing.

โ€” Belly :

Row 1 :

With white yarn and hook B/2 (2.5 mm) make a ch6. sc in the second st from the hook, sc in the next 3 stitches, 3sc in the last stitch. Working on other side of your chain: sc in the next 3 stitches, 2sc in the last st = 12 sts

Row 2 :

2sc in the first stitch, sc in the next 3 stitches, 2 sc in the next 3 stitches, sc in the next 3 stitches, 2sc in the next 2 stitches = 18 sts

Info :

Join with sl st, I leave the long tail of the yarn for sewing.

โ€” Tail :

Round 1 :

6 sc in magic ring = 6 sts

Round 2 (INC) :

(sc in next st, 2 sc in next st)*3 times =9 sts

Info :

Join with sl st and fasten off. Leave the long tail of the yarn for sewing.

โ€” Bunny Assembly :

Item 1 (P1) :

If you use safety eyes, you must insert them when you crocheted the head or sew the eyes to the head between rounds 8 and 9 with 5 sts in between.

Item 2 (P1) :

Sew the head to the body (round 13 of the head to sts from round 11 of the body).

Item 3 (P1) :

!!! To head does not dangle, fill the body and neck strongly and sew twice.

Item 4 (P1) :

Sew arms to the body between 10 and 11 rounds of the body.

Item 5 (P1) :

Sew legs to the body between 3 and 4 rounds of the body.

Item 6 (P1) :

!!!Try to stick the needle in the same place that will help to keep limbs flexible.

Item 7 (P1) :

Sew the tail to the body between 2 and 5 rounds of the body.

Item 8 (P1) :

Sew the ears to the top of the head, make a couple of stitches to sew them together.

Item 9 (P1) :

Sew the muzzle between rounds 8 and 13 of the head. Stuff a little in sewing process.

Item 10 (P1) :

Embroider nose with pink yarn and eyebrows with brown yarn between rounds 4 and 8 with 3 sts between.

Item 11 (P1) :

Sew the belly between rounds 3 and 11 of the body.

โ€” Carrot :

Round 1 :

6 sc in magic ring = 6 sts

Round 2 :

sc in each st around = 6 sts

Round 3 (INC) :

2 sc in each st around = 12 sts

Round 4 :

sc in each st around = 12 sts

Round 5 (INC) :

(sc in next st, 2 sc in next st)*6 times =18 sts

Round 6 :

sc in each st around = 18 sts

Round 7 (INC) :

(sc in next 2 sts, 2 sc in next st)*6 times = 24 sts

Round 8-15 :

sc in each st around = 24 sts

Info :

Check that the width and height of the carrot are enough to fit the bunny!!!

Round 16 :

sc in next 6 sts, Ch 24 = 30 sts

Round 17 :

sc in next 6 sts, sc in next ch 9, skip ch 6 (buttonhole), sc in next ch 9 = 24 sts

Info :

VIDEO for ROUNDS 16-17 on my https://www.youtube.com/watch?v=wiTx8-QGNjI

Round 18-21 :

sc in each st around = 24 sts

Round 22 (DEC) :

(sc in next 2 sts, sc dec)*6 times =18 sts

Round 23 (DEC) :

(sc in next st, sc dec)*6 times =12 sts

Round 24 (DEC) :

sc dec*6 times =6 sts

Info :

Fasten off, cut yarn and weave in ends.

โ€” Carrot Leaves and Finishing :

Item :

With green plush yarn and hook G/6 (4 mm) make the leaves. Make sl st in the round 24 of the carrot, (ch 10, sl st in the same st)*repeat 3 times.

Info :

Fasten off, cut yarn and weave in ends.

Item :

Sew the button in the middle between rounds 13 and 14.

Assembly Instructions

  • If you use safety eyes, insert them before stuffing the head and position them between rounds 8 and 9 with 5 stitches between the eyes.
  • Sew the head to the body by aligning round 13 of the head with the stitches from round 11 of the body, and sew securely, reinforcing the neck so the head does not dangle.
  • Attach arms to the body between rounds 10 and 11 and sew firmly, positioning them slightly forward for a natural pose.
  • Sew legs to the body between rounds 3 and 4, inserting the needle in the same places on both legs to keep limbs flexible.
  • Sew the tail to the body between rounds 2 and 5, then sew the muzzle between rounds 8 and 13 of the head stuffing slightly while sewing for shape.

Important Notes

  • ๐Ÿ’กUse stitch markers to keep track of rounds and to mark the stitch where you begin each round for accurate shaping.
  • ๐Ÿ’กInsert safety eyes between rounds 8 and 9 with 5 stitches between them; secure the backs tightly or embroider the eyes if making for a small child.
  • ๐Ÿ’กStuff the head and body gradually and firmly for good shape but avoid overstuffing as it can distort stitches and make sewing difficult.
  • ๐Ÿ’กLeave long tails for sewing (about 15 cm) on pieces that will be attached to make assembly easier and neater.
  • ๐Ÿ’กWeave in ends and secure buttons and safety eyes firmly to ensure safety and durability.

This sweet Bunny in Carrot pattern makes a tiny keepsake toy that is perfect for gifting or decorating for spring and Easter. The mix of cotton and plush yarn gives the bunny a soft body and the carrot a cozy, tactile feel. Have fun personalizing colors and details โ€” each finished little bunny is a handmade delight. ๐Ÿงถ๐Ÿฐโœจ

You ask,

we answer.

FAQs

What size will the finished piece be?

The finished amigurumi measures approximately 4 in/10 cm high without ears and approximately 6 in/15 cm high with ears when using the recommended yarn and hook sizes.

Can I use different yarn weights for this pattern?

Yes โ€” you can substitute yarn weights, but the final size and texture will change; use appropriate hook sizes (B/2 2.5 mm for cotton, G/6 4 mm for plush) and adjust stuffing and stitch tension accordingly.

Do I need prior crochet experience for this pattern?

This pattern is beginner friendly but assumes you know basic crochet skillsโ€”magic ring, single crochet (sc), increases and decreasesโ€”so basic experience is helpful for best results.

How long does this project typically take to complete?

Most crocheters finish this bite-sized project in about 2-4 hours, depending on experience and how much time you spend on assembly and embroidery.