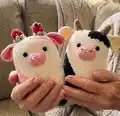
🧢 Beautiful ✨ Detailed πŸ’ Adorable

Cow Squishmallow Plushie Pattern

Cow Squishmallow Plushie Pattern
4.3β˜… Rating
5-7 Hours Time Needed
3.3K Made This
βœ‚οΈ

Intermediate Level

Ideal for those with basic crochet experience, featuring slightly more advanced stitches and techniques to expand your skills.

⏱️

Weekend Treat

Takes 5-7 hours, making it an enjoyable project to finish over a couple of days.

🧸

Cute Companion

An adorable friend to cherish, handcrafted with love to bring comfort and joy for years to come.

About This Cow Squishmallow Plushie Pattern

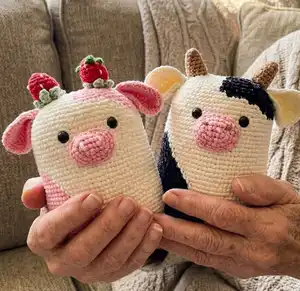
This pattern teaches you how to crochet a soft Cow Squishmallow-style plushie using chenille yarn. You'll make the head body, a raised nose, ears, tiny strawberries for decorative horns, and small horns. The instructions include complete round-by-round counts and tips for assembly to ensure a neat finish.

Cow Squishmallow Plushie Pattern crochet pattern - detailed view of completed project

Worked mostly in continuous rounds with simple increases and decreases, this pattern is ideal for intermediate crocheters. Photos show placement and finishing to help you assemble each piece.

Why You'll Love This Cow Squishmallow Plushie Pattern

I absolutely love this pattern because it transforms soft chenille yarn into a cuddly, huggable character that feels wonderful to hold. I enjoy the balance between simple shaping and small decorative pieces like strawberries and horns that let you personalize each plushie. The pattern gives clear round counts which makes it satisfying to watch the shape develop as you go. I particularly love how easy it is to change colors to create different cow patterns and personalities.

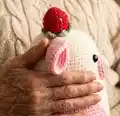
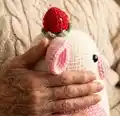
Cow Squishmallow Plushie Pattern step 1 - construction progress Cow Squishmallow Plushie Pattern step 2 - assembly progress Cow Squishmallow Plushie Pattern step 3 - details and accessories Cow Squishmallow Plushie Pattern step 4 - final assembly and finishing

Switch Things Up

I love customizing this pattern by changing the color blocking to create different cow personalities; swap the pink for gray, brown or pastel tones depending on the look you want.

I often make mini versions by using thinner yarn and a smaller hook to create keychain-friendly pals that are perfect as gifts.

For a chunkier cuddle friend, I use bulkier chenille and a larger hook to increase the finished size and squish factor.

I sometimes embroider little freckles or lashes on the face for added character using contrasting yarn and simple straight stitches.

If you want a poseable plush, try adding wire inside the horns or lightly inside the body to create small bends for display.

I also experiment with attaching felt clothing or tiny crocheted scarves to give each cow its own style and a seasonal vibe.

Try varying the strawberry size or color to make whimsical horn decorations β€” white speckles or sequins add a playful shine.

I recommend swapping safety eyes for embroidered eyes on toys intended for very young children for extra safety.

To make a matching set, alter color combos across several plushies and place them on a shelf as a colorful cluster of handmade friends.

When gifting, I like to include a tiny crocheted tag or sewn-in label to personalize the cow with a name or message.

Common Mistakes & How to Fix Them

βœ— Skipping stitch markers during continuous rounds leads to losing the start of round easily; use a marker at the first stitch of every round to stay oriented. βœ— Not stuffing gradually causes lumps or misshapen areas near decreases; add small amounts of filling while shaping to keep an even, smooth surface. βœ— Pulling chenille yarn too tight hides the stitch definition and makes seams difficult; maintain relaxed, consistent tension and allow stitches to sit naturally. βœ— Forgetting to leave a long yarn tail before fastening off makes sewing parts awkward and short; always leave a long tail when instructed to sew pieces together. βœ— Placing safety eyes without checking positioning can make the face look uneven; pin or mark eye placement and check symmetry before securing the eyes.

Cow Squishmallow Plushie Pattern

Create an irresistibly squishy cow plushie with this friendly crochet pattern. You will enjoy working with soft chenille yarn and clear step-by-step rounds to shape the head, nose, ears, strawberries and horns. The pattern uses simple amigurumi techniques and small sewn details to bring the character to life. Perfect to make as a gift or a cuddly keepsake.

Intermediate 5-7 Hours

Materials Needed for Cow Squishmallow Plushie Pattern

β€” Main Fabric

  • 01
    100g Soft Chenille yarn in white (main body)
  • 02
    100g Soft Chenille yarn in pink (color blocks and nose)
  • 03
    Small amount of red chenille yarn for strawberries (approx 10-20g)
  • 04
    Small amount of mint green chenille yarn for strawberry leaves (approx 5-10g)

β€” Tools Required

  • 01
    Crochet hook size 3.5mm
  • 02
    Stitch marker
  • 03
    Sewing needle (yarn needle)
  • 04
    Scissors
  • 05
    Cotton filling / polyester stuffing
  • 06
    Hot glue gun
  • 07
    Plastic safety eyes

Progress Tracker

0% Complete

β€” Head :

Info :

The pink text is the wool color

Round 1 :

10 Ch, 14 Ch hook on the 2nd stitch 13 SC, 9 SC, 3 SC in one st, 9 SC, 12 SC, INC (48)

Round 2 :

2 INC, 11 SC, 8 SC, 5 INC, 8 SC, 11 SC, 3 INC (58)

Round 3 :

(SC, INC) 2 times, 11 SC, 8 SC, (SC, INC) 5 times, 8 SC, 11 SC, (SC, INC) 3 times (68)

Round 4 :

17 SC, 31 SC, 20 SC(68)

Round 5 :

(2SC, INC) 2 times, 11 SC, 8 SC, (2SC, INC) 5 times, 8 SC, 11 SC, (2SC, INC) 3 times (78)

Round 6-7 :

19 SC, 36 SC, 23 SC(78)

Round 8 :

18 SC, 38 SC, 22 SC(78)

Round 9 :

17 SC, 40 SC, 21 SC(78)

Round 10 :

16 SC, 42 SC, 20 SC(78)

Round 11 :

15 SC, 44 SC, 19 SC(78)

Round 12 :

14 SC, 46 SC, 18 SC(78)

Round 13 :

13 SC, 48 SC, 17 SC(78)

Round 14 :

12 SC, 50 SC, 16 SC(78)

Round 15 :

11 SC, 52 SC, 15 SC(78)

Round 16 :

10 SC, 54 SC, 14 SC(78)

Round 17 :

9 SC, 56 SC, 13 SC(78)

Round 18 :

8 SC, 58 SC, 12 SC(78)

Round 19 :

7 SC, 60 SC, 11 SC(78)

Round 20 :

6 SC, 62 SC, 10 SC(78)

Round 21 :

5 SC, 64 SC, 9 SC(78)

Round 22 :

4 SC, 66 SC, 8 SC(78)

Round 23 :

3 SC, 75 SC(78)

Round 24-29 :

78 SC(78)

Info :

Cut the yarn, leaving a long tail for sewing

Round 30 :

30 SC, 13 SC, 35 SC(78)

Round 31 :

29 SC, 16 SC, 33 SC(78)

Round 32 :

27 SC, 19 SC, 31 SC(78)

Round 33 :

(11SC, DEC) 2 times, 11SC, DEC, 10 SC, SC, DEC, (11SC, DEC) 2 times (72)

Round 34 :

20 SC, 32 SC, 20 SC(72)

Round 35 :

(3SC, DEC) 3 times, 4 SC, 4 SC, (3SC, DEC) 6 times, SC, 3 SC, (3SC, DEC) 3 times (60)

Round 36 :

16 SC, 29 SC, 15 SC(60)

Round 37 :

2 SC, DEC, 12 SC, 10 SC, (2SC, DEC) 2 times, 11 SC, 13 SC, DEC (56)

Round 38 :

15 SC, 27 SC, 14 SC(56)

Round 39 :

(5SC, DEC) 2 times, SC, 4 SC, DEC, (5SC, DEC) 3 times, (5SC, DEC) 2 times (48)

Info :

*stuffing*

Round 40 :

(2 SC, DEC) 3 times, SC, SC, DEC, (2SC, DEC) 5 times, (2 SC, DEC) 3 times (36)

Round 41 :

(SC, DEC) 3 times, SC, DEC, (SC, DEC) 5 times, (SC, DEC) 3 times (24)

Info :

Cut the yarn, leaving a long tail for sewing

β€” Nose :

Round 1 :

6 Ch hook on the 2nd stitch 4 SC, W, 3 SC, INC (12)

Round 2 :

INC, 3 SC, 3 INC, 3 SC, 2 INC (18)

Round 3 :

SC, INC, 3 SC, (SC, INC) 3 times, 3 SC, (SC, INC) 2 times (24)

Round 4 :

2 SC, INC, 3 SC, (2 SC, INC) 3 times, 3 SC, (2 SC, INC) 2 times (30)

Info :

Cut the yarn, leaving a long tail for sewing.

β€” Ear (Make 2) :

Round 1 :

6 SCin a MR (6)

Round 2 :

INC 6 times (12)

Round 3 :

(SC, inc) 6 times (18)

Round 4 :

(2 SC, inc) 6 times (24)

Round 5 :

(3 SC, inc) 6 times (30)

Round 6 :

(4 SC, inc) 6 times (36)

Round 7 :

(5 SC, inc) 6 times (42)

β€” Strawberry (Make 2) :

Round 1 :

Row 1 (Red): 6 SCin a MR (6)

Round 2 :

(SC, inc) 3 times (9)

Round 3 :

(2 SC, inc) 3 times (12)

Round 4 :

(3 SC, inc) 3 times (15)

Round 5 :

(4 SC, inc) 3 times (18)

Round 6-7 :

18 SC(18)

Round 8 :

(SC, inc) 6 times (12)

Round 9 :

6 DEC (6)

Round 10 :

Row 10 (Mint) slst, 4 Ch hook on the 2nd stitch: slst, 2 SC(repeat 5 times)

β€” Horn (make 2) :

Round 1 :

6 Sc in a Mr (6)

Round 2 :

(Sc, Inc) 3 times (9)

Round 3 :

9 Sc (9)

Round 4 :

(2Sc, Inc) 3 times (12)

Round 5 :

12 Sc (12)

Round 6 :

(3Sc, Inc) 3 times (15)

Round 7 :

15 Sc (15)

Info :

*Stuffing*

β€” Assembly :

Item Name (P1) :

Sew the nose on the face and create the nostrils as shown in the photos.

Item Name (P2) :

Making sure the eyes are centred, insert or glue the plastic safety eyes into position.

Item Name (P3) :

Sew the two strawberries together to form the horn and then attach mint leaves to finish the decoration.

Item Name (P4) :

Sew 2 ears to almost 2 strawberries and secure horns to the head as pictured to complete the look.

Info :

Final checks: weave in ends and make sure all parts are sewn securely.

Assembly Instructions

  • Sew the nose on the face using the long tail left from the nose piece and embroider or stitch the nostrils to create depth and detail.
  • Place and secure the plastic safety eyes ensuring they are centred on the face; pin and check symmetry before fixing.
  • Sew the two strawberry halves together and attach mint leaf pieces to form the decorative horn cluster, then sew the cluster to the top of the head.
  • Attach each horn behind the strawberry cluster and sew 2 ears near the strawberries so the ears sit just below the horns for a balanced look.
  • Weave in all yarn ends, tuck extra stuffing as needed, and check that all pieces are fastened securely for child-safe finishing.

Important Notes

  • πŸ’‘Use a stitch marker to mark the first stitch of each round when working in continuous rounds to avoid losing the start position.
  • πŸ’‘Stuff gradually and evenly while shaping so you do not overstuff and distort the plushie's silhouette during decreases.
  • πŸ’‘Cut and leave a long tail when instructed so you have enough yarn to sew parts together neatly without frustration.
  • πŸ’‘Pin pieces in position before sewing to check placement and symmetry, especially eye and nose placement.
  • πŸ’‘Work with consistent tension throughout to ensure even stitches and a professional-looking finish.

This Cow Squishmallow pattern brings a soft, huggable friend to life with chenille yarn and playful details. Whether you make a pink cow or a classic spotted version, each finished plushie is full of charm and squish. Perfect for gifting, displaying, or collecting β€” each one is handmade with love and personality. πŸ§ΆπŸ„

You ask,

we answer.

FAQs

What size will the finished piece be?

The finished plushie measures approximately 18-22 cm tall depending on yarn tension and stuffing, when using the recommended chenille yarn and a 3.5mm hook.

Can I use different yarn weights for this pattern?

Yes, you can use different yarn weights but the final size and texture will vary; choose an appropriate hook size for the yarn you select and adjust stuffing accordingly.

Do I need prior crochet experience for this pattern?

This pattern is rated intermediate, so basic experience with single crochet, increases, decreases, and working in rounds is recommended.

How long does this project typically take to complete?

Most crocheters complete this project in 5-7 hours depending on experience, color changes, and assembly time.