🧢 Beautiful ✨ Detailed πŸ’ Adorable

Bunny Crochet Pattern #105 Amigurumi Pattern

Bunny Crochet Pattern #105 Amigurumi Pattern
4.5β˜… Rating
5-7 Hours Time Needed
2.9K Made This
βœ‚οΈ

Intermediate Level

Ideal for those with basic crochet experience, featuring slightly more advanced stitches and techniques to expand your skills.

⏱️

Weekend Treat

Takes 5-7 hours, making it an enjoyable project to finish over a couple of days.

🧸

Cute Companion

An adorable friend to cherish, handcrafted with love to bring comfort and joy for years to come.

About This Bunny Crochet Pattern #105 Amigurumi Pattern

This pattern teaches you how to crochet a charming sitting bunny approximately 20 cm tall using sport-weight yarn. You will work in continuous rounds to shape the head, body, arms, legs, ears and tail. Photo references and clear round-by-round instructions help you assemble and embroider the finished toy.

Bunny Crochet Pattern #105 Amigurumi Pattern crochet pattern - detailed view of completed project

The pattern uses simple increases and decreases, and recommends invisible decrease for neat shaping. It is ideal for makers who can work single crochet in the round and want a satisfying weekend project.

Why You'll Love This Bunny Crochet Pattern #105 Amigurumi Pattern

I absolutely love this pattern because it combines simple amigurumi shaping with a sweet, timeless design that finishes beautifully. I enjoy the process of working in rounds to shape each part and seeing the character emerge as you stuff and assemble. The open embroidery area for the face lets me add personality every time I make one. This pattern is versatile and forgiving, so I often make variations in color and size for gifts.

Bunny Crochet Pattern #105 Amigurumi Pattern step 1 - construction progress Bunny Crochet Pattern #105 Amigurumi Pattern step 2 - assembly progress Bunny Crochet Pattern #105 Amigurumi Pattern step 3 - details and accessories Bunny Crochet Pattern #105 Amigurumi Pattern step 4 - final assembly and finishing

Switch Things Up

I love how easy it is to customize this bunny β€” try changing the yarn color or using variegated yarn for a unique look.

I often make the same pattern with a thicker yarn and a larger hook to create a chunkier, more cuddly version.

If you want a tiny keychain version, use finer yarn and a much smaller hook to scale down the size while keeping the same stitch counts.

I sometimes add felt cheeks or tiny crocheted accessories like a bow or a scarf for personality and seasonal themes.

You can embroider different expressions to change the bunny's personality β€” experiment with eyebrow placement and eye shape for many looks.

I recommend trying invisible decrease for the neatest shaping on the head and body, especially if you plan to photograph your finished piece.

For posable limbs, add a thin wire inside the arms or legs before stuffing; bend carefully and secure the ends inside the stuffing.

I also like to use safety eyes for older children’s toys, but for baby-safe versions, embroider the eyes with black yarn as instructed.

To create a sibling set, make multiple bunnies in complementary colors and slightly vary the ear shape for each one.

Don't be afraid to experiment β€” a change of hook or yarn gives you endless versions and makes each bunny truly yours.

Common Mistakes & How to Fix Them

βœ— Skipping the stitch marker when working in continuous rounds leads to losing the round start; use a stitch marker and move it each round to always know your beginning. βœ— Stuffing too much early on makes shaping difficult and causes lumps; stuff gradually and add small amounts as you shape each piece for an even finish. βœ— Not counting stitches after increases or decreases causes mismatched shaping later; count your stitches at the end of each round, especially after shaping rounds. βœ— Closing rounds with a slip stitch when the pattern is written as continuous rounds will alter stitch alignment; follow the instruction to work in spirals and do not join unless the pattern explicitly says so.

Bunny Crochet Pattern #105 Amigurumi Pattern

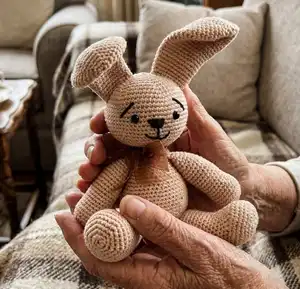
Make a sweet handmade bunny with this clear, photo-backed crochet pattern. You will create a cuddly 20 cm (8 in) sitting bunny using sport-weight yarn and basic amigurumi techniques. The pattern includes step-by-step rounds for head, body, arms, legs, ears and tail plus finishing and embroidery guidance so you can assemble a polished, gift-ready toy.

Intermediate 5-7 Hours

Materials Needed for Bunny Crochet Pattern #105 Amigurumi Pattern

β€” Main Fabric

  • 01
    Sport weight yarn (#2) 260-330m per 100g (approx. 240m/263 yds used for cream color)
  • 02
    Cream color yarn: approx. 240m (263 yds)
  • 03
    Black color yarn: approx. 1m (1.1 yds) for facial details
  • 04
    Pattern can be made with sport or worsted weight yarn (adjust hook and finished size accordingly)

β€” Tools Required

  • 01
    Crochet hook size 2.5 - 2.75mm (US size C)
  • 02
    Sewing needle / tapestry needle for sewing parts
  • 03
    Scissors
  • 04
    Polyester stuffing / fiberfill
  • 05
    Stitch markers (optional)
  • 06
    Pins for assembly (optional)
  • 07
    Textile marker for marking embroidery placement (optional)

Progress Tracker

0% Complete

β€” Head :

Info :

Cream color yarn: ch2

Rnd. 1 :

6sc in 2nd ch from hook; 6sts

Rnd. 2 :

inc 6 times; 12sts

Rnd. 3 :

(1sc, inc) 6 times; 18sts

Rnd. 4 :

(2sc, inc) 6 times; 24sts

Rnd. 5 :

(3sc, inc) 6 times; 30sts

Rnd. 6 :

(4sc, inc) 6 times; 36sts

Rnd. 7 :

(5sc, inc) 6 times; 42sts

Rnd. 8 :

(6sc, inc) 6 times; 48sts

Rnd. 9 :

(7sc, inc) 6 times; 54sts

Rnd. 10 :

(8sc, inc) 6 times; 60sts

Rnd. 11 :

(9sc, inc) 6 times; 66sts

Rnd. 12-20 :

sc around; 66sts

Rnd. 21 :

(sc2tog, 9sc) 6 times; 60sts

Rnd. 22 :

(sc2tog, 8sc) 6 times; 54sts

Rnd. 23 :

(sc2tog, 7sc) 6 times; 48sts

Rnd. 24 :

(sc2tog, 6sc) 6 times; 42sts

Rnd. 25 :

(sc2tog, 5sc) 6 times; 36sts

Rnd. 26 :

(sc2tog, 4sc) 6 times; 30sts

Rnd. 27 :

(sc2tog, 3sc) 6 times; 24sts

Rnd. 28 :

(sc2tog, 2sc) 6 times; 18sts

Info :

Finish. Stuff the head (Pic.1). Leave a long tail to sew the head to the body.

β€” Body :

Info :

Cream color yarn: ch2

Rnd. 1 :

6sc in 2nd ch from hook; 6sts

Rnd. 2 :

inc 6 times; 12sts

Rnd. 3 :

(1sc, inc) 6 times; 18sts

Rnd. 4 :

(2sc, inc) 6 times; 24sts

Rnd. 5 :

(3sc, inc) 6 times; 30sts

Rnd. 6 :

(4sc, inc) 6 times; 36sts

Rnd. 7-10 :

sc around; 36sts

Rnd. 11 :

sc2tog 10 times, 16sc; 26sts

Rnd. 12-13 :

sc around; 26sts

Rnd. 14 :

2sc, sc2tog 3 times, 18sc; 23sts

Rnd. 15 :

sc around; 23sts

Rnd. 16 :

1sc, sc2tog 3 times, 16sc; 20sts

Info :

Begin to stuff the body (Pic.2). Continue stuffing as you go so the body keeps its shape.

Rnd. 17-20 :

sc around; 20sts

Rnd. 21 :

(sc2tog, 8sc) 2 times; 18sts

Rnd. 22-23 :

sc around; 18sts

Rnd. 24 :

(sc2tog, 4sc) 3 times; 15sts

Rnd. 25 :

sc around; 15sts

Info :

Finish and leave long end to sew head to the body. Stuff the body (Pic.2).

β€” Arms (make 2) :

Info :

Cream color yarn: ch2

Rnd. 1 :

6sc in 2nd ch from hook; 6sts

Rnd. 2 :

inc 6 times; 12sts

Rnd. 3 :

(1sc, inc) 6 times; 18sts

Rnd. 4 :

(2sc, inc) 6 times; 24sts

Rnd. 5-9 :

sc around; 24sts

Rnd. 10 :

(sc2tog, 4sc) 4 times; 20sts

Rnd. 11-20 :

sc around; 20sts

Rnd. 21 :

(sc2tog, 3sc) 4 times; 16sts

Info :

Start to stuff the arm lightly and keep adding stuffing after every few rounds.

Rnd. 22 :

sc around; 16sts (Pic.3)

Rnd. 23 :

(sc2tog, 6sc) 2 times; 14sts

Rnd. 24 :

(sc2tog, 5sc) 2 times; 12sts

Rnd. 25 :

(sc2tog, 2sc) 3 times; 9sts

Info :

Finish, leave long end to sew arms to the body. (Pic.5)

β€” Legs (make 2) :

Info :

Cream color yarn: ch2

Rnd. 1 :

6sc in 2nd ch from hook; 6sts

Rnd. 2 :

inc 6 times; 12sts

Rnd. 3 :

(1sc, inc) 6 times; 18sts

Rnd. 4 :

(2sc, inc) 6 times; 24sts

Rnd. 5 :

(3sc, inc) 6 times; 30sts

Rnd. 6 :

(4sc, inc) 6 times; 36sts

Rnd. 7-10 :

sc around; 36sts

Rnd. 11 :

sc2tog 10 times, 16sc; 26sts

Rnd. 12-13 :

sc around; 26sts

Rnd. 14 :

2sc, sc2tog 3 times, 18sc; 23sts

Rnd. 15 :

sc around; 23sts

Rnd. 16 :

1sc, sc2tog 3 times, 16sc; 20sts (Pic.4)

Info :

Start to stuff the leg lightly and keep adding stuffing after every few rounds.

Rnd. 17-20 :

sc around; 20sts

Rnd. 21 :

(sc2tog, 8sc) 2 times; 18sts

Rnd. 22-23 :

sc around; 18sts

Rnd. 24 :

(sc2tog, 4sc) 3 times; 15sts

Rnd. 25 :

sc around; 15sts

Info :

Finish and leave long end to sew legs to the body. (Pic.5)

β€” Ears (make 2) :

Info :

Cream color yarn: ch2

Rnd. 1 :

6sc in 2nd ch from hook; 6sts

Rnd. 2 :

inc 6 times; 12sts

Rnd. 3 :

(1sc, inc) 6 times; 18sts

Rnd. 4 :

(2sc, inc) 6 times; 24sts

Rnd. 5 :

(3sc, inc) 6 times; 30sts

Rnd. 6 :

(4sc, inc) 6 times; 36sts

Rnd. 7-11 :

sc around; 36sts

Rnd. 12 :

(sc2tog, 4sc) 6 times; 30sts

Rnd. 13-15 :

sc around; 30sts

Rnd. 16 :

(sc2tog, 3sc) 6 times; 24sts

Rnd. 17-22 :

sc around; 24sts

Rnd. 23 :

(sc2tog, 4sc) 4 times; 20sts

Rnd. 24-27 :

sc around; 20sts

Info :

Finish and leave long end to sew ear onto the head. Do not stuff (Pic.6).

β€” Tail (make 1) :

Info :

Cream color yarn: ch2

Rnd. 1 :

6sc in 2nd ch from hook; 6sts

Rnd. 2 :

inc 6 times; 12sts

Rnd. 3 :

(1sc, inc) 6 times; 18sts

Rnd. 4-6 :

sc around; 18sts

Rnd. 7 :

(sc2tog, 1sc) 6 times; 12sts

Info :

Finish and leave long end to sew tail to the body. Stuff the tail (Pic.7).

β€” Finishing / Assembly :

Item :

1. Sew legs, arms and tail to the body.

Item :

2. Sew head to the body.

Item :

3. Sew ears onto the head.

Item :

4. Embroider eye, nose and mouth areas with black yarn (if you prefer, mark those areas with a textile marker before embroidering).

Assembly Instructions

  • Sew legs, arms and tail to the body, positioning the legs at the base of the body and the arms slightly above them; secure with a whipstitch and hide ends inside the body.
  • Attach the head to the body using the long tail left on the head; position it centered on the top opening, whipstitch securely and pull tight so the seam is neat.
  • Pin and sew ears onto the top sides of the head, spacing them evenly and shaping the ear fold before securing for a natural look.
  • Use black yarn to embroider the eyes, nose and mouth; mark positions with a textile marker first if you need precise placement, then use small satin stitches for a neat finish.

Important Notes

  • πŸ’‘Work in continuous rounds (spiral) and use a stitch marker to mark the beginning of each round to keep your stitch count accurate.
  • πŸ’‘Stuff parts gradually while shaping so you get an even, well-defined form β€” overstuffing can distort the piece.
  • πŸ’‘Leave long yarn tails when finishing pieces so you have enough to sew parts together securely and weave in ends neatly.

This adorable Bunny pattern is a sweet project that makes a thoughtful handmade gift and a lovely decoration. The pattern combines approachable amigurumi shaping with clear photos for easy assembly. Make one in classic or playful colors and enjoy personalizing the face and accessories. 🧢🐰

You ask,

we answer.

FAQs

What size will the finished piece be?

The finished bunny measures approximately 20 cm (8 inches) sitting when made with the recommended sport-weight yarn and a 2.5-2.75 mm hook.

Can I use different yarn weights for this pattern?

Yes, you can change yarn weight to alter the final size; use an appropriate hook for the yarn and note that stitch counts will remain the same but the finished dimensions will change.

Do I need prior crochet experience for this pattern?

This pattern is rated intermediate; you should be comfortable working single crochet in the round, increases and decreases, and basic sewing and embroidery for facial features.

How long does this project typically take to complete?

Most crocheters complete this project in 5-7 hours, though time may vary depending on experience level, assembly time and embroidery details.