🧢 Beautiful ✨ Detailed πŸ’ Adorable

Bunny Amigurumi Pattern

Bunny Amigurumi Pattern
4.1β˜… Rating
5-7 Hours Time Needed
2.5K Made This
βœ‚οΈ

Beginner Friendly Level

Perfect for those just starting their crochet journey, with clear instructions and simple techniques

⏱️

Weekend Treat

Takes 5-7 hours, making it an enjoyable project to finish over a couple of days.

🧸

Cute Companion

An adorable friend to cherish, handcrafted with love to bring comfort and joy for years to come.

About This Bunny Amigurumi Pattern

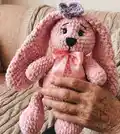
This pattern creates a plush velvet Bunny with floppy ears and soft paws using plush/velvet yarn. The instructions include step-by-step rounds for hind paws, front paws, ears and the body with clear photos to guide you. Techniques used are simple single crochet and half-double crochet in spirals with easy shaping.

Bunny Amigurumi Pattern crochet pattern - detailed view of completed project

Perfect for beginners who want a quick, satisfying amigurumi project. The finished bunny measures approximately 12 inches tall with long floppy ears.

Why You'll Love This Bunny Amigurumi Pattern

I absolutely love this pattern because it transforms simple plush yarn into an irresistibly soft companion that kids and adults will adore. The construction uses easy, repetitive rounds so I can relax while crocheting without second-guessing my stitches. I enjoy how the long ears and rounded paws give the bunny character with minimal effort. Sharing this pattern brings me joy because it encourages makers of all levels to create something beautiful and cuddly.

Bunny Amigurumi Pattern step 1 - construction progress Bunny Amigurumi Pattern step 2 - assembly progress Bunny Amigurumi Pattern step 3 - details and accessories Bunny Amigurumi Pattern step 4 - final assembly and finishing

Switch Things Up

I love how easy it is to customize this Bunny by changing yarn color or texture; try pastel shades for a baby-friendly look or bold tones for contrast.

To make a mini keychain version, switch to a thinner yarn and a smaller hookβ€”this will reduce the overall size dramatically.

I often add embroidered cheeks or a tiny bow to personalize each bunny; these small touches make every piece unique.

If you want a poseable bunny, try inserting thin wire into the limbs before stuffing for gentle shaping and posability.

Swap safety eyes for embroidered eyes if the toy is for a very young child to keep it fully soft and safe.

Try adding weighted beads to the bottom of the body for a more stable sitting toy if desired.

Make a set in varying sizes by changing yarn weight and hooks to create a family of bunnies with coordinated colors.

I also like to make clothes or tiny accessories like scarves using leftover yarn scraps to give the bunny extra charm.

Experiment with different ear shapesβ€”longer, shorter, or slightly curvedβ€”to change the expression and style of your bunny.

When making gifts, consider embroidering a small name or initial on the foot or ear for a sweet personalized detail.

Common Mistakes & How to Fix Them

βœ— Skipping the instruction to pull the working loop up to hook level when crocheting SC can leave visible holes; pull the working loop to the level of the hook for a seamless canvas. βœ— Not placing or moving the stitch marker at the start of each round can result in lost stitch counts; place the marker in the 1st stitch of a row and move it each round to keep track. βœ— Overstuffing the paws causes a lumpy, misshapen look; stuff gently and evenly, checking the shape as you go and using the same amount for matching parts. βœ— Crocheting too tightly with plush yarn will make the fabric stiff and hard to fold; maintain a relaxed tension and loosen your loop slightly when needed.

Bunny Amigurumi Pattern

Make a super-soft plush bunny using velvet yarn and easy amigurumi techniques. This pattern walks you through each paw, ear, and the body with clear photo-based steps so you can create a cuddly toy. Perfect for gifting or keeping as a handmade keepsake, the finished bunny has long floppy ears and a squishy body. Follow the detailed rounds and helpful tips to get a neat, hole-free finish.

Beginner Friendly 5-7 Hours

Materials Needed for Bunny Amigurumi Pattern

β€” Main Fabric

  • 01
    Plush / velvet yarn 130 yards (120 m) per 100 g - 2 skeins (main color required)
  • 02
    Example yarn used: Baby Love plush yarn, peach color (2 skeins)
  • 03
    Small amounts of embroidery yarn or thread for muzzle detailing

β€” Tools Required

  • 01
    Crochet hook size 4 mm
  • 02
    Crochet hook size 6 mm
  • 03
    Safety eyes 15 mm (2 pieces)
  • 04
    Soft stuffing / polyester fiberfill
  • 05
    Plastic needle with large eyelet
  • 06
    Stitch markers (3 pieces recommended)
  • 07
    Scissors
  • 08
    Yarn needle for sewing pieces together

Progress Tracker

0% Complete

β€” Materials and tools :

Info :

Any plush or velvet yarn 130 yards (120m)/100gr, 2 skeins. In my example, I used Baby Love plush yarn, peach color; 4 mm and 6 mm hooks; Safety eyes, 15 mm; Soft stuffing; Any yarn for embroidery of the muzzle; Plastic needle with large eyelet; Marker, 3 pieces; Scissors.

Info :

Gauge: 16 stitches and 13 rows = 4*4 inches (10*10 cm). Finished bunny from the specified materials: height - 12 inches (30 cm), length of the ears - 11 inches (27 cm).

β€” Abbreviations :

Infos :

MR - magic ring, CH - chain stitch, SlSt - slip stitch, SC - single crochet, HDC - half double crochet, DTR - double treble crochet, Inc - increase (2 SC/ 2 HDC in 1), Dec - decrease (2 SC/ 2 HDC together).

β€” Hind paws :

Info :

Take the 4 mm hook.

Round 1 :

Crochet 5 CH. From the 2nd loop from the hook 3 SC, 3 SC in 1, 2 SC, 1 Inc (=10).

Info :

Next crochet a spiral. Place the marker in the 1st SC of the row. Next rearrange the marker to the 1st SC of the each subsequent row.

Round 2 :

1 Inc, 2 SC, 3 Inc, 2 SC, 2 Inc (=16).

Info :

When crochet SC, pull the working loop to the level of the hook. Then the canvas will be without holes. Then tighten the loop on the hook back.

Round 3 :

1 SC, 1 Inc, 3 SC, 1 Inc, 3 SC, 1 Inc, 3 SC, 1 Inc, 2 SC (=20).

Round 4 :

1 SC, 1 Inc, (4 SC, 1 Inc)*3, 3 SC (=24).

Round 5-6 :

2 rows of 24 SC.

Round 7 :

6 SC, (1 Dec, 1 SC)*3, 1 Dec, 5 SC, 1 Dec (=19).

Round 8 :

4 SC, 4 Dec, 5 SC, 1 Dec (=14).

Round 9-14 :

6 rows of 14 SC.

Info :

Take some stuffing. Take the same amount for the second paw to ensure they are equally filled. Gently stuff the lower part of the paw. Fold in half.

Round 15 :

Crochet 6 SC on both part. Cut the thread, pull out the end.

Info :

Similarly crochet the 2nd paw.

β€” Front paws :

Info :

Take the 4 mm hook.

Round 1 :

Crochet 2 CH. 6 SC in the 2nd loop from the hook.

Info :

Next crochet a spiral.

Round 2 :

6 Inc (=12). Place the marker in the 1st SC of the row. Next rearrange the marker to the 1st SC of the each subsequent row.

Round 3 :

(5 SC, 1 Inc)*2 (=14).

Round 4-7 :

4 rows of 14 SC.

Round 8 :

10 SC, 2 Dec (=12).

Round 9-13 :

5 rows of 12 SC.

Info :

Take some stuffing. Take the same amount for the second paw to ensure they are equally filled. Gently stuff the lower 2/3 of the paw. Fold in half.

Round 14 :

Crochet 5 SC on both part. Cut the thread, pull out the end.

Info :

Similarly crochet the 2nd paw.

β€” Ears :

Info :

Take the 6 mm hook.

Round 1 :

Crochet 2 CH. 6 HDC in the 2nd loop from the hook.

Info :

Next crochet a spiral. Crochet the loops loosely to create a voluminous pattern.

Round 2 :

6 Inc (=12). Place the marker in the 1st HDC of the row. Next rearrange the marker to the 1st HDC of the each subsequent row.

Round 3 :

(1 HDC, 1 Inc)*6 (=18).

Round 4-8 :

5 rows of 18 HDC.

Round 9 :

(4 HDC, 1 Dec)*3 (=15).

Round 10-12 :

3 rows of 15 HDC.

Round 13 :

(3 HDC, 1 Dec)*3 (=12).

Round 14-16 :

3 rows of 12 HDC.

Round 17 :

(4 HDC, 1 Dec)*2 (=10).

Round 18 :

10 HDC.

Round 19 :

(3 HDC, 1 Dec)*2 (=8).

Round 20-22 :

3 rows of 8 HDC.

Info :

Fold in half. Crochet 4 SlSt on both part. Cut the thread, pull out the end.

Info :

Similarly crochet the 2nd ear.

β€” Body :

Info :

Take the 4 mm hook.

Round 1 :

Crochet 2 CH. 6 SC in the 2nd loop from the hook.

Info :

Next crochet a spiral.

Round 2 :

6 Inc (=12). Place the marker in the 1st SC of the row. Next rearrange the marker to the 1st SC of the each subsequent row.

Round 3 :

12 Inc (=24).

Round 4 :

(3 SC, 1 Inc)*6 (=30).

Assembly Instructions

  • Fold and stuff the lower part of each paw evenly, then sew the open edge with slip stitches or mattress stitch to close securely before attaching to the body.
  • Attach front paws to the lower sides of the body, aligning them evenly and sewing through the rounds so they sit neatly on either side.
  • Position and sew the hind paws to the bottom back of the body so the bunny can sit stably, using hidden stitches to secure them firmly.
  • Pin the ears to the top of the head spaced evenly, then sew them with small stitches so they sit naturally and securely.
  • Place safety eyes between the specified rounds on the head (use markers to ensure even spacing), secure with washers, then embroider the muzzle.

Important Notes

  • πŸ’‘Use stitch markers to keep track of the first stitch of each round, especially when working in a spiral to avoid losing your place.
  • πŸ’‘Pull the working loop up to the level of the hook when crocheting single crochet with plush yarn to prevent holes in the fabric.
  • πŸ’‘Stuff gradually and evenly; overstuffing can distort shapes and under-stuffing can make pieces floppy, so match stuffing amounts for symmetric parts.
  • πŸ’‘Work with consistent tension and crochet the loops slightly looser for the ears to create a voluminous textured surface.

This adorable Bunny pattern is designed for cozy, tactile plush results using velvet yarn. It includes clear rounds for paws, ears, and body with photo guidance and shaping tips. Make it for nurseries, gifts, or to brighten a mantelβ€”each handmade bunny is a tiny bundle of joy. 🧢🐰

You ask,

we answer.

FAQs

What size will the finished piece be?

The finished amigurumi measures approximately 12 inches (30 cm) tall when using the recommended plush yarn and the 4 mm and 6 mm hook sizes.

Can I use different yarn weights for this pattern?

Yes, you can use different yarn weights but this will affect the final size and texture; switch hook sizes appropriately and expect a different finished scale.

Do I need prior crochet experience for this pattern?

This pattern is beginner friendly, so basic knowledge of chain, single crochet, half double crochet, increases and decreases is helpful to follow the rounds easily.

How long does this project typically take to complete?

Most crocheters complete this project in 5-7 hours, depending on experience, assembly time, and embellishments.