🧢 Beautiful ✨ Detailed πŸ’ Adorable

Bumble Blossom Amigurumi Pattern

Bumble Blossom Amigurumi Pattern
4.6β˜… Rating
5-7 Hours Time Needed
1.6K Made This
βœ‚οΈ

Intermediate Level

Ideal for those with basic crochet experience, featuring slightly more advanced stitches and techniques to expand your skills.

⏱️

Weekend Treat

Takes 5-7 hours, making it an enjoyable project to finish over a couple of days.

🎁

Tiny Treasure

Small, sweet, and gift-worthy creations that fit perfectly in the palm of your hand with detailed charm.

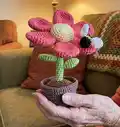
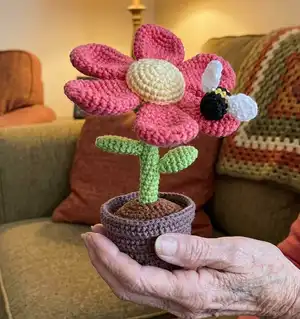
About This Bumble Blossom Amigurumi Pattern

This pattern teaches you how to crochet a potted flower with six petals, a sturdy stem, leaves, soil insert and a tiny bumblebee. It uses sport weight yarn and small hookwork to create well-defined shapes and neat details. The instructions include round-by-round directions and helpful assembly photos so you can sew each piece together cleanly.

Bumble Blossom Amigurumi Pattern crochet pattern - detailed view of completed project

Perfect for makers who enjoy small amigurumi projects and creative finishing touches. Details like BLO rounds and picot sepals add texture and character.

Why You'll Love This Bumble Blossom Amigurumi Pattern

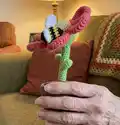
I absolutely love this pattern because it combines simple amigurumi techniques into a charming decorative piece you can display anywhere. I enjoy how the petals and center come together to create a sculptural flower, and the optional wire in the stem gives it a satisfying poseability. The little bumblebee is a fun finishing touch that brings the whole design to life. Every part is small and quick to make, so I get the joy of finishing a complete project in a weekend.

Bumble Blossom Amigurumi Pattern step 1 - construction progress Bumble Blossom Amigurumi Pattern step 2 - assembly progress Bumble Blossom Amigurumi Pattern step 3 - details and accessories Bumble Blossom Amigurumi Pattern step 4 - final assembly and finishing

Switch Things Up

I love how easy it is to change colors and create an entirely different mood; swap the pink petals for pastels or bold jewel tones to match your decor.

You can scale the whole design by changing yarn weight and hook size: use bulky yarn and a larger hook for a chunky statement piece or fine yarn for a delicate mini.

I often add embroidered details to the petal edges or the center for extra texture β€” try chain-stitched veins or a small French knot border.

For a poseable version, insert a length of florist wire down the center of the stem before stuffing and bend to give the flower character.

To make a set, crochet several flowers in different colors and place them in matching pots for a lovely handmade bouquet.

Swap the cardboard base for a small wooden disk or felt circle to create a different look and extra durability for the pot bottom.

Try adding beads or tiny buttons to the center for a whimsical focal point instead of the plain yellow center.

Make the bumblebee detachable by sewing it to a small snap or by leaving a long tail to tie it on and off for playability.

Use variegated yarn for the petals to get a marbled look without changing colors as you work the rounds.

I also like to embellish the pot with surface slip stitches or a contrasting rim color to coordinate with the petals and create a polished finish.

Common Mistakes & How to Fix Them

βœ— Skipping stitch markers during long straight rounds causes lost stitch counts; place a marker every 10-20 stitches or at round starts to stay accurate. βœ— Not stuffing the stem firmly enough results in a floppy flower; add stuffing gradually and firmly as you work and consider inserting optional wire for support. βœ— Changing colors without securing ends neatly leads to loose tails; weave in or secure color joins before continuing for a clean finish. βœ— Forgetting to cut cardboard for the pot base makes the piece unstable; cut and insert a circle of cardboard before finishing the pot for added stability.

Bumble Blossom Amigurumi Pattern

Create a cheerful crocheted potted flower complete with petals, a stem, leaves, a soil insert and a tiny bumblebee. This pattern gives you clear, photographed steps and full round-by-round instructions so you can stitch a lovable handmade gift. Perfect for gifting or brightening a windowsill, the finished piece stands about 12 cm tall and is full of charming details.

Intermediate 5-7 Hours

Materials Needed for Bumble Blossom Amigurumi Pattern

β€” Main Fabric

  • 01
    Sport weight yarn (Schachenmayr Catania), Kamelie 00252 - pink (main petals) ~30g
  • 02
    Sport weight yarn (Schachenmayr Catania), Honig 00206 - light yellow (flower center) ~15g
  • 03
    Sport weight yarn (Schachenmayr Catania), Greenery 00418 - green (stem, leaves, sepal) ~20g
  • 04
    Sport weight yarn (Schachenmayr Catania), Teddy 00161 - light brown (pot interior/top/soil) ~30g
  • 05
    Sport weight yarn (Schachenmayr Catania), Marone 00157 - brown (dirt and pot trim) ~20g
  • 06
    Sport weight yarn (Schachenmayr Catania), Sonne 00208 - yellow (bumblebee stripes) ~10g
  • 07
    Sport weight yarn (Schachenmayr Catania), Schwarz 00110 - black (bumblebee body) ~5g
  • 08
    Sport weight yarn (Schachenmayr Catania), Weiss 00106 - white (bumblebee wings) ~5g

β€” Tools Required

  • 01
    Crochet hook size 2.0mm
  • 02
    Sewing needle
  • 03
    Stitch marker
  • 04
    Scissors
  • 05
    Yarn needle for sewing and weaving ends
  • 06
    Polyester stuffing material
  • 07
    Cardboard for the pot base
  • 08
    Optional wire for the stem (for reinforcement and posability)

Progress Tracker

0% Complete

β€” Petals (Make 6) :

Round 1 :

6 sc in mr (6)

Round 2 :

6 inc (12)

Round 3 :

(1 sc, 1 inc) x 6 (18)

Round 4 :

(2 sc, 1 inc) x 6 (24)

Round 5-7 :

24 sc (24) (3 rounds)

Round 8 :

(2 sc, 1 dec) x 6 (18)

Round 9-11 :

18 sc (18) (3 rounds)

Round 12 :

(1 sc, 1 dec) x 6 (12)

Round 13 :

12 sc (12)

Info :

Cut the yarn and fasten off, leaving a long tail for sewing. Do not add stuffing.

β€” Stem (Make 1) :

Round 1 :

8 sc in mr (8)

Round 2-30 :

8 sc (8) (29 rounds)

Info :

Add stuffing material to the stem as you go along. It is important to stuff the stem very firmly to make sure the finished project stands up. Adding wire is encouraged to help the flower stand up, especially if your stitches tend to be looser.

Round 31 :

BLO (1 sc, 1 inc) x 4 (12)

Round 32 :

12 inc (24)

Round 33 :

(3 sc, 1 inc) x 6 (30)

Round 34 :

(9 sc, 1 inc) x 3 (33)

Round 35 :

33 sc (33)

Info :

Cut the yarn and fasten off invisibly.

β€” Sepal :

Info :

Add the sepal to the stem. Holding the flower with the stem facing up, insert the hook into the last stitch of the remaining loops of round 31 and attach green yarn (pic 1). ch 4, 3-ch picot, ch 1, slst into the next loop in the row (pics 2-3). Repeat 7 more times in the remaining loops for a total of 8 sepal (pic 4). Cut yarn and fasten off invisibly.

β€” Flower Center (Make 1) :

Round 1 :

6 sc in mr (6)

Round 2 :

6 inc (12)

Round 3 :

(1 sc, 1 inc) x 6 (18)

Round 4 :

(2 sc, 1 inc) x 6 (24)

Round 5 :

(3 sc, 1 inc) x 6 (30)

Round 6 :

(9 sc, 1 inc) x 3 (33)

Round 7-8 :

33 sc (33) (2 rounds)

Info :

Cut the yarn and fasten off, leaving a long tail for sewing.

β€” Leaves (Make 2) :

Round 1 :

5 sc in mr (5)

Round 2 :

(1 sc, 1 inc) x 2, 1 sc (7)

Round 3 :

(2 sc, 1 inc) x 2, 1 sc (9)

Round 4 :

(2 sc, 1 inc) x 3 (12)

Round 5-7 :

12 sc (12) (3 rounds)

Round 8 :

(2 sc, 1 dec) x 3 (9)

Round 9 :

(1 sc, 1 dec) x 3 (6)

Info :

Cut the yarn and fasten off, leaving a long tail for sewing. Do not add stuffing.

β€” Pot (Make 1) :

Round 1 :

6 sc in mr (6)

Round 2 :

6 inc (12)

Round 3 :

(1 sc, 1 inc) x 6 (18)

Round 4 :

(2 sc, 1 inc) x 6 (24)

Round 5 :

(3 sc, 1 inc) x 6 (30)

Round 6 :

(4 sc, 1 inc) x 6 (36)

Round 7 :

(5 sc, 1 inc) x 6 (42)

Round 8 :

BLO 42 sc (42)

Round 9-11 :

42 sc (42) (3 rounds)

Round 12 :

(13 sc, 1 inc) x 3 (45)

Round 13-15 :

45 sc (45) (3 rounds)

Round 16 :

(14 sc, 1 inc) x 3 (48)

Round 17-19 :

48 sc (48) (3 rounds)

Round 20 :

FLO (7 dc, 1 dcinc) x 6 (54)

Round 21 :

54 sc (54)

Info :

Cut the yarn and fasten off invisibly.

β€” Dirt (Make 1) :

Round 1 :

6 sc in mr (6)

Round 2 :

6 inc (12)

Round 3-14 :

12 sc (12) (12 rounds)

Info :

Cut the yarn and fasten off invisibly.

Info :

Begin to crochet the top of the dirt. Holding the hole with the opening facing up, insert the hook from the inside of the hole going out (pic 5). Re-attach the yarn and continue to crochet the dirt top (pics 6-7).

Round 15 :

(1 sc, 1 inc) x 6 (18)

Round 16 :

(2 sc, 1 inc) x 6 (24)

Round 17 :

(3 sc, 1 inc) x 6 (30)

Round 18 :

(4 sc, 1 inc) x 6 (36)

Round 19 :

(5 sc, 1 inc) x 6 (42)

Round 20 :

(6 sc, 1 inc) x 6 (48)

Info :

Cut the yarn and fasten off, leaving a long tail for sewing.

β€” Bumblebee Wing (Make 2) :

Info :

Using white yarn, ch 4. Starting in the 2nd chain from the hook and working into both sides of the chain.

Round 1 :

1 sc, 1 hdc, 5 dc in the same stitch, 1 hdc, 1 sc (9)

Info :

Cut the yarn and fasten off, leaving a long tail for sewing.

β€” Bumblebee Body (Make 1) :

Round 1 :

6 sc in mr (6)

Round 2 :

6 inc (12)

Round 3 :

12 sc (12)

Info :

Switch to yellow yarn.

Round 4-5 :

12 sc (12) (2 rounds)

Info :

Switch to black yarn.

Round 6-7 :

12 sc (12) (2 rounds)

Info :

Begin to add stuffing material, adding more as you go along if needed.

Info :

Switch to yellow yarn.

Round 8 :

6 dec (6)

Info :

Cut the yarn and use the yarn tail to close the remaining stitches.

β€” Assembly :

Info :

Begin to assemble the flower by attaching the stem to the center piece. Place the center piece on the stem and sew the pieces together using the yarn tail of the center piece (pics 8-9). Add stuffing before sewing the last remaining stitches closed (pics 10-11).

Info :

Attach the petals by sewing along the rounds where the stem and center piece were connected (pic 12). The petals will fit closely next to one another when attached, with very little space between one another (pic 13).

Info :

Position the leaves on either side of the stem and sew in place using the long yarn tails (pic 14).

Info :

Before assembling the pot, cut out a piece of cardboard and add to the bottom of the pot for added stability (pic 15).

Info :

Attach the dirt to the pot by sewing into the remaining loops of round 20 of the pot (pics 16-18). Add stuffing before sewing the last remaining loops closed (pic 19).

Info :

Take your time adding the stuffing and make sure the hole is centered in the pot. This will help the flower stand up without falling over.

Info :

Sew the wings to the bumblebee body between rounds 4 and 5 of the body using the long yarn tails. Attach the bumblebee to a petal or place as desired (pic 20).

Assembly Instructions

  • Attach the center piece to the stem by placing the center piece on the stem and sewing with the center piece yarn tail, adding stuffing before closing the last stitches.
  • Sew each petal to the rounds where the stem and center piece connect so petals sit closely together with minimal gaps.
  • Position the two leaves on opposite sides of the stem and sew in place using the long yarn tails left from the leaves.
  • Cut a circle of cardboard to fit the pot bottom for stability, then sew the dirt piece into the remaining loops of round 20 of the pot and add stuffing before closing.
  • Sew the bumblebee wings to the bumblebee body between rounds 4 and 5, then close and secure the body and attach the bumblebee to a petal or position on the flower as desired.

Important Notes

  • πŸ’‘As with all amigurumi patterns, stitches should be worked tightly to achieve the desired shape.
  • πŸ’‘Each round is worked in a spiral and does not need to be joined unless otherwise specified.
  • πŸ’‘The stem may be reinforced by adding wire; this is especially encouraged if your stitches tend to be looser.
  • πŸ’‘Make sure to insert your hook correctly when re-attaching yarn for parts like the dirt top so the wrong side of stitches sits on the bottom as pictured.
  • πŸ’‘Pattern is written in US terms.

This adorable Bumble Blossom pattern brings a touch of handmade joy to any windowsill or gift box. The little bumblebee and sculpted petals make a delightful display piece you can finish in a weekend. Use optional wire in the stem for a poseable flower and add a cardboard base to the pot for stability. 🧢🌸

You ask,

we answer.

FAQs

What size will the finished piece be?

The finished project will be approximately 12 cm tall by 8.5 cm wide when using the recommended sport weight yarn and a 2.0 mm hook.

Can I make the flower larger or smaller?

Yes, changing yarn weight and hook size will change the finished dimensions; use bulkier yarn and a larger hook for a chunkier version or thinner yarn and smaller hook for a mini version.

Do I need to add wire to the stem?

Adding wire is optional but recommended if your stitches are loose or you want to pose the stem; insert wire before final stuffing and secure inside the stem.

Is this pattern suitable for beginners?

This pattern is rated intermediate because it includes shaping, BLO/FLO rounds and small parts; basic amigurumi experience is helpful for best results.

How do I make the dirt sit firmly in the pot?

Cut a piece of cardboard to fit the pot base and sew the dirt piece into the pot loops, adding stuffing and centering the hole so the stem stands upright.