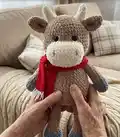
About This Bull Amigurumi Pattern
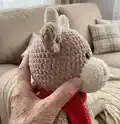
This pattern teaches you how to crochet an adorable bull amigurumi using plush Alize Softy yarn. It includes full instructions for head, body, muzzle, horns, ears, arms, legs and tail with clear row-by-row guidance. Photos show placement and assembly to help you finish a neat handmade toy.

Worked in spiral rounds with details crocheted in two strands as noted, the toy measures about 39 cm tall when finished. The pattern includes yarn colors, tools list, and helpful assembly tips.
Why You'll Love This Bull Amigurumi Pattern
I absolutely love this pattern because the plush yarn gives the bull an irresistibly soft texture that children and adults both adore. I enjoy how simple shaping creates a charming, rounded body and expressive muzzle with minimal pieces. Sewing the parts together is satisfying and the clear photos helped me place details accurately every time. I also appreciate that this design is adaptable—change colors or yarn weight to make a custom-sized friend.
Switch Things Up
I love how easy it is to customize this bull by changing yarn colors and textures; try pastel shades for a nursery-friendly friend or high-contrast colors for a playful look.
To make the bull smaller or larger, change the yarn weight and hook size—use thicker yarn with a larger hook for a chunky toy or thinner yarn for a mini version.
I often swap the safety eyes for embroidered eyes on toys for younger children to make them fully soft and washable.
For a posable version I add a short piece of craft wire inside each limb before stuffing and closing; this lets me pose arms and tail slightly.
Try different muzzle shapes by adjusting the count or rounds when making the cream muzzle to create a more rounded or elongated snout.
Add small crocheted accessories like scarves, hats, or a tiny bell around the neck to give personality and seasonal flair.
Experiment with surface embroidery on the cheeks or hooves to create spots, lashes, or tiny hoof details for a handcrafted finish.
If you want a sleeker look, work the head and body in a smooth cotton or acrylic yarn rather than plush, and reduce stuffing slightly for firmer shaping.
I sometimes use a different color for the inner ear to add contrast and visual interest; try a pale pink or cream against the beige outer ear.
Don’t be afraid to combine yarn types—use plush yarn for the body and a smooth yarn for smaller details like horns or muzzle to highlight textures and details.
Common Mistakes & How to Fix Them
✗ Not marking the beginning of each round causes you to lose track of rounds and increases; use a stitch marker or contrast thread at the start of every spiral round to stay oriented.
✗ Stuffing too early or too much leads to a distorted shape and lumpy sections; stuff gradually while crocheting and add filling in small amounts to maintain smooth contours.
✗ Skipping counting stitches after increases or decreases results in incorrect stitch counts and mismatched shaping; count your stitches each round, especially after any shaping rows.
✗ Forgetting to leave long sewing tails prevents easy assembly later; always leave a long thread at the end of pieces you will sew to other parts.
✗ Placing safety eyes without checking placement makes facial features uneven; pin or hold the muzzle and eyes in place before securing to ensure correct spacing and symmetry.
✗ Changing yarn color inaccurately causes visible joins or gaps at the color transition; switch color on the last loop of the stitch before the new color row and weave in ends neatly.