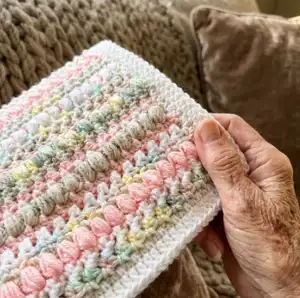
Make a soft, boho-inspired baby blanket with this easy-to-follow crochet pattern. Youll work four stitches in a repeated 20-row sequence for a textured, colorful finish. The pattern uses medium-weight yarn and a simple border to create a sweet 36" x 40" blanket thats perfect for gifting or snuggling. Follow the step-by-step rows and photo tips to get even, professional-looking results.
Progress Tracker
0% Complete
— Instructions :
Start :
Chain 124 with Off-White (OW), or any even number
Row 1 :
Moss Stitch; With OW, 1 SC into the 4th chain from the hook. Skip (SK) the next chain and CH 1. SC into the next chain. Repeat until the end of the row. Finish with a SC into the last chain and pull through with Baby Pink (BP). CH 2 and turn.
Row 2 :
Moss Stitch; With BP, SK the first SC. *1 SC into CH space of the previous row, SK the next SC and CH 1. Repeat * until the end of the row. Finish with a SC into the chain space (AFTER THE LAST SC) and pull through with White (W). CH 2 and turn.
Row 3 :
Puff Stitch; With W, SK the first SC. *PS into the chain space, SK the next SC and CH 1. Repeat * until the end of the row. Finish your row with a PS into the chain space and pull through with Baby Rainbow (BR). CH 2 and turn.
Row 4 :
Alt. SC and DC; With BR, *SC into the top of the first PS. DC into the chain space. Repeat * until the end of the row. Finish with a DC into the chain space (AFTER THE LAST PS) and pull through with OW. CH 2 and turn.
Row 5 :
2 HDC; With OW, 2 HDC into the first SC of the previous row. *SK the DC. Stitch two HDC into the next SC. Repeat * until the end of the row. Finish with 2 HDC in the last SC and pull through with BP. CH 2 and turn.
Row 6 :
Moss Stitch; With BP, *SC into the space between the HDC pairs, SK 2 HDC, CH 1. Repeat * until the end of the row. Finish with a SC into the chain space (AFTER YOUR LAST HDC PAIR) and pull through with W. CH 2 and turn.
Row 7 :
Moss Stitch with W
Row 8 :
Puff Stitch with BR
Row 9 :
Alt. SC and DC with OW
Row 11 :
Moss Stitch with W
Row 12 :
Moss Stitch with BR
Row 13 :
Puff Stitch with OW
Row 14 :
Alt. SC and DC with BP
Row 16 :
Moss Stitch with BR
Row 17 :
Moss Stitch with OW
Row 18 :
Puff Stitch with BP
Row 19 :
Alt. SC and DC with W
Info :
Repeat Rows 1-20 5 times, or until desired length.
Border :
Weave in any loose ends.
Round 1 :
Pull up a loop of White in any corner. CH 2 and SC into that same space. SC around the blanket. SC in each stitch on top and bottom, 1-2 stitches in each row on the sides (Work as evenly as you can!) and 3 SC into each corner space. At the end of the round, SL ST into the top first stitch of the round. CH 2.
Round 2 :
In same direction, stitch 1 DC into each SC of previous round. stitch 3 DC into each corner stitch. At the end of the round, SL ST into the top of the first DC. Tie off and weave all ends.
— Detailed Instructions :
Start :
Chain 124 with Off-White (OW), or any even number
Row 1 :
MOSS STITCH With OW, 1 SC into the 4th chain from the hook (A). Skip (SK) the next chain and CH 1. SC into the next chain (B). Repeat until the end of the row. Your last stitch of the row will be a SC (C). CHANGING COLORS: For your last SC, insert your hook into the last chain, YO with OW, pull up a loop. Pick up a strand of Baby Pink (BP), YO with BP and pull through the two OW loops on your hook (C). Chain 2 and turn.
Row 2 :
MOSS STITCH With BP, SK the first SC (A). 1 SC into chain space from the previous row. SK the next SC and CH 1. SC into the next chain space (A). Repeat until the end of the row. Your last stitch of the row will be a SC into the chain space of the previous row. CHANGING COLORS: During your last SC, insert your hook, YO with BP. Pick up a strand of White (W), YO with W and pull through the two BP loops on your hook. Chain 2 and turn.
Row 3 :
PUFF STITCH (PS) With W, SK the first SC. PS into the chain space. SK the next SC and CH 1. Repeat until the end of the row. Your last stitch of the row will be a PS into the chain space (AFTER THE LAST SC) of the previous row (A). Reminder: PS: YO, insert your hook, YO, pull up a loop. Repeat 3 times. Pull through all loops. CHANGING COLORS: During your last PS with W but before you pull through all the loops on your hook, YO with Baby Rainbow (BR), then pull through (B). Chain 2 and turn.
Row 4 :
ALTERNATING SC AND DC With BR, SC into the top of the first puff stitch (This stitch will be BR colored, because you finished off the last puff stitch with it; A). DC into the chain space between the first and second PS (B). Repeat until the end of the row. Your last stitch of the row will be a DC into the chain space of the previous row (AFTER THE LAST PS; C). CHANGING COLORS: For your last DC, YO with BR, insert your hook, YO with BR, pull up a loop. YO with BR, pull through two loops. YO with OW, pull through the two BR loops on your hook (C). Chain 2 and turn.
Row 5 :
2 HDC With OW, stitch two HDC into the first SC of the previous row (A). SK the DC. Stitch two HDC into the next SC of the previous row. Repeat until the end of the row (B). Your last stitches of the row will be two HDC into the last SC of the previous row (C). Tip: Look for the “V” shape of the single crochet, insert your hook there. CHANGING COLORS: For your last HDC, YO with OW, insert your hook, YO with OW, pull up a loop. YO with BP, pull through all three loops (D). Chain 2 and turn.
Row 6 :
MOSS STITCH With BP, 1 SC into the space between your first pair of HDCs and your second pair of HDC of the previous row. CH 1. Repeat until the end of the row (A). Your last stitch of the row will be a SC into the chain space of the previous row (AFTER YOUR LAST PAIR OF HDCs; B). CHANGING COLORS: During your last SC, insert your hook, YO with BP. Pick up a strand of W, YO with W and pull through the two BP loops on your hook (B). Chain 2 and turn (B).
Info :
The pattern repeats after 20 rows. I repeated those 20 rows a total of 5 times for the sample blanket, but you can make your blanket as long as youd like.
Info :
If you pick your own colors: I recommend staggering colors and neutrals. For example, in this pattern, my color order is: 1 row in Off-White, 1 row Baby Pink, 1 row White, 1 row Baby Rainbow then repeat.
Info :
Changing colors: Cut your ends to 5-6 inches long to carry as you crochet the next row. When you turn your work, pull up your ends so they lie parallel on top of the row you just completed. Crochet over those ends as if they were simply part of your blanket. Pull them somewhat tight so they dont peak through between stitches.
Info :
Ending your blanket: The designer prefers the first row and last row to match. For the last row, add a single MOSS STITCH row in Off-White, or stop when your blanket reaches your preferred length.
Border Round 1 :
Insert your hook in any corner space. YO with W, pull up a loop. CH 2 (A). Rotate clockwise. SC into the side of your blanket. SC along this side until you reach the first corner (B). At the end of the row, slip stitch into the top of the first SC from that row (C). CORNERS: Stitch 3 SC into the same corner space. Rotate clockwise. SC along the rest of the sides of your blanket (making sure to stitch 3 SC into EACH corner), until youve gone all the way around. CH 2. Rotate clockwise.
Border Round 2 :
Stitch 1 DC into every SC from the previous row. Stitch 3 DC into the same corner space. Join the end of the row with a slip stitch (A). Pull your last loop 5-6 inches and cut. Pull the yarn connect to your skein out. Pull the yarn connected to your blanket tight (B). Weave in this end.
Info :
If your blanket starts curling in: Your blanket is being pulled too tight! Undo stitches until before the place where it is curling and stitch more stitches than before. If your blanket starts to ripple: You have too many stitches in that area! Undo stitches until before the place where it started rippling and stitch fewer stitches than before.
Youve reached the end of the Boho Rainbow Baby Blanket Pattern — well done! This blanket uses a soothing 20-row repeat and gentle color rotations to create a cozy textured throw youll treasure. Make one for a new baby, a thoughtful gift, or a cozy addition to your home. Happy crocheting and enjoy the cuddles! 🧶✨