🧢 Beautiful ✨ Detailed πŸ’ Adorable

Bobby the Pencil Amigurumi Pattern

Bobby the Pencil Amigurumi Pattern
4.8β˜… Rating
5-7 Hours Time Needed
3.5K Made This
βœ‚οΈ

Intermediate Level

Ideal for those with basic crochet experience, featuring slightly more advanced stitches and techniques to expand your skills.

⏱️

Weekend Treat

Takes 5-7 hours, making it an enjoyable project to finish over a couple of days.

🧸

Cute Companion

An adorable friend to cherish, handcrafted with love to bring comfort and joy for years to come.

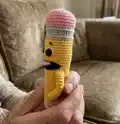
About This Bobby the Pencil Amigurumi Pattern

This pattern shows you how to crochet Bobby the Pencil, a small amigurumi pencil toy with a smiling mouth, tongue and expressive eyes. It uses cotton or semi-cotton yarn with precise color changes to create the pencil tip, body and eraser. You will also add wire for posable arms and finish with embroidered facial details.

Bobby the Pencil Amigurumi Pattern crochet pattern - detailed view of completed project

The pattern contains full round-by-round instructions, materials list and assembly notes so you can complete the toy exactly as shown. Clear photos and tips are included to help with tricky steps like sewing the mouth and inserting the wire.

Why You'll Love This Bobby the Pencil Amigurumi Pattern

I absolutely love this pattern because it transforms simple yarn into a character with so much personality. I enjoy the small details β€” the stitched mouth, the tiny tongue, and the bright eraser β€” that make Bobby so expressive. Working with color changes and small rounds is satisfying and quick, giving a big result from a compact project. I designed the arms with optional wire so you can pose Bobby however you like, which always makes the finished amigurumi more playful and interactive.

Bobby the Pencil Amigurumi Pattern step 1 - construction progress Bobby the Pencil Amigurumi Pattern step 2 - assembly progress Bobby the Pencil Amigurumi Pattern step 3 - details and accessories Bobby the Pencil Amigurumi Pattern step 4 - final assembly and finishing

Switch Things Up

I love to customize this pattern by switching the eraser color to a bright neon for a modern twist.

I often make a mini keychain version by using thinner yarn and a smaller hook to create a tiny Bobby for bag charms.

I sometimes skip the wire and stuff the arms lightly for a softer, child-safe toy for very young kids.

I like to experiment with different eye styles β€” safety eyes, embroidered eyes or French knots β€” to change Bobby's expression.

Try adding tiny accessories like a crocheted pencil cap, a bow tie, or a tiny notebook to give Bobby a personality.

I also enjoy embroidering different smiles or moustaches for quirky variations β€” placement of the mouth changes the whole look.

To make a chunky Bobby, I use a bulkier cotton yarn and a larger hook to create a larger, cuddlier version.

If you want Bobby to stand, reinforce the base with a small button or felt disc sewn inside at the tip to add stability.

Change yarn textures such as using bamboo or mercerized cotton to achieve a smoother or glossier finish for a different aesthetic.

I recommend trying contrasting color stripes in the pencil body to create a funky, playful look and practice your color-changing skills.

Common Mistakes & How to Fix Them

βœ— Skipping the long tail when finishing small details makes sewing difficult later; always leave a long ending for sewing and weaving in. βœ— Not changing colors at the correct stitch can create uneven color joins; follow the exact round instructions and change colors where indicated to keep the pattern neat. βœ— Forgetting to insert wires before closing the body will mean you cannot make posable arms; insert and secure the wire tips before final stuffing and closing. βœ— Using a larger hook or looser tension will make the stuffing show through; use the recommended hook size and maintain medium tension for a neat fabric.

Bobby the Pencil Amigurumi Pattern

Make a playful pencil friend with this complete crochet pattern. You will create a charming 15 cm pencil toy with a removable inner mouth, embroidered details, and posable wire arms. The pattern includes step-by-step rounds, color changes, and assembly instructions so you can crochet a lovable character you will be proud to gift or display.

Intermediate 5-7 Hours

Materials Needed for Bobby the Pencil Amigurumi Pattern

β€” Main Fabric

  • 01
    Cotton/semi-cotton yarn YarnArt Jeans or Alize Cotton Gold (~160 m/50 g) - less than a ball of each color
  • 02
    Yellow yarn - less than 50 g (main body)
  • 03
    Black yarn - small amount for mouth and tip
  • 04
    Ivory yarn - small amount for pencil tip (lead surround)
  • 05
    Gray yarn - small amount for eraser band
  • 06
    Pink yarn - small amount for eraser and tongue
  • 07
    White yarn - small amount for eye details

β€” Tools Required

  • 01
    Crochet hook size 1.75-2.0 mm (recommended 1.75 mm for details)
  • 02
    A pair of plastic eyes ~10 mm (2 pieces)
  • 03
    Aluminum/copper wire 1-1.5 mm for the arms
  • 04
    Band-aid (to wrap wire ends)
  • 05
    Yarn sewing needles
  • 06
    Stitch markers
  • 07
    Pins with large head
  • 08
    Scissors
  • 09
    Fiber filling (polyester stuffing)
  • 10
    Small pliers or cutters to trim wire ends

Progress Tracker

0% Complete

β€” Inner Part of the Mouth :

Info :

*black yarn, 1,75 mm hook

Round 1 :

6 SC in MR;

Round 2 :

6 INC (12);

Round 3 :

(SC, INC)*6 (18);

Round 4 :

(2 SC, INC)*6 (24);

Round 5 :

(3 SC, INC)*6 (30);

Info :

fix the thread and leave a long ending for sewing.

β€” Tongue :

Info :

*pink yarn, 1,75 mm hook

Round 1 :

6 SC in MR;

Round 2 :

6 INC (12);

Round 3 :

3 SC, CH, turn the detail (3);

Round 4 :

3 SC in the other direction;

Info :

fix the thread and leave a long ending for sewing, withdraw the initial thread from the MR to the last row.

β€” Body :

Info :

*start with black yarn, 1,75 mm hook

Info :

*stuff in process

Round 1 :

3 SC IN MR;

Round 2 :

3 INC (6);

Round 3 :

(SC, INC)*3 (9);

Round 4 :

(2 SC, INC)*3 (12);

Info :

*change the color to ivory

Round 5 :

(3 SC, INC)*3 (15);

Round 6 :

(4 SC, INC)*3 (18);

Round 7 :

(5 SC, INC)*3 (21);

Round 8 :

(6 SC, INC)*3 (24);

Info :

*in Round 9 begin to change the thread color in turn

Round 9 :

(3 SC, change the color to yellow, SC, change the color to ivory)*6 (24);

Round 10 :

2 SC, (change the color to yellow, 3 SC, change the color to ivory, SC)*5, change the color to yellow, 2 SC (24);

Info :

* further, there are repeated rounds; if you want a longer pencil, just work extra repeated rounds

Round 11 - 24 :

14 rounds 24 SC;

Round 25 :

5 SC, INC, 12 SC, INC, 5 SC (26);

Round 26 :

6 SC, INC, 12 SC, INC, 6 SC (28);

Round 27 :

7 SC, INC, 12 SC, INC, 7 SC (30);

Round 28 :

7 SC, 16 SS back loops only, 7 SC (30);

Round 29 :

6 SC, chain 18, skip18 St, 6 SC (12);

Round 30 :

6 SC, 18 SC on the chain, 6 SC (30);

Info :

*further, there are repeated rounds (Rounds 31-38); after you would crochet 3 rounds, fix the mouth inner part - sew it, as shown in the photo: on the top - hooking up black front loops and yellow loops of the chain, from below hooking up black and yellow front loops; fix with a stitch the middle part of the mouth and the body from the other side, so that the fiber filling does not push the black part out;

Round 31 - 38 :

7 rounds 30 SC;

Round 39 :

(4 SC, INC)*6 (36);

Info :

*insert plastic eyes 4 rounds higher than mouth upper line at the distance of 6 SC;

Info :

*change the color to gray

Round 40 :

36 SC front loops only;

Round 41 :

36 BPSC;

Round 42 - 43 :

2 rounds 36 SC;

Round 44 :

36 BPSC;

Info :

*change the color to pink

Round 45 :

(5 SC, INC)*6 (42);

Round 46 :

(6 SC, INC)*6 (48);

Round 47 - 49 :

3 rounds 48 SC;

Round 50 :

(6 SC, DEC)*6 back loops only (42);

Round 51 :

(5 SC, DEC)*6 (36);

Round 52 :

(4 SC, DEC)*6 (30);

Round 53 :

(3 SC, DEC)*6 (24);

Round 54 :

12 DEC (12);

Round 55 :

6 DEC (6);

Info :

- tighten the hole, fix the thread and hide the ending inside;

Info :

- embroider the white of the eye on the sides, eyebrows and nose;

Info :

- sew the tongue.

β€” Arms :

Info :

(2 details): *yellow yarn, 1,75 mm hook *don't stuff

Round 1 :

3 SC IN MR;

Round 2 :

3 INC (6);

Round 3 :

(SC, INC)*3 (9);

Round 4 :

9 SC;

Round 5 :

chain 3, (start in the 2nd chain from the hook) 2 SC on the chain, 9 SC (9+2 on thumb);

Round 6 :

9 SC;

Round 7 :

(SC, DEC)*3 (6);

Round 8 - 17 :

10 rounds 6 SC;

Info :

- fix the thread and leave a long ending for sewing;

Info :

- insert wire into the body, trim the ends, bend and isolate the tips with a band-aid, so that the length of the wire on each side is equal to the length of the arms;

Info :

- put the arms on the wire and sew them.

Assembly Instructions

  • Insert the inner black mouth piece and sew it to the body after crocheting 3 rounds of the section (hook black front loops and yellow loops of the chain on top, hook black and yellow front loops from below), then fix the center of the mouth with a stitch so the stuffing does not push the black part out.
  • Insert plastic eyes four rounds higher than the mouth upper line, spaced 6 single crochet stitches apart, then embroider the white of the eye on the sides.
  • Embroider eyebrows and nose in black yarn, sew the pink tongue inside the mouth and hide all thread endings.
  • Insert aluminum/copper wire into the body, trim and bend the ends, wrap the tips with a band-aid so they are insulated, ensure the wire length on each side equals the arms, slide the arms onto the wire and sew them securely to the body.

Important Notes

  • πŸ’‘Use stitch markers to mark the beginning of each round to stay on track with increases and color changes.
  • πŸ’‘Stuff gradually and evenly while shaping the pencil to avoid lumps and to keep the fabric firm but not overstuffed.
  • πŸ’‘When inserting wire, wrap and isolate the wire tips (band-aid) to prevent sharp edges from poking through the crochet fabric.

This cheerful Bobby the Pencil design is a pocket-sized companion full of personality and handmade charm. Make one as a gift, a desk buddy or a fun project to sharpen your amigurumi skills. Enjoy the bright colors, tiny details and the satisfaction of finishing a playful little toy. 🧢✨😊

You ask,

we answer.

FAQs

What size will the finished piece be?

The finished amigurumi measures approximately 15 cm tall when using the recommended yarn and hook size.

Can I use different yarn weights for this pattern?

Yes, you can use different yarn weights, but the final size and look will change; choose an appropriate hook and be aware that safety eyes and wire length may need adjusting.

Do I need prior crochet experience for this pattern?

This pattern is rated intermediate; you should be comfortable with magic ring, increases, decreases, changing colors and sewing small parts.

How do I make the arms posable?

Insert 1-1.5 mm aluminum or copper wire into the body, trim and insulate the tips with a band-aid, then slide the crocheted arms onto the wire and sew them in place to secure posability.