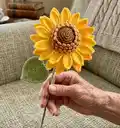
๐Ÿงถ Beautiful โœจ Detailed ๐Ÿ’ Adorable

Crochet Sunflower Pattern

Crochet Sunflower Pattern
4.7โ˜… Rating
5-7 Hours Time Needed
2.5K Made This
โœ‚๏ธ

Intermediate Level

Ideal for those with basic crochet experience, featuring slightly more advanced stitches and techniques to expand your skills.

โฑ๏ธ

Weekend Treat

Takes 5-7 hours, making it an enjoyable project to finish over a couple of days.

๐Ÿก

Cozy Accent

A warm touch for your space that transforms ordinary corners into inviting nooks filled with handmade charm.

About This Crochet Sunflower Pattern

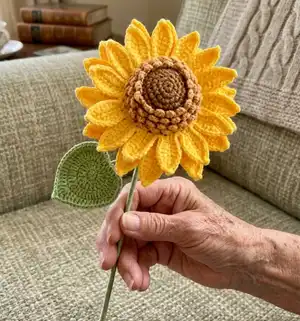
This pattern walks you through crocheting a realistic sunflower with a textured center (torus), layered petals, and a wired stem with leaves. It uses 4-ply cotton yarn for crisp stitch definition and includes picots and triple crochet details for texture. The instructions include every round for the heart, seeds, petals, torus and leaf so you can follow step-by-step. Youll also find assembly steps to finish the stem and attach the leaf securely.

Crochet Sunflower Pattern crochet pattern - detailed view of completed project

Designed for intermediate crocheters who enjoy shaping and small details. The pattern includes wiring instructions for a sturdy stem and finishing tips for a polished look.

Why You'll Love This Crochet Sunflower Pattern

I absolutely love this pattern because it turns simple stitches into a stunning, realistic sunflower that brightens any room. I enjoy the layered petal construction โ€” it gives the flower depth and movement that photos rarely capture. The wired stem and wrapped finish make the piece both decorative and durable, perfect for bouquets or single stems in a vase. I created this pattern to share a joyful project that uses small amounts of yarn but delivers a big visual impact; it is satisfying to complete and makes a wonderful handmade gift.

Crochet Sunflower Pattern step 1 - construction progress Crochet Sunflower Pattern step 2 - assembly progress Crochet Sunflower Pattern step 3 - details and accessories Crochet Sunflower Pattern step 4 - final assembly and finishing

Switch Things Up

I like to change colors to create different moods โ€” try soft pastels for a cottage look or deep golds and rusts for autumnal bouquets.

If you want a larger sunflower, I switch to a bulkier yarn and a larger hook; conversely use finer yarn for mini versions or keychains.

I often add embroidery or small beads to the center for extra texture and shine; these little touches personalize each bloom.

Try varying petal counts or lengths to create sunflowers with relaxed or full looks โ€” adding or subtracting repeats changes the silhouette.

I sometimes replace the floral stems with dowels for sturdier vase arrangements and wrap them tightly with floral tape before yarn wrapping.

For a lightweight mobile, I omit wire from petals and use thin ribbon for hanging, which keeps the flowers delicate and floaty.

I love making a whole bunch in slightly different sizes and arranging them in a mason jar for a cheerful handmade gift set.

You can substitute the picot edge with a small sc border for a cleaner, simpler petal edge if you prefer fewer decorative steps.

To make the sunflower child-safe, skip exposed wire and securely glue and sew all parts; I use extra strong craft glue for final fixes.

I also experiment with mixed fibers โ€” cotton for crisp petals and a soft acrylic for a fluffy center โ€” it changes the texture in interesting ways.

Common Mistakes & How to Fix Them

โœ— Skipping the turning chain recommendation causes uneven round starts; always chain 1 at the start of a round as instructed and do not count it as a stitch. โœ— Working into the wrong loop when instructed to use half-side stitches will misplace petals or seeds; identify and work only in the half-side stitches that are facing away or toward you as the pattern specifies. โœ— Not inserting or securing the wire in petals and leaf results in floppy pieces; insert the wire during the petal/leaf rounds and trim+secure the wire ends before finishing. โœ— Overstuffing the torus or center distorts shape and makes sewing difficult; add fillings gradually and shape as you go, stopping when the center holds form but remains flexible for sewing. โœ— Ignoring slst closures at the end of each round leads to misaligned rounds; always close each round with a slip stitch through the first stitch as directed to keep edges neat.

Crochet Sunflower Pattern

Create a bright, handmade sunflower to display or gift with this detailed crochet pattern. Youll make a textured center, layered petals, a leafy stem and assemble everything for a professional finish. This pattern includes clear rounds, stitch notes, and assembly steps so you can follow along with confidence. Perfect for adding a cheerful touch to home decor or a bouquet of handmade blooms.

Intermediate 5-7 Hours

Materials Needed for Crochet Sunflower Pattern

โ€” Main Fabric

  • 01
    4ply milk cotton yarn - Corn yellow #67 (approx 20-40g for petals)
  • 02
    4ply milk cotton yarn - Dark brown #26 (approx 15-30g for center/torus)
  • 03
    4ply milk cotton yarn - Willow green #25 (approx 10-20g for leaf and stem wrap)
  • 04
    Polyester stuffing/fillings for the flower center (small amount)

โ€” Tools Required

  • 01
    Floral stem 2mm x 40cm (use 3 pieces to strengthen)
  • 02
    Craft wire 0.5mm (for inserting into petals and leaf)
  • 03
    Crochet hook size 2.5mm
  • 04
    Yarn needle for sewing and weaving ends
  • 05
    Scissors
  • 06
    Glue gun (for fixing stem ends)
  • 07
    Stitch marker
  • 08
    Pins for assembly
  • 09
    Needle or pliers to trim and manipulate craft wire

Progress Tracker

0% Complete

โ€” Abbreviations :

Info :

ch - chain. st(s) - stitch(es). sc - single crochet. inc - increase. slst - slip stitch. dec - decrease. dc - double crochet. hdc - half double crochet stitch. tr - triple crochet. turn - turn to the other side. FO - finish off. [ ] - crochet in the same stitch. ( ) X 6 - repeat whatever is between the brackets the number of times stated.

โ€” Other stitches used :

Info :

Triple crochet (tr) stitch and 3ch picot stitch are used as shown in the pictured tutorials.

โ€” Flower heart :

Info :

*Every time start a new round, chain 1 as the turning chain (do not count as a stitch);*Every time close a round, work a slip stitch through the 1st stitch;

Round 1 :

6sc in a magic ring (6)

Round 2 :

6 inc (12)

Round 3 :

(sc, inc)*6 (18)

Round 4 :

(2sc, inc)*6 (24)

Round 5 :

(3sc, inc)*6 (30)

Info :

From R6: work only in the half-side stitches that are far away from us. every time close a round, still work a normal slst(through a whole stitch, not just half side), still chain 1 to strat every round;*The left half stitches of R5-8 will be the place to work flower seeds;

Round 6 :

(2sc, inc, 2sc)*6 (36)

Round 7 :

(5sc, inc)*6 (42)

Round 8 :

(3sc, inc, 3sc)*6 (48)

Round 9 :

(7sc, inc)*6 (54)

Round 10 :

54 sc (54), FO, cut off the yarn

โ€” Flower seeds :

Info :

*work 4 rows of flower seeds at the left half stitches of R5-8.*seeds numbers at each round: R5-15, R6-18, R7-21, R8-24.

Info :

Reconnect yarn to the 1st stitch of R5, chian 3, work a slst through the current space on the flower heart, 1skip (see pic), 2slst, repeat until the end. Work a slst through the 1st space to close R5.

Info :

R6-8: move yarn to the next round by working a slst through the 1st space of the new round, repeat the same process to finish all seeds. FO, move the tail to the back.

โ€” Flower petals :

Round 1 :

Reconnect yarn to the 1st stitch of R9, chian 8, from the 2nd stitch from the hook, work 7sc, 1skip, 2slst, chain 8 ... repeat 18 times. Finally work a slst through the 1st stich of this round to close. Keep the yarn.

Round 2 :

insert the wire, for each flower petal, work: sc, hdc, 3dc, sc, [sc, 1ch picot, sc], hdc, 3dc, hdc, sc, 1skip, 1slst (see pic). Repeat to work 18 petals. After finishing the last, work a slst through the 1st stitch to close round, FO. Cut off the yarn and wire.

Round 3 :

work the second layer of petals only in half-side stitches that are facing us. Reconnect the yarn, chain 10; from the 2nd stitch from the hook, work 9sc, 1skip, 2slst, chain 8 ... repeat 18 times. Finally work a slst through the 1st stitch of this round to close. Keep the yarn.

Round 4 :

insert the wire, for each flower petal work: sc, hdc, 5dc, sc, [sc, 1ch picot, sc], hdc, 5dc, hdc, sc, 1skip, 2slst. Repeat to work 18 petals. After finishing the last, work a slst through the 1st stitch to close round, FO. Cut off the yarn and wire.

โ€” Flowers torus :

Info :

* Every time start a new round, chain 1 as the turning chain (do not count as a stitch);*Every time close a round, work a slip stitch through the 1st stitch;

Round 1 :

6sc in a magic ring (6)

Round 2-3 :

6sc (6)

Round 4 :

6inc (12)

Round 5 :

(sc, inc)*6 (18)

Round 6 :

(2sc, inc)*6 (24)

Round 7 :

(3sc, inc)*6 (30)

Round 8 :

(2sc, inc, 2sc)*6 (36)

Round 9 :

(5sc, inc)*6 (42)

Round 10 :

(3sc, inc, 3sc)*6 (48)

Round 11 :

(7sc, inc)*6 (54)

Round 12 :

work only in the half-side stitch that is facing us (see pic). 1ch, [1ldc inc, 3ch picot, 1ldc inc], [1slst, 1ch], 1skip (see pic), repeat until the end. Finally, a slst throught the 1st space to close round, FO, cut off the yarn

โ€” Leaf :

Round 1 :

7sc in a magic ring;

Round 2 :

2ch as the turning chain, do not count as a stitch; [3dc], [dc inc]*2, [3tr], [dc inc]*2, [3dc, 2ch], 1slst through the 1st stitch of R1;

Round 3 :

2ch as the turning chain, do not count as a stitch; insert the wire (about 15cm long); [sc, hdc], [3dc], [dc inc]*6, [3dc], [dc inc]*6, [3dc], [hdc, sc, 1ch], 1slst through the 1st stitch of R2 (pic);

Round 4 :

1ch as the turning chain, do not count as a stitch; sc, hdc, [dc inc]*5, 11dc, [dc, tr, 2ch picot, tr, dc], 11dc, [dc inc]*5, hdc, sc, 1ch, 1slst through the 1st stitch of R3; FO, wrap the craft wires with the tail.

โ€” Assemble all parts :

Step 1 :

Find 3 pieces of floral stem (to make the stem stronger than just using 1 piece; 40cm long, 2mm wide), wrap one end (about 5cm long) together with yarn, fold as shown on pic.

Step 2 :

Sew the flower with the torus together with a yarn needle. Stop when finishing 3/4 to insert the floral stem we prepared and the filling.

Step 3 :

Continue sewing the flower with the torus. Hide the tail.

Step 4 :

Apply some glue at the end of the floral torus to prevent it from moving.

Step 5 :

Wrap the floral stem with a long piece of green yarn, attach the leaf as well; Apply glue at the end of stems to fix. Done!

Assembly Instructions

  • Find 3 pieces of floral stem (40cm long, 2mm wide) and wrap one end (about 5cm) together with yarn to form a stronger stem before inserting into the flower.
  • Sew the flower petals and the torus together with a yarn needle; stop when 3/4 complete to insert the prepared floral stem and add filling into the center.
  • Continue sewing to close the torus and hide the tail; secure with glue at the torus end to prevent shifting.
  • Wrap the floral stem with green yarn for a finished look and attach the leaf by sewing and gluing the base to the stem.
  • Trim and secure any wire ends; apply glue at the end of stems to fix and finish the piece neatly.

Important Notes

  • ๐Ÿ’กAlways chain 1 at the start of a new round and do not count it as a stitch to keep rounds consistent.
  • ๐Ÿ’กClose every round with a slip stitch through the first stitch to maintain neat edges and correct stitch counts.
  • ๐Ÿ’กInsert and secure craft wire during petal and leaf construction, then trim and wrap wire ends before finishing to avoid poking and to stabilize shape.
  • ๐Ÿ’กWork only in the specified half-side stitches when instructed to place seeds or second-layer petals to ensure correct placement and symmetry.

This bright crochet sunflower is a joyful project that adds handmade charm to any space.๐ŸŒป The layered petals and textured center make it a standout decorative piece for vases or gifts.โœจ Keep one for yourself and make a bouquet for friends to share the sunshine!๐ŸŒผ

You ask,

we answer.

FAQs

What size will the finished piece be?

The finished sunflower measures roughly the size of a medium decorative bloom (varies with yarn/hook); petals total diameter is approximately 12-15 cm when using 4ply cotton and a 2.5mm hook.

Can I use different yarn weights for this pattern?

Yes, you can use different yarn weights, but this will change the final size and look; use an appropriate hook for your yarn and adjust wire length as needed.

Do I need prior crochet experience for this pattern?

This pattern is rated intermediate due to shaping, working in half-side stitches, picots and wire insertion, so basic crochet experience and familiarity with increases and picot stitches is recommended.

How long does this project typically take to complete?

Most crocheters complete a single sunflower in about 5-7 hours, depending on experience and how many decorative steps (wiring, stuffing, assembly) you complete.