๐Ÿงถ Beautiful โœจ Detailed ๐Ÿ’ Adorable

Goose Mittens Pattern

Goose Mittens Pattern
4.2โ˜… Rating
2-3 Hours Time Needed
3.6K Made This
โœ‚๏ธ

Beginner Friendly Level

Perfect for those just starting their crochet journey, with clear instructions and simple techniques

โฑ๏ธ

Bite-Sized Project

Finishes in 2-4 hoursโ€”perfect for an afternoon of creative relaxation.

๐Ÿ‘•

Casual Chic

Relaxed style with a modern twist, perfect for everyday wear while maintaining that handcrafted uniqueness.

About This Goose Mittens Pattern

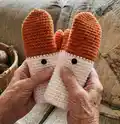
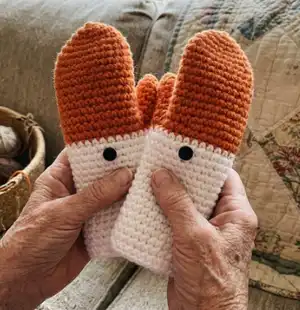
This pattern creates a pair of cozy, goose-inspired mittens crocheted top-down in the round with two strands held together for a chunky texture. It includes clear step-by-step rounds for the mitten top, thumb construction, color change, and eye placement. You can customize the size easily by adding or removing rounds for a tailored fit. Simple stitches make this a great project for beginners looking to try wearable crochet.

Goose Mittens Pattern crochet pattern - detailed view of completed project

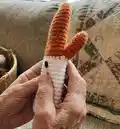
Worked in a spiral (no joining) like amigurumi, the pattern shows how to make the thumb while attached to the glove for a neat finish. Test mittens are sized teen/women's small and use a snug fit, but adjustments are simple.

Why You'll Love This Goose Mittens Pattern

I absolutely love this pattern because it turns a practical accessory into something playful and unique that really sparks joy. I enjoyed designing the color-block beak and the small eye placement to give the mittens personality without complicated embellishments. The pattern is forgiving and easy to customize, so I often make several sizes for family and friends. Working with two strands held together creates a wonderfully warm, quick-to-make fabric that I find very satisfying to crochet.

Goose Mittens Pattern step 1 - construction progress Goose Mittens Pattern step 2 - assembly progress Goose Mittens Pattern step 3 - details and accessories Goose Mittens Pattern step 4 - final assembly and finishing

Switch Things Up

I love how easy these mittens are to customize, and I often switch up the colors to create different bird characters or seasonal themes.

You can change the orange beak to yellow or red to make a chick or cardinal instead of a goose.

To make a smaller child size, I use a lighter weight yarn and a smaller hook; conversely, use bulky yarn and a larger hook for oversized, super-warm mittens.

I sometimes add stripes to the wrist section by alternating colors every few rounds for a fun, sporty look.

Try embroidering tiny nostrils or details on the beak for extra character, or sew felt accents for a softer, less bulky finish.

If you want a snugger fit, decrease one additional stitch in the wrist rounds; for a looser glove, omit the decreases altogether.

I like to add a ribbed cuff by working back loop only single crochet for a few rounds to help the mitten stay put on the wrist.

Consider using safety eyes for durability on adult mittens, or small sewn buttons for a vintage feel on children's mittens.

For a cozy winter version, line the mitten with fleece or a thin fabric cut to the same shape for extra warmth and wind resistance.

Lastly, experiment with matching hat or scarf patterns using the same colorway to create a coordinated set that makes a great handmade gift.

Common Mistakes & How to Fix Them

โœ— Skipping the magic ring weave-in step can leave a hole at the top of the mitten; weave in the magic ring end securely after Round 3 to close the center. โœ— Making the thumb hole chain too loose or too tight will affect thumb fit; chain the recommended 6 and adjust by using an even number of chains if you need a larger thumb hole. โœ— Not checking the mitten width before continuing can result in an ill-fitting glove; try the mitten on and add extra rounds of (sc in st, inc in next) as needed for medium to large hands. โœ— Changing colors without securing ends can create a visible gap at the join; use a slip stitch join and start the next round by crocheting into the first stitch (skip the slip st) to minimize the gap. โœ— Overstuffing or stretching while wearing can distort shaping; work with consistent tension and avoid stretching the fabric when checking fit to maintain intended shaping.

Goose Mittens Pattern

Make playful goose-themed mittens using worsted weight yarn held double for a chunky, cozy finish. This pattern guides you from the top down, showing how to shape the mitten, create a thumb hole, and add the goose beak and eyes. You can easily customize sizing and color placement to fit teens and adults. Perfect for gifting or a whimsical seasonal accessory you will love to wear.

Beginner Friendly 2-3 Hours

Materials Needed for Goose Mittens Pattern

โ€” Main Fabric

  • 01
    Worsted weight yarn (approx 364 yards) - Orange - 1 skein (use two strands held together)
  • 02
    Worsted weight yarn (approx 364 yards) - White - 1 skein (use two strands held together)
  • 03
    Small amounts of contrasting colors if desired for details (use held double as above)

โ€” Tools Required

  • 01
    Yarn needle
  • 02
    12mm flat back safety eyes (or black buttons) - choose size that looks best for your mitten
  • 03
    J-6mm crochet hook

Progress Tracker

0% Complete

โ€” Before we begin :

Info :

These mittens will be made to fit the wearers hands. You will be creating these mittens from the top down in the round. At the end of the round, you will not be joining stitches (It is worked in a spiral, as done in amigurumi projects). Afterwards, you will create the thumb while attaching it to the glove.

โ€” Making the top of the mitten :

Round 1 :

Start 10 sc in a magic ring (10)

Round 2 :

Sc around (10)

Round 3 :

Sc around (10) 'Weave in magic ring end'

Round 4 :

Inc in each st around (20)

Info :

See how the glove is fitting so far, if you have medium to large size hands, you may want to do several more rounds of (sc in st, inc in next) repeat around

Round 5-14 :

Sc around (20)

Info :

After reaching the proper width for your hand, continue to make rounds of sc until the glove reaches the crook of your hand. (If you slip on the mitten, it should be just touching the space in between your thumb and index finger)

Round 15 :

Thumb hole round: Sc in the first stitch of the round, chain 6 *not too loose or tight*, skip the next two stitches in the round and sc in the next st. Sc around until you get back to that first stitch that had the chain 6. Fasten off, weave ends.

Info :

Note: You can chain more stitches in an even number to create a larger thumb hole

โ€” Making the lower hand and wrist of the mitten :

Round 16 :

Slip st and then sc into that same st 3 sts away from the thumb hole. (You can choose anywhere in the round if you would like, this color change will be hardly visible.) Sc around. (24)

Round 17 :

You may notice a gap at the beginning of this next round from where the color change happened. We are going to start this next round without any joining, just sc in the first stitch (skip the slip st) and sc around. (24)

Round 18 :

Sc around (24)

Info :

Note: From here on forward with the pattern, you can continue to sc around without any decreasing to have looser fitting mittens. Or, you can choose to shape them by decreasing as they go down your hand and your wrist for a snug fit. (Test mittens are made with a snug fit). So, wherever you see fit to make the mitten tighter, repeat for each round (Sc in 2sts, decrease in next st)

Round 19 :

(Sc in 2sts, decrease in next) (18)

Round 20-28 :

Sc around (18)

Info :

Fasten off. You can add some ribbing to the end of the mitten if you wish.

โ€” Making the thumb :

Info :

With 2 Strands of Orange: Flip glove inside out, and you will be crocheting from the inside of the circle (See image)

Round 1 :

Slip st yarn into any chain around the thumb hole. Sc in the same st. Then in traditional and non-traditional spaces, work 12 sts around. (12)

Round 2-3 :

Sc around

Round 4 :

Decrease in all sts (6)

Info :

If you added more chains than 6 when you made the thumb hole, continue to decrease in each st until you reach 6 sts in the round.

Round 5-7 :

Sc around (6)

Info :

Fasten off and weave top of thumb shut.

โ€” Placing the eyes :

Info :

Flip the glove right side out and place your goose eyes (Can be flat back eyes that are then melted at the sharp end, also buttons, or small crocheted circles) on the inner corner of the glove, with the test gloves, the eyes were placed between the 2nd and 3rd round of white.

Info :

The mittens are complete! Honk!

Assembly Instructions

  • After finishing the thumb, fasten off and weave the top of the thumb shut carefully to create a neat rounded tip.
  • Flip the glove right side out and place the flat back safety eyes or buttons on the inner corner of the glove between the 2nd and 3rd round of white, then secure following the manufacturers instructions.
  • Weave in all yarn ends from color changes and the magic ring securely on the inside to keep the outside clean and tidy.
  • If desired, add ribbing to the cuff by working rounds of back loop only single crochet or slip stitch ribbing until you reach the preferred cuff length.

Important Notes

  • ๐Ÿ’กWork the mitten in a spiral without joining; use a stitch marker to mark the beginning of your rounds if that helps keep track.
  • ๐Ÿ’กHold two strands of yarn together throughout for the intended gauge and fabric density; changing to a single strand will significantly alter size.
  • ๐Ÿ’กTry the mitten on as you go to check width and length; add additional rounds or decrease rounds as needed for a custom fit.
  • ๐Ÿ’กWhen changing from orange to white, use a slip stitch then begin the next round by crocheting into the first stitch (skip the slip st) to minimize a visible gap.

These adorable Goose Mittens bring a playful touch to chilly days with a bold orange beak and bright white wrist. Handmade with two strands of worsted yarn, they are warm, quick to crochet, and endlessly customizable. Whether you gift them or keep them, they will honk their way into someoneโ€™s heart! ๐Ÿงถ๐Ÿงค

You ask,

we answer.

FAQs

What size will the finished piece be?

The finished mitten size is customizable; test mittens are a teen/women's small when using two strands of worsted yarn and a J-6mm hook.

Can I make these mittens smaller or larger?

Yesโ€”add extra increase rounds at the top for a wider hand, or skip some rounds for a smaller fit; try them on as you go to determine the perfect width and length.

Do I need experience with any special stitches?

Noโ€”this beginner-friendly pattern uses single crochet, increases, and decreases, plus basic chains and slip stitches; familiarity with the magic ring is helpful.

What materials are recommended for the eyes?

You can use 12mm flat back safety eyes, small buttons, or crocheted circles; choose a size that looks best for your mitten and secure them safely.

How long does it take to make a pair?

Most crocheters finish a pair in about 2-3 hours, depending on experience and how much fitting adjustments you make while working.